BILT Speaker

BILT Speaker
RevitCat - Revit Consultant
Showing posts with label total. Show all posts

Monday, 20 April 2020

System Volume Parameter in Generic Category Families

 Here in New South Wales, Australia, we have a planning requirement (SEPP65) to provide a certain amount of storage in multi-unit residential developments.  Some of that storage can be in the apartment itself, and some can be in storage cages/cupboards in the basement.

The storage has to be calculated by volume per apartment - this means that we have to create schedules that combine the storage cupboards in apartments with the cages in the basement.  Thus we need to create objects of different shapes and sizes in the model.

There are several ways to calculate the volumes from these objects, but surely the simplest way would be to use Revit's automatic volume calculation properties?

System Volume Property

You would think that Revit would be able to report back the volume of any object in your model.  It is a database, right?

It turns out that it can do so, to a very limited extent - and of course that leads to restrictions and frustrations.

It seems that only cetain category objects can report their volume, and then there may be further restrictions on scheduling or tagging:

By Category

  • Many of the system families do have a "Volume" property

  • But you would not want to create storage cages or cupboards by mis-using those categories?  No, you would not!
  • Logically you would use the Casework category for cupboards - but sadly that category does not have a volume property.
  • The same applies for most loadable family categories.

  • You could use the Mass category, but that is not sensible either, because that should be reserved for creating building massing models - if you start mis-using that category it will surely make life difficult (not least with visibility issues).

  • Rooms do have volume properties, although that can depend on project settings - see below.
  • Rooms are also not an ideal way to model such things as high-level storage cupboards!

  •  That leaves us with one last option (that I know of):  the Generic category.
  • For many years in Revit, generic families did report a Volume property (automatically calculated from the volume of all solid objects in the family).
  • However, it was not originally possible to schedule this property
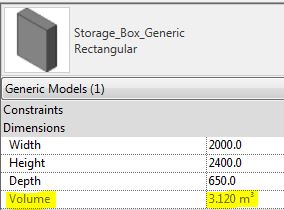
 
  • In Revit 2014, Autodesk enabled the ability to schedule this Volume property.
  • This was one of my few successes with lobbying Autodesk to include one small new feature in Revit, that would make a big difference to us.
  • Sadly they ignored my pleas to also enable this property to be tagged.

Generic Families

Prior to v2014, we created a range of storage families that did the volume calculations as formulas within the families - so that we could schedule and tag the volumes.

When it comes to basement storage cages, the shapes often become quite complex as they have to wrap around columns or need angled sides.


This led to some quite complex formulas that needed to take into account optional cutouts to the shapes, and to allow for overlapping cutouts.

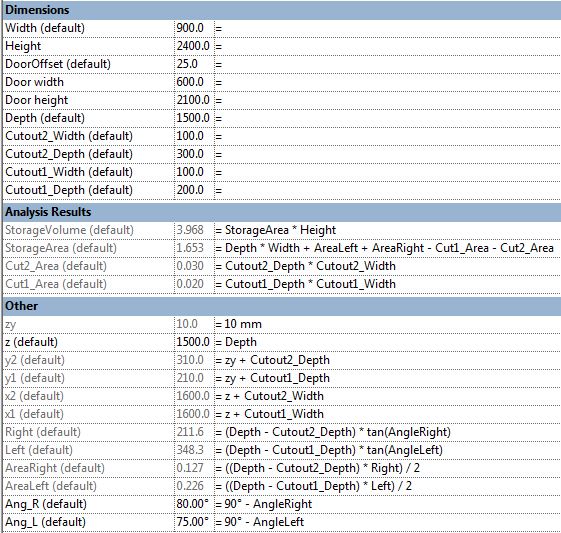


Fortunately all these calculations became redundant with v2014, as we can now use the system calculated "Volume" parameter to schedule storage volumes.

Except . . . . . When a project requires the storage to be tagged on drawings.

Room Volumes

Rooms do have the ability to calculate and report their volume, and it may be easier to create basement storage cages as rooms with cage walls to enclose them.  This would allow any shaped area without having to create a range of families.


However, this becomes problemmatic when you need to create one schedule that combines the basement storage cages (Rooms) with in apartment storage cupboards (Generic category families).

Room volume calculations also have some quirks, that depend on project-wide settings:

  • Rooms have a height property - this is used for the system calculated volume.
  • However, it will not work if Rooms are set to only calculate Areas (not Volume)
  • This project-wide setting is generally recommended as it makes the project performance noticeably faster - the menu even tells you that (and it is true)

  • If you enable Areas and Volume calculation you will get the volumes being reported, but a slower project.
  • If you need to do this anyway, then it is no extra overhead for calculating room storage.


Room Volumes are calculated at Wall Finish, regardless of the Room Area settings.
  • This can be complicated if you need room areas to be calculated to wall centrelines.
  • More on this in another blog post . . . .

Monday, 19 August 2019

PS - Update on Hide Zeros in Revit Schedules

Following on from my previous post about Hide Zeros in Multi-Element per Row Schedule, here is a simplified version of the schedule formulas - as noted in a comment by Kovyljan.

. . . . . When using the percentage formula, we can cut out one calculation field by changing which field the percentage is taken from:
"Schedule Count" instead of "MyCount" - since both of them have a value of 1 (or 0/Blank) when the schedule is expanded.

  • The 'MyCount' formula can then be changed to take on the role that 'MyCountTotal' had in my previous version:
    if(Schedule Count / MyPerc = 0, Blank, Schedule Count / MyPerc)

  • Make sure that 'MyCount' is formatted to not calculate totals - otherwise you'll get totals of totals per room.
 

  • Hide the 'Schedule Count',  'Blank' and 'Count' columns (Count is only required for checking anyway)
  • Rename 'MyCount' to whatever you need.

For more detail on this technique, refer to Hide Zeros in Multi-Element per Row Schedule
and Using Count Parameter in Schedule Formulas

Friday, 9 August 2019

Hide Zero Values in Multiple Item Rows in Revit Schedules

Hide zero values in schedules (Previous post)


Following on from a previous post about how to Hide Zero Values in Revit Schedules, I have noticed that it does not work when you untick 'Itemise each Instance' (Multiple items per row) and you set the formatting to calculate totals - the zero returns.

Calculate Totals - Zeros shown
In the example above, you probably would want to show the zeros when calculating totals of different numbers - but there are situations where you legitimately do not want to show the zero.  Here follows an example, and yet another workaround to solve that problem.

Example of Workflow

A situation where you may not want to show the zeros might be when the field is a count of items.  As demonstrated in my previous "Count Dracula" post, it is not possible to include the system parameter 'Count' in a Schedule formula; nor is it possible to make a 'Count' value of zero - the workaround to that problem is to create your own 'MyCount' parameter, as described previously.

In this example,  items are to be listed in a schedule with consecutive room numbers - at this stage some of the rooms do not yet have any real items placed in them.  The schedule needs to show all the room numbers, even when not yet furnished.   In order for the rooms to appear in the schedule, a dummy item has to be placed in the room, but we do not want it to be formally counted.
This is where a 'MyCount' parameter is useful, as the dummy items can be forced to schedule with a count of zero.
  • First a 'Schedule Count' parameter has to be created for the nominated categories
  • Set the value to 1 for all items to be counted
  • Set the value to zero for those not to be counted
  • [NB. This could be a Y/N parameter, but that has complications - to be dealt with in another blog post]
  • If it does not yet exist, create a 'Blank' calculated value, with no formula
    (Refer to Hide Zeros)
  • Then create a 'MyCount'  calculated value (Number or Integer)
  • It can be given a formula of:
    if(Schedule Count' = 0, Blank, Schedule Count)

  • The schedule should list a 1 MyCount value for each item to schedule, and nothing for those Spare (dummy) items.

  • Group the schedule by Room Number (no footers)
 
  • Untick "Itemise every Instance"
  • Notice that the MyCount total values are not totalling up
  • Format 'MyCount' to calculate totals
  •  Untick "Itemise every Instance"
  • Aaaargh!   The zeros are back

Workaround

In order to get the number of items in each room to total, you have to add a couple more calculated values - this is where it starts getting crazy!
  • Add another Calculated Value 'MyPerc' or 'MyPercentage'
  • Make it a Percentage (not a formula)
  • Select the field 'MyCount' of which it is to show a percentage
  • Select the Grouping title - 'Room Number' (rather than Grand Total) - so it only calculates a percentage of that Room sub-total

  • Add another calculated value, with a formula:
    if(MyCount/MyPerc = 0, Blank, MyCount/MyPerc)

  • This will show the total count per Grouping (Room) in each row - which looks a bit crazy when each row is listed separately

  • Untick 'Itemise every instance' and it looks better - and without the zeros
  • Do not Calculate Totals for these two calculated values, otherwise it gives wrong totals

  • Hide the intermediate calculated values, and rename the 'MyCountTotal' as desired

Now, if you actually want to show Grand Totals for the Item Count, that is another story . . . .
  • You would probably need to create another schedule that shows 'MyCount' (which gives the correct total), but collapse it down to one row (no sorting/grouping; no grant total) - and align it on a sheet with the column for MyCountTotal.
  • That would also enable you to have bold text for the total
  • However, I am not going to try that here - you are on your own.
[Edit.  A comment from Kovyljan has pointed out that the last method above can be simplified by making the percentage calculate on 'Schedule Count' instead of MyCount - refer to ps Update on Hide Zeros ]

For more information on this technique, refer to an earlier post on using Totals in Formulas *
For more information on creating your own Count parameter

* Thanks to Martijn de Riet of BIMForce who initially posted on his blog a similar solution to another scheduling problem in Revit

Monday, 5 August 2019

Using Count Parameter in Revit Schedule Formulas

Anyone who has tried to master Revit Schedules would have encountered all kinds of limitations.  One of those is the limitations on which parameter types can be used in a calculation:

These parameter types can be used in formulas:
  • Number
  • Integer
  • Length
  • Area
  • Volume
  • Angle
  • Yes/No
  •  <Family Type..>
  • etc
They are all basically a number or a choice between items that have a number hidden behind them (Y/N  or <Family Type..>

The following parameter types cannot be used in formulas:
  • Text
  • URL
  • etc
They are some kind of text, which is all too hard for Revit to cope with (poor little Revit).

There is another kind of schedule parameter, which is not listed above (because it is a system parameter that you cannot choose from a list of types): 

        "Count", which is just a number (always = 1 for each item).


However, if you try to use this in a schedule formula, Revit gets very uppity and says you cannot.


This is unprecedented in Revit - a message that actually explains why it can't do what you want!
  • In case its not obvious what this means, it is referring to when you uncheck "Itemise every instance" under the Sorting/Grouping tab.

However, it is quite likely that you do actually want to perform a calculation on the combined result when multiple elements appear on the same row.  If not that, you may want to calculate per item and then total up the results of your calculation.  Here is my workaround:

Count Dracula Formulas

In your schedule, you can create your own "Count" parameter:
         a Calculated Value with a formula = 1

You could call it "Dracula", but that might confuse everyone later, so its better to use something more prosaic like "MyCount"
MyCount formatted to No Calculation

Don't forget to format your Count Dracula parameter to 'Calculate Totals' otherwise it will list only 1 even for multiple elements per row (as above).
MyCount formatted to Calculate Totals

Once you have 'MyCount' working, you can include it in a formula:
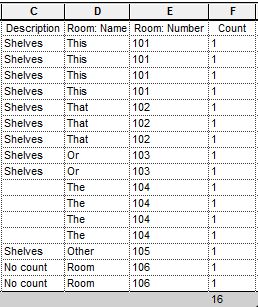
  • You may have a numeric parameter - say 'Num Shelves', which represents the number of shelves in a unit.
  • This can be multiplied by your Count parameter in a new 'ShelfCount' calculated value

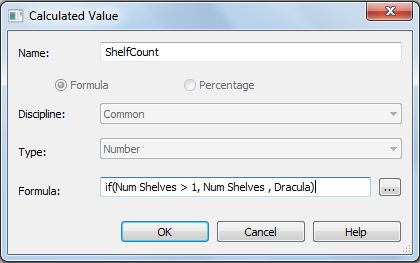
Revit is quite happy to include "Dracula" or "MyCount" in the formula even though it is doing the same job as the system parameter 'Count'.

The formula could include an if statement:

Or you could put a formula directly into your 'MyCount' parameter

NB  . The last two formulas were somewhat superfluous, but just shown to demonstrate that you can create formulas with your own Count parameter.  For a more realistic example, refer to my previous post on Hiding Zeros in Schedule Formulas

This workaround removes one of Revit's many limitations - the programmers obviously put that one in deliberately to prevent "wrong workflows", but in reality they didn't anticipate all our requirements with schedule formulas. [Yes, my spellchecker doesn't like "formulas", but then I never liked learning Latin, so I'm not changing it!]

For more information about Revit Schedules, refer to this index of Schedule blog posts
 

Sunday, 22 January 2017

Using Totals in Formulas in Revit Schedules

This has been a frequently asked question on the various forums over the years:
"Is it possible to use a grand total from a schedule in a formula in Revit".  The first response is always No!  Then eventually someone will mention the arcane workaround but it is not always clearly explained so I have decided to show a simple example of what the problem is, and how the workaround might be applied.

I must confess that this is not my original idea - in fact I have found references to the workaround, as far back as 2006 on AUGI by Leonard Raiz (one of the Revit Founders).  More recently (2011), Martijn de Riet published a description of how to calculate a ratio between two area types - this includes the workaround but does a few extra tricks of calculating a ratio of two different sub-totals after first separating them from one grand total, so it is not that easy to understand just the 'totals in formulas' workaround.  Many thanks to Martijn, as I originally learnt the technique from his blog posting.


The Problem With Schedule Totals

Let us suppose that you want to schedule a series of floor areas for a multistorey building and then calculate the ratio between the total of those floor areas against the site area - in Australia we call that the 'Floor Space Ratio'.  There are actually two problems that Revit presents us with here:
  • Revit apparently does not allow you to insert a total of several values into a formula- it only performs the calculations on individual values in each row
  • You can't create a schedule that combines 'Areas' and 'Property Line Areas' because they are different categories - this is another topic so we'll use another quick workaround to deal with that here.
In this example I will use Mass Floor Areas, but they could easily be normal Areas

The Floor Space Ratio calculation is defined as:   'Gross Floor Area' divided by 'Site Area'
It is usually represented as the 'number : 1'   eg. 2.5 : 1

Step 1

  • The first step is to create a Mass Floor schedule, and add the Levels plus Floor Areas
 
  • The first problem we encounter is that you cannot combine a Mass Floor schedule with Site category schedules - so you cannot include the site area value that Revit automatically calculates from your property lines

Workaround 1

  • Create a shared parameter and apply it to the Project Information category
  • This will be a value that you have to type in to the project information page once - and update it if the site area changes, which is obviously a technique prone to user error.  If your site area is not yet settled, and is constantly changing, I would not recommend this method.
  • Once the value is in, you can add the shared parameter to your schedule just by changing the category from the drop-down list and choosing Project Information
 
  • The same value for Site Area will appear in each row, so make sure not to calculate totals for this parameter.
 

Step 2

  • Add a calculated parameter to the schedule, called 'Calc Ratio' (or some such) 
  • Make it a 'Number' type with this formula:
    Floor Area / Site Area
  • Note that each row has its own calculation of the ratio - none of which is correct.
  • If you make the parameter 'Calculate Totals', the Grand Total value of the Ratio will actually be correct - but it makes for a very confusing schedule
  • You could of course collapse the schedule down to one line (untick 'Itemise Every Instance'), and hide the totals - this would display the correct Ratio - but you may require the schedule to show individual floor areas
 
However, there is a way to get Revit to display all the rows of data and to perform calculations on the total value - it requires the following workaround:

Workaround 2

  • In the schedule, add a new calculated parameter called 'F Area Percentage'
  • This time, make it a percentage calculation - click on the 'Percentage' radio button
  • Then select 'Floor Area' as the parameter to calculate 'Of'
  • Leave it to calculate 'By' Grand Total
  • This will list each floor area as a percentage of the total
  • Create another new calculated parameter, called 'Total Floor Area'
  • leave it as a Formula calculation, with type 'Area'
  • Add the Formula:
    Floor Area / F Area Percentage
  • This will give you the correct overall floor area in each row 
  • Be sure not to calculate totals for this parameter.
 
  • Now change the Ratio formula to calculate using the Total Floor Area:
    Total Floor Area / Site Area
  • This will give the correct ratio in each row
  • Remove the Calculate Totals setting for this parameter as the total would be a crazy value

  • You can then hide the two intermediate calculations (Total Floor Area and F Area Percentage) to get a schedule showing the correct site area, floor area and ratio in every row
 

Tidy Up

  • To make the schedule read a little more cleanly, you could sort it by Site Area, with a Header, and then hide the Site Area parameter column - but it only shows the value of the Site Area, not its parameter title, which is not clear enough

  • Then add another Calculated Parameter at the beginning - a text type with a formula:
    "Site Area :"
  • Sort by that parameter before the Site Area, and hide that one too
  • It puts them on two different lines but at least it removes some repetitive information from the body of the schedule
 
 
  • You could try the same with the Floor Space Ratio but unfortunately Revit does not like to sort a schedule by such a formula  - it does not show in the Sort by or Filter list (a bug perhaps? or just a special feature?)
  • You could also put in a few extra text formulas (with blank headings), although they will repeat the same information

Workaround 3

If you can cope with two schedules, it is a lot easier: a simple one liner schedule for the Floor Space ratio calculation, plus a separate schedule list of all the floor areas.
  • You can either create two similar schedules as described above, but collapse one of them down to one line (untick 'Itemise every instance'), and remove the calculations from the full list.
    or
  • Revit makes it simpler to do this operation on Mass Floor areas because you can just create a Mass schedule (as opposed to Mass Floors) that already has a property called 'Gross Floor Area', in which it automatically calculates the total of the Mass Floors - thus you can do a direct calculation on it


I hope this explains the technique clearly.  If you want something more complex, then refer to Martijn de Riet's blog posting on how to calculate a ratio between two area types