BILT Speaker

BILT Speaker
RevitCat - Revit Consultant
Showing posts with label number. Show all posts

Monday, 5 August 2019

Using Count Parameter in Revit Schedule Formulas

Anyone who has tried to master Revit Schedules would have encountered all kinds of limitations.  One of those is the limitations on which parameter types can be used in a calculation:

These parameter types can be used in formulas:
  • Number
  • Integer
  • Length
  • Area
  • Volume
  • Angle
  • Yes/No
  •  <Family Type..>
  • etc
They are all basically a number or a choice between items that have a number hidden behind them (Y/N  or <Family Type..>

The following parameter types cannot be used in formulas:
  • Text
  • URL
  • etc
They are some kind of text, which is all too hard for Revit to cope with (poor little Revit).

There is another kind of schedule parameter, which is not listed above (because it is a system parameter that you cannot choose from a list of types): 

        "Count", which is just a number (always = 1 for each item).


However, if you try to use this in a schedule formula, Revit gets very uppity and says you cannot.


This is unprecedented in Revit - a message that actually explains why it can't do what you want!
  • In case its not obvious what this means, it is referring to when you uncheck "Itemise every instance" under the Sorting/Grouping tab.

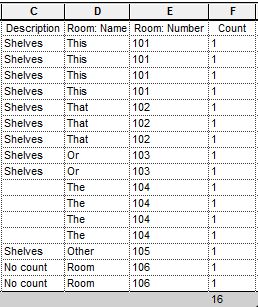
However, it is quite likely that you do actually want to perform a calculation on the combined result when multiple elements appear on the same row.  If not that, you may want to calculate per item and then total up the results of your calculation.  Here is my workaround:

Count Dracula Formulas

In your schedule, you can create your own "Count" parameter:
         a Calculated Value with a formula = 1

You could call it "Dracula", but that might confuse everyone later, so its better to use something more prosaic like "MyCount"
MyCount formatted to No Calculation

Don't forget to format your Count Dracula parameter to 'Calculate Totals' otherwise it will list only 1 even for multiple elements per row (as above).
MyCount formatted to Calculate Totals

Once you have 'MyCount' working, you can include it in a formula:
  • You may have a numeric parameter - say 'Num Shelves', which represents the number of shelves in a unit.
  • This can be multiplied by your Count parameter in a new 'ShelfCount' calculated value

Revit is quite happy to include "Dracula" or "MyCount" in the formula even though it is doing the same job as the system parameter 'Count'.

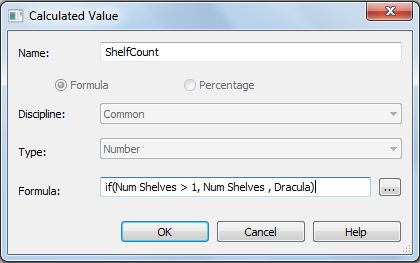
The formula could include an if statement:

Or you could put a formula directly into your 'MyCount' parameter

NB  . The last two formulas were somewhat superfluous, but just shown to demonstrate that you can create formulas with your own Count parameter.  For a more realistic example, refer to my previous post on Hiding Zeros in Schedule Formulas

This workaround removes one of Revit's many limitations - the programmers obviously put that one in deliberately to prevent "wrong workflows", but in reality they didn't anticipate all our requirements with schedule formulas. [Yes, my spellchecker doesn't like "formulas", but then I never liked learning Latin, so I'm not changing it!]

For more information about Revit Schedules, refer to this index of Schedule blog posts
 

Sunday, 28 July 2019

Arrays in Revit Global Parameters

Continuing with the theme of  Global Parameters in Revit . . . . .

Global Parameters and Arrays


Global parameters do not directly support arrays – you cannot associate a parameter to an array number in a model (unlike the ability to do so in the family editor).

When you select an array number in a project, have a look at the Options Bar - there is no label for you to associate a global parameter.


In the family editor, when you select an array number - there is a label on the Options Bar for you to associate a family  parameter to the array number.


Workaround


To work around this Global Parameter limitation, you need to build the array into an external family:
  • The family needs to have an integer instance parameter - this can be created directly when associating the array number (or created prior).
  • The array could consist of nested families or arrayed elements - it is usually much easier to control the array when it is a nested family, but that may slow response times if there are too many levels of nesting.
  • If you need to be able to schedule, tag or select individual families in the project (from the array), then the nested family should be 'Shared'.

  • Once you have associated the array number to a controlling parameter, it is wise to use that as a check parameter, to prevent users from inputting a value of less than 2 - because this would break the array.
  • You need to then create a User Input parameter, which is the one used in the project.
  • The check parameter is then driven by the User Input array number, with a check formula in place to prevent an input less than 2

  • Load the family into project then its instance property (Array Number) can be associated to a global parameter.

Once this is set up, your nested family array should be driven by Global Parameters in the project.

If you would like Autodesk to fix this annoying limitation, please go to Revit Ideas to vote:

Enable global parameters to associate to Array Numbers


Sunday, 24 September 2017

Weird Railing Stuff - part 7 - Support Spacing

It amazes me that very few Reviteers make use of the 'Railing Support' capability that we have had in the software for over 5 years now.  In fact, a very large percentage of users don't even know they exist
Here are some possible reasons why that is the case:
  • If you upgrade a project with the old style railings in it, they are not converted to the new style railings, so you cannot use railing supports in them.  To achieve this, you have to copy a new railing type into your project, then swap the old family type to a new one to get access to the support functionality.
  • The metric project templates provided by Autodesk do not include any railings that use handrail supports (this includes the Australian and UK templates);  they do have some support families - but if you don't know how to use them, you'll never figure it out by playing around with the railing samples.
  • The sample files that you can download from the Autodesk Knowledge website include only the old method of using balusters to look like handrail supports - and that is the imperial unit sample file, which you would expect to be the most likely one to be updated when the software was changed (The metric version would have no chance, even if you could find it on the Autodesk labyrinth-site).  I wonder if anyone at Autodesk knows what QA means?  'Quality Assurance' is the correct answer, not 'Quick As (get this out the door)'.
  • The settings for adding supports are buried deep as type properties of a nested family.  The chances of finding this are slim - although that has improved recently with the ability to get to a handrail family properties directly from the railing type properties dialog box with one mouse click.
  • The methodology for setting up handrail supports is mind-bogglingly complicated and counter-intuitive - and it is all type-based properties hidden inside handrail families nested into the railing family.
  • Even when you have set up the supports in a handrail family, you have to remember to choose left or right (for the handrail) in the railing family, otherwise nothing shows up.

Handrail Support Spacing

Once you have figured out how to set up Handrail Supports in a railing,you will obviously want to control the spacing - first the initial spacing, and then changing the spacing.  There are at least two weird things you need to know about this - the first is how illogical and inconsistent the spacing properties are.  The second weird thing relates to moving the supports - to be dealt with later:

Spacing Properties

Do you think it is weird that baluster spacing and handrail/top rail extension length properties are measured in plan distance regardless of the slope of the railings, while support spacing is measured along the actual length of the handrail whether it is horizontal, sloping, vertical or going round a twirly flourish at the end?  Whichever one is correct, it is weirdly inconsistent.

How would you measure the support distances on this handrail?
In the Handrail type properties, you have the typical Revit options (plus a special one):
  • None
  • Fixed Distance
  • Align With Posts
  • Fixed Number
  • Maximum Spacing
  • Minimum Spacing
Unfortunately these are not consistent with each other, and none of them will give you the outcome that you desire (unless by a fluke the spacing just happens to work for your stair):

1.  'Fixed Number' does not put supports at the ends of the railing;  the spacing varies depending on the overall railing length, and the number that you put in - NB. the number is a type property of the handrail, which means that you most likely need a unique handrail type and a unique railing type for every single instance of the railing.
It seems that the supports always use centre justification for this - it is greyed out and you can't change it;  also, the greyed out value for spacing is just a remembered value from the previous settings, and is misleading here.  Revit does not report back to you what the actual support spacing is on each handrail instance.

If you have a free end handrail, you would typically want a support close to the end (but not exactly at the end).  You don't get a support anywhere near the end, unless you put in a ridiculous number of supports, like 50 in this example.
Fixed number does not put supports at the ends
If you have an extension to wall or floor, then this option makes sense, however, the spacing includes the length of the extension, measured along the handrail, including vertical length for a floor extension.  The example below, with a wall extension is the one and only situation where Revit gets the support locations close to what you might need, albeit that you need a separate type for each different number of supports.


2.  'Fixed Distance' only puts a support at the start or end of the handrail if the justification is set to Beginning or End;  the distance at the other end is pot-luck depending on the overall handrail length.  If the justification is 'Center', then the distance from the start and end again depends totally on the overall length of the handrail - so it is luck of the draw, but it will be the same at each end.
The calculated distance includes extensions.


 3.  'Maximum Spacing' always puts a support exactly at the start and end of the handrail; justification is not an option here - it is greyed out (and set to center).  Just imagine sending this drawing to a builder or fabricator - you'd be laughed off the site.

Revit does not take into account whether an extension with a wall or floor fixing is chosen - it still puts a support in place at the very end, just where it is fixed to the wall/floor.

4.  'Minimum Spacing' behaves just like the Maximum Spacing settings, although the actual spacing will be different.

5.  'Align with Posts' is an interesting option - I don't get why you would use it, unless your posts are non-supporting in themselves.  If you do use it, you have no option for supports between the posts, so what good is that?  I would have thought the option should be 'Align with Posts & Maximum Spacing Between' and suchlike.  Or 'Maximum Spacing Except at Posts' etc.

With all of these options, you have the opportunity to unpin a support and move or delete it; [Edit - thanks to Peter Schiettecatte for pointing this out:] but you can only add additional supports by unpinning an existing one and copying it along the handrail (a clever but not too obvious workflow).  However, once you have done this, it takes just one innocent (or stupid) click on the 'Reset Railings' button to lose all that hard-won support over-ride spacing.

The Solution

What we really need to solve some of these issues is to have consistency in how the spacing is applied (at ends); and the ability to set start and end indent properties for handrail support spacing.  These would operate rather like the equivalent properties on a 'Divided Path', although I guess they'd need to be type properties to be consistent with all the other handrail properties (Oh, how I wish most of those were instance properties in the actual railing)

If you think this is a good idea, please go to the official Revit Ideas website and vote up my idea on this.

 More on this subject

Tuesday, 26 May 2015

Got Your Repeaters in a Twist?


How many times have you tried to create a 'Repeater' from multi-point adaptive components in Revit, only for the result to be a tangled mess, instead of the neat array that you were expecting? 

You may be in luck - there could be a simple solution. . . .

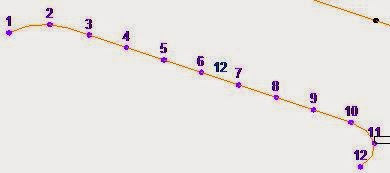
When you select the underlying 'Divided Path' that the repeater is hosted on, it will display the number of nodes (a blue number above the centre of the divided path)
It also shows up in the properties dialog box.  A few other useful properties are also there, including 'Show Node Numbers', which is off by default.  Try ticking the checkbox.
 It will display each node number as well as the total
If you select the other divided path, and do the same thing, you may find that the node numbers go in the opposite direction.  Unfortunately you cannot display both sets of numbers at the same time - so you need to select them individually and remember the direction
If the numbers are in opposite directions, all you need to do is reverse one of them by clicking in the 'Flip Direction' checkbox.
You might be lucky and have the repeater magically untangle itself, but that is unlikely.  More likely it will still be wrong - maybe some missing elements if the node numbers are slightly out of synch.  It is probably better to undo the repeat command before you flip the direction.

Sometimes the hosted adaptive component will disappear when you flip the direction - in which case undo and delete it first - as Revit still thinks it is out there somewhere.

If you have just one hosted adaptive component, you may find that it just gets stretched to another location when the direction is flipped.
In which case you could select the adaptive point at one end, and rehost it to the correct node on the divided path
Once the nodes are matched up you can try the Repeat command again

If that didn't solve the problem, it could be more complicated!  Have a look at some of my other posts on Repeaters - listed on the Repeater Index Page