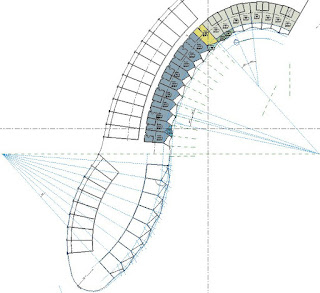
I have noticed that most people who want to create a non-standard stair in Revit will resort to the old stair sketch tool. This is a really bad idea for a number of reasons. I only know of one good reason for doing so (more on that later).
The old Stair by Sketch tool was left in Revit as a 'safety blanket' for those worried about the new Stair by Component tools. In reality the component stair tools are much better than the old tools despite the many glitches and shortcomings. [
Edit: in Revit 2018 the old Stair by Sketch tool has finally been removed]
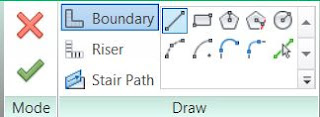
So, what happens if you want to create a non-standard stair that cannot be done using standard components? A tapering stair for example. Well, the component stair has its own sketch tool: the icon looks like a pencil with curvy line (highlighted below). That means you can sketch just one component - say a run or landing (both have the sketch option, but Support does not).
Once you start a component sketch, you get three line types, much like the old stair sketch tools:
- Boundary lines
- Riser lines
- Stair path
Once you start using these line tools, you will see that they work quite differently - each line has to be created (drawn or copied), unlike the old sketch tool that created all the lines when you placed the central run line. This may seem like a retrograde step (pardon the pun) but it is no great hardship, particularly as there are so many other advantages.
I usually find it is easier and quicker to create a standard run or landing component that approximates what you ultimately need - then convert it to a sketch.
It will give you a warning that the process is irreversible. Take heed, because once it is a sketch it will always be a sketch, unless you delete and replace with a component (and risk losing hosted elements).
Once a component is converted to a sketch, you need to select it in order to then edit the sketch - this seems like a needless step, but in fact it is logical. It caught me out a few times, wondering why my converted component did not look like sketch lines.
Once you are in sketch mode, you need to remember that adjusting the central Stair Path line will not affect the riser spacing - it is just another line. The Finish Sketch command is much more forgiving than the old sketch tools, which were very temperamental. I will cover more detail on the rules of what the sketch command will or will not allow, in another post.
Stair by Component = Good; Stair by Sketch = Bad

Why is it bad to use the old sketch tools? Here are a number of reasons:
- Using the old stair tools means that you are missing out on new features like stair numbering - despite the shortcomings, they are useful.
- The old sketched stairs have the path arrow built into the stair, which means limited control on where and when they show up. It also means very limited control on the stair arrow style.
- It is really bad news to mix old and new stairs together in the same project because the annotation can be extremely inconsistent between the two - particularly for stair path arrows. This leads to confusion and messy drawings. Refer to Stair Paths Arrows for more detail.
- Stair by component gives much greater control and options for changing the number of risers, the height and location of landings etc.
- Stair by Component allows stair runs to go over the top of each other - useful for spiral stairs more than 360 degrees, or for stairs with 3 runs per storey.
- Sketching individual components (run or landing) allows other parts of the stair to remain as components, with all the benefits of that. Stair by Sketch means the whole stair is one sketch.
- The list goes on . . .
Reasons to use Stair by Sketch
There are a couple of reasons for reverting to the old stair tools, but hopefully these will be dealt with by Autodesk fixing the bugs in the component tools:
- "Show Hidden Lines" does not work on component stairs
- There are many shortcomings with the Stair Path tool for adding stair arrows, including:
- Cannot copy and paste stair arrows between views
- There is no "Tag all stairs" command for adding paths to multiple stairs at one go
- Duplicating a view will not include stair path arrows unless you duplicate with Detailing, in which case you get all the other annotation.
The moral of this story is that the reasons for using Stair by Component sketching far outweigh the minor benefits of sticking with the old Stair by Sketch tools. I wish that Autodesk would fix those bugs and remove the old tool so that people would stop using it.


