BILT Speaker

BILT Speaker
RevitCat - Revit Consultant
Showing posts with label schedule. Show all posts

Wednesday, 14 July 2021

Filtering Filters in Revit

The term "Filter" is much used in Revit - and it means different things in different situations.  Filters also follow varied and confusing rules depending on what you are doing.  Below are some of the rules and exceptions:

Coffee Filters

The 'Filter' icon in Revit probably makes good sense to most Americans, but others around the world might be a bit puzzled - it is a historical image, much like the Floppy Disk for 'Save'.

In the USA, coffee filters are still quite common:

Many American restaurants have a coffee filter machine, with a pot of brown liquid sitting on a hot-plate for hours after it has been dripped through a paper filter.


In Europe you might find various different machines for making coffee - plungers (French Press) used to be quite popular:


In Greece or Turkey, traditional coffee was made in copper pots.  now of course, there are updated electric versions available.


In Australia coffee-plungers are now a rarity, while filters can only be found in antique and junk shops.  Nothing less than a full-on espresso machine will do in even the smallest cafe.  A restaurant with a coffee filter would be laughed out of town:


There ends the 'Filter' icon history lesson.  I have to say that I do like the coffee filter as an icon because it is neat and distinctive - but it might puzzle the younger generation.  I can't see an espresso machine making a good icon.

Jeff has pointed out that the filter icon is probably derived from laboratory funnel filters - probably true, and much more logical than my coffee filter theory!


Selection Filters

When you select a number of elements in Revit, two Selection Filters icons are activated:

Status Bar Filter Icon

The Status Bar icon (lower right of screen) shows the number of selected elements; and the coffee filter icon, which gives you access to the Selection Filter dialog box.


Ribbon Selection Filter Commands

Ribbon Selection Filter commands allow you to:

  • Save, Load or Edit element selections
  • access to the Selection Filter dialog box


This is an invaluable (but underused) tool for filtering down your selection

It is really important to check the selection filter to make sure that you have not accidentally selected partially hidden items (eg. floors, section lines) before you delete, modify or copy them.


View Filters

View filters are created and saved in each project, and can be applied to:

  • individual views
  • multiple views or
  • view templates

View filter rules allow AND and/or OR

  • OR filter capability was added to Revit in v2019, which made our lives so much easier
  • OR filter rules are pure gold (as the French would say)

View filters can be used to:

  • Hide/show elements (Visibility) or 
  • To override their appearance

 Filter Overrides are not part of the View Filter:

  • Overrides are part of the view definition - meaning they are tricky to maintain or duplicate
  • Overrides can be part of a View Template


  • One of the annoying restrictions in View Filters is that Shared Parameters created in loadable Families are not available for use in View filters - unless you also add them as Project Parameters - refer to this blog post

More on View Filters in another blog post . . . .


Schedule Filters

Schedule Filters are quite different to View Filters in many ways:

  • Schedule Filters are an integral part of each schedule - they cannot be separately applied to other similar schedules - this is entirely different and inconsistent to View filters
    • However, Schedule Filters can now be included in View Templates that are then applied to multiple schedules (since v2017).
    • Be warned that if you create a complex filter as part of a schedule, then apply a view template, your filter could be overridden by whatever is in the template - never to be retrieved.
  • There is a huge list of system parameters that are not available for use in Schedule Filters - way too many to list here.  Autodesk are slowly adding new ones with each release, but it is a very slow feed, rather like an old-fashioned coffee filter that is clogged up with coffee grounds.
  • Shared Parameters created in loadable Families are available for use in Schedule filters - this is a good thing (but not consistent with View Filters).
  • Schedule Filters do not allow an 'OR' rule - this is a really bad thing (and not consistent with View Filters);  they only allow 'AND' rules.
  • Schedule Filters have a fixed number of 'AND' rules - currently 7 (this was increased to 7 a few years back).


More on Schedule Filters in another blog post . . . .


Browser Filters

Project Browser has its own filtering system:

  • It is limited to 3 'AND' rules, which includes some System Parameters and Shared Parameters

  • A few years back Autodesk added "Family" and "Type" as separate parameters for filtering, which is much better
  • Unfortunately the default filter "all" is by the combined "Family and Type" parameter, which cannot be edited - I would prefer the "all" filter to be by "Family" and "Type" as two separate rules.


Parameter Search Filters

A few years back (v2017) Autodesk added a new filtering function to a couple of dialog boxes.  They referred to them as "Search" capabilities but really they are just filters - which adds to the confusion.

Global Parameters Dialog Box

There is a 'Search parameters' box at the top of the dialog.

If you type in a word or part of a word, it does not search for parameters containing that (part)word.  What it does is to filter the parameters in the dialog so that it only displays those containing the (part)word in any of the columns (parameter, value or formula);

  • Any parameters not matching the filter are hidden


I seldom use this capability - partly because the way it was implemented is quite confusing.  No doubt there are people out there who love it!

It can catch the unsuspecting user out - if you don't realise that the focus is in that Search box, and you type something in (say a value that you are trying to input in a parameter), then all your parameters may disappear.  This could be very disconcerting.

I think it would have been easier to understand if the Parameter grouping titles did not get hidden.


Family Types Dialog Box

The same capability is also available in the Family Types dialog in the Family editor (since v2017).

The same gotcha/confusion is also available in the Family Types dialog in the Family editor.


Sunday, 14 March 2021

Shared Parameters in Revit View Filters

Here is another Revit Gotcha for young and old: 

Family Editor Shared Parameters

If you add a new Shared Parameter in the family editor, you might expect that parameter to be available in a project in all situations.  You would be wrong!


Shared Parameters created in the family editor, and then loaded into a project have two entirely different (inconsistent) behaviours:

  • In Schedules, the shared parameters will automatically be available to add as fields
  • In View Filters, the family shared parameters will not be available to add as fields

This is quite confusing and inconsistent.  It can also catch you out, however experienced with Revit you might be - as I recently discovered when demonstrating how to create View Filters to a client

Schedules

If you create a new schedule  for the category of the recently loaded family, the Shared Parameter is automatically available in the list of available fields - as you might expect:  it is one of their mystical powers.

View Filters

Try the same trick with View Filters and you will probably get a nasty surprise


 Workaround

To make the shared parameters available for use in View Filters, you have to add them (again) as Project Parameters.


View Filter

If you go back to the View Filter definition, you will see that the Shared Parameter is now available as a field to be added.


As a BIM Manager, I would once have known about this Revit inconsistency - but I just plain forgot!  There is no way we can remember all of the inconsistencies.  And why should we have to?

Fortunately, Autodesk are slowly addressing some of these irritations - but it is such a laborious process.


Monday, 20 April 2020

System Volume Parameter in Generic Category Families

 Here in New South Wales, Australia, we have a planning requirement (SEPP65) to provide a certain amount of storage in multi-unit residential developments.  Some of that storage can be in the apartment itself, and some can be in storage cages/cupboards in the basement.

The storage has to be calculated by volume per apartment - this means that we have to create schedules that combine the storage cupboards in apartments with the cages in the basement.  Thus we need to create objects of different shapes and sizes in the model.

There are several ways to calculate the volumes from these objects, but surely the simplest way would be to use Revit's automatic volume calculation properties?

System Volume Property

You would think that Revit would be able to report back the volume of any object in your model.  It is a database, right?

It turns out that it can do so, to a very limited extent - and of course that leads to restrictions and frustrations.

It seems that only cetain category objects can report their volume, and then there may be further restrictions on scheduling or tagging:

By Category

  • Many of the system families do have a "Volume" property

  • But you would not want to create storage cages or cupboards by mis-using those categories?  No, you would not!
  • Logically you would use the Casework category for cupboards - but sadly that category does not have a volume property.
  • The same applies for most loadable family categories.

  • You could use the Mass category, but that is not sensible either, because that should be reserved for creating building massing models - if you start mis-using that category it will surely make life difficult (not least with visibility issues).

  • Rooms do have volume properties, although that can depend on project settings - see below.
  • Rooms are also not an ideal way to model such things as high-level storage cupboards!

  •  That leaves us with one last option (that I know of):  the Generic category.
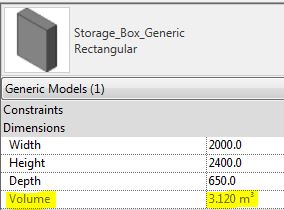
  • For many years in Revit, generic families did report a Volume property (automatically calculated from the volume of all solid objects in the family).
  • However, it was not originally possible to schedule this property
 
  • In Revit 2014, Autodesk enabled the ability to schedule this Volume property.
  • This was one of my few successes with lobbying Autodesk to include one small new feature in Revit, that would make a big difference to us.
  • Sadly they ignored my pleas to also enable this property to be tagged.

Generic Families

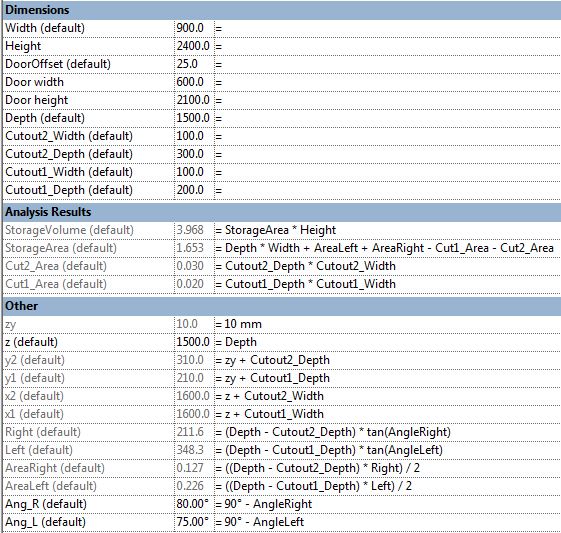
Prior to v2014, we created a range of storage families that did the volume calculations as formulas within the families - so that we could schedule and tag the volumes.

When it comes to basement storage cages, the shapes often become quite complex as they have to wrap around columns or need angled sides.


This led to some quite complex formulas that needed to take into account optional cutouts to the shapes, and to allow for overlapping cutouts.


Fortunately all these calculations became redundant with v2014, as we can now use the system calculated "Volume" parameter to schedule storage volumes.

Except . . . . . When a project requires the storage to be tagged on drawings.

Room Volumes

Rooms do have the ability to calculate and report their volume, and it may be easier to create basement storage cages as rooms with cage walls to enclose them.  This would allow any shaped area without having to create a range of families.


However, this becomes problemmatic when you need to create one schedule that combines the basement storage cages (Rooms) with in apartment storage cupboards (Generic category families).

Room volume calculations also have some quirks, that depend on project-wide settings:

  • Rooms have a height property - this is used for the system calculated volume.
  • However, it will not work if Rooms are set to only calculate Areas (not Volume)
  • This project-wide setting is generally recommended as it makes the project performance noticeably faster - the menu even tells you that (and it is true)

  • If you enable Areas and Volume calculation you will get the volumes being reported, but a slower project.
  • If you need to do this anyway, then it is no extra overhead for calculating room storage.


Room Volumes are calculated at Wall Finish, regardless of the Room Area settings.
  • This can be complicated if you need room areas to be calculated to wall centrelines.
  • More on this in another blog post . . . .

Monday, 23 September 2019

Inconsistent Units Settings UI in Revit


There are several very different ways of getting to Units Settings in the Revit User Interface.  Most of them are not very intuitive - and certainly they are totally different from each other.

Project Unit Settings

There are 3 different icons on the 'Manage' ribbon, depending on your screen resolution and size:

Largest resolution or screen
 If you are operating on a laptop or low resolution, the icon automatically reduces in size, and you may or may not get a text description:
Medium resolution or screen

Smallest resolution or screen

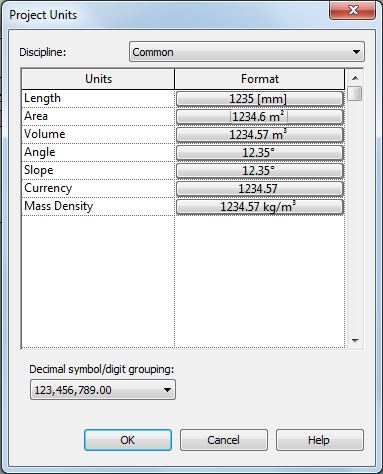
Once you click on the Project Units icon it takes you to the units dialog box, which has a list of different kinds of units:


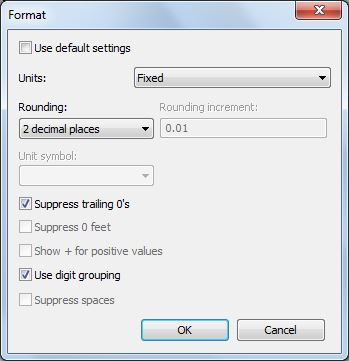
Once you choose a particular unit type, it gives the project-wide 'Format' settings for that type.  Since this is the project settings, the checkbox at the top is greyed out.   Some of the checkboxes are related only to imperial measurements so would always be greyed out for metric users.

This dialog box is the one common UI that appears for all methods of accessing units - but different items are greyed out in each situation that the dialog box appears.


Dimension Units

  • Select a Dimension in the project 
  • Click on Edit Type


  • Click on the Units Setting property
  • This takes you to the Units Format dialog box where you can override the project settings
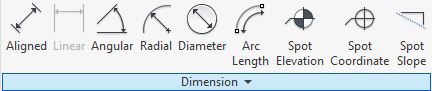
Alternatively you can access this units dialog box from the Annotation ribbon:
  • Click on the Dimensions drop-down arrow
  • Select the kind of dimension you want


Schedule Units Settings

  • In the Schedule Properties, go to the 'Formatting' tab
  • Select a field (on the left)
  • Click on the 'Field Format...' button on the right


  • Once you click on this, you get the standard Units dialog box
  • Typically the 'Use default settings' checkbox is ticked 
  • You can untick it if you want to over-ride the project settings


Tag Units Settings

Refer to Revit's Most Hidden Commands (part 2) for more detail on this.  It is quite tricky to find this setting:

  • Edit the tag family
  • Select and Edit a label

  • The parameter in the label may look like it is selected (on the left), but it is probably not
  • Select the relevant parameter (on left, even though it shows on the right)

  • The 'Properties' icon (a hand) will be enabled
  • Click on it

  • Finally you get to the units settings, which is normally defaulted to 'Use project settings'
  • It is not possible to get to this unit override setting within the project environment (unlike dimensions and schedules)

Summary

Here we have at least 4 completely different ways to access Revit units settings:

Method 1 (Ribbon in the project ):


Method 2 (Dimension Type properties in the project ):

or

Method 3 (Schedule formatting properties in the project ):


Method 4 (Tag properties in the Family Editor ):


Why does something so simple have to be so inconsistent, and complicated ?