BILT Speaker

BILT Speaker
RevitCat - Revit Consultant
Showing posts with label family. Show all posts

Friday, 14 April 2023

Zoom in Family Types Dialog Box

Today I watched episode 99 of BIM After Dark, hosted by the Revit Kid.  The guest presenter was  Nicolas Catellier (Revit Pure), showing Advanced Revit Family Concepts.  However much you might think you know about Revit, there is always something new to learn.  

One tip that I picked up was the ability to zoom in the Family Types dialog box - this can be useful when you are editing families on a high resolution screen and the text is tiny.   Editing a complex formula is painful enough in Revit without having to squint to count the brackets at the end of a formula.

Family Editor Zoom

Just click in the Family Types dialog box, hold down the Ctrl key and use the mouse scroll wheel to zoom in or out.


There is one problem with doing this:  it plays havoc with the column widths.

  • The Lock column will most likely no longer fit in the dialog box 
  • A horizontal scroll bar may appear at the bottom of the dialog box

  • If you click in one of the formulas, it tries to display the whole formula column - which is logical
  • It also shifts everything to the left so it can display the Lock column - this is illogical and intensely irritating as you can no longer see the values.
  • You need to scroll left again to see the values

To resolve this you need to make the Formula column a bit narrower, and the Lock column much narrower (width of the checkbox).

It is not immediately obvious how to adjust the Lock column width:

  • Drag (to the left) the right-hand vertical line on the Lock column header - it seems like nothing is happening, but keep dragging it left until you align with the checkbox.

  • Drag the left-hand vertical line on the Lock column header to the right, until just before the right-hand line disappears.
  • You may need to make the Formula column narrower again until the horizontal scroll bar disappears from the bottom of the dialog box - but once you have minimised the Lock column width it should be easier to do that.


For a more detailed explanation of this workaround trick, refer to my blog post of a couple of years ago:

 Family Types Dialog Column Widths

 Thanks again to Jeff and Nicolas for the BIM After Dark presentation.


Wednesday, 13 October 2021

Double-Click Trouble in Revit

In Revit 2019, one of the fantastic new features was the ability to slow double-click to rename views in the Project Browser !  

Fantastic?  Not true - it is an almost universally hated new feature.  If you search on the internet, you will find an endless list of questions and answers on how to disable this feature.

I do know one person (who shall remain nameless) who claims to like this feature - but they are only one amongst thousands (or even millions) who hate it.

Beta Testing

I remember reading about this feature during beta testing of Revit 2019.  Many of the testers pleaded with Autodesk NOT to roll this feature out, as we knew it would cause trouble.  However, it was too late - the code was already in the software.  Autodesk did relent somewhat, and offered us a way to disable it by editing the revit.ini file, to add the line (in the [User Interface] section):

SlowDoubleClickInProjectBrowser=0

Of all the many online descriptions of how to disable this feature, here is a link to one of them, written by Pieter Schiettecatte on Dan Stine's blog:

BIM Chapters 

Default Setting

Now why did Autodesk make the ridiculous mistake of making the default behaviour different from previous versions?  I would guess that it was to make the change "discoverable" - but it is very annoying that we have to actively disable it.

In contrast to this,  despite much pleading, Autodesk refuses to change one other default behaviour that causes much Revit-misery:

Why, oh why can't they make the "Little Button of Evil" disabled by default?  Yes, that is the "Drag Elements on Selection" setting.

More Double-Click Trouble

Another irritating double-click feature that was added in Revit 2013 was the ability to take you straight into the Family Editor when you try to select a component in Revit.  For various reasons this might register as a double-click - particularly when you try to edit a tag value, for example.  What a huge time-waster that it opens the Family Editor when you clearly do not want to edit the family.

 This was another feature that we asked them not to include after beta testing it - to no avail.

Again, Autodesk relented, but it was not until a couple of releases later (so we had to live with it for a while).

Now you can either edit the Revit.ini file or better still, go to the Revit Options to choose what double-click behaviour you would like.


These settings get saved into your Revit.ini file, so they can be rolled out to an organisation:

[UserInterface]
DoubleClickFamily=EditType
DoubleClickSketchedElement=EnterEditMode
DoubleClickViewOnSheet=ActivateView
DoubleClickOutsideViewOnSheet=DeactivateView
DoubleClickAssembly=EnterEditMode
DoubleClickGroup=EnterEditMode
DoubleClickComponentStairs=EnterEditMode


I prefer a Double-Click on a component to either do nothing or to 'Edit Type' - but never, ever edit the family.  That should only be done as a very conscious decision of right-clicking or clicking on a command on the Ribbon menu.


Tuesday, 15 June 2021

Family Types Dialog Column Widths in Revit

Does anyone find trying to control the column width in the Family Types dialog box annoying?

The "Lock" column in particular, has been driving me mad for the last 16 years!

About 7 or 8 years ago (?), Autodesk made a partial improvement to that dialog box: 

  • Revit remembers the size of the dialog box when you open or close the dialog - previous to that it always reset to a small default size & layout.  
  • However, it still behaves in an unpredictable way, which is intensely irritating.

I just discovered a trick that helps to get around the problem - so I spent a while analysing exactly what is going on:

Family Types Dialog Box Size Behaviour

  • When you close the Family Types dialog, and subsequently reopen it, Revit remembers the overall size and location of the dialog box.
 
  • This also happens between sessions:  When you close Revit, the next time you start Revit, it remembers the size and location of the dialog box.


Family Types Dialog Column Widths Behaviour

If you adjust the column widths in the dialog box:

  • When you close the Family Types dialog, and subsequently reopen it, Revit remembers the widths of the columns in the dialog box (even if you are editing a different family).
  • Not so between sessions:  When you close Revit, the next time you start Revit, it RESETS the widths of the columns in the dialog box to defaults below (albeit within saved overall width).

Default Column Widths:

    • Parameter = 26%
    • Value = 22%
    • Formula = 40%
    • Lock = 12%

Adjusting Column Widths

If you adjust the column widths, it follows strange and annoying rules:

  • Adjust between Parameter/Value:  It changes Parameter and Lock Column widths
    • This is not helpful as the lock column is wasted space!

  • Adjust between Value/Formula:  It changes Value and Lock Column widths
    • Even less helpful as the Lock column gets enormous

  • Adjust between Formula/Lock:  It changes Formula and Lock Column widths

When adjusting Formula/Lock columns, be careful:

  • If the right-hand "Lock" column vertical line disappears, it means the Lock column no longer fits in the overall width - this will cause much irritation (see below)
  • This makes a horizontal scroll bar appear at the base of the dialog box - yuk!
  • If you subsequently put the cursor anywhere in the "Value" column, as soon as you type a value and press enter, your dialog box may do a "crazy leprechaun dance"*
    • The focus moves into the Formula Column
    • In its infinite wisdom (/stupidity), Revit wants to display the column to the right in full - so it moves to show the whole of the Lock Column
    • You will probably no longer be able to see the Parameter name and/or Value

[*NB. this is what the first iteration of the ribbon menus in Revit 2010 was referred to as doing]

NB. This does not always happen - I think it depends on the overall dialog box width and the Lock Column width


Clever Trick

I only discovered this a couple of days ago:

  • Adjust the Formula/Lock column widths as close as you can to desired

  • Select the right-hand vertical line of the Lock column, drag it to the left until the cursor aligns with check-box
    • Nothing appears to happen
    • However, in its mind, Revit is actually making the column width smaller (it just doesn't show the change)

  • Adjust the Formula/Lock column widths again - to the right
    • it lets you get the Lock column width much smaller (without losing the right-hand line)
  • You can make the Lock column tiny - check-boxes will shrink

Once you have made the Lock column very small - it remains proportionally small when you increase the dialog box size - which is really useful.

Workaround to Avoid the Problem

If you always follow these rules, you are less likely to have a problem:

1.  Adjust your dialog box size to exactly what you will need for the entire Revit session - so if you are working with formulas a lot, then allow for a large width

2.  Adjust the column widths in this order:

  • Parameter/Value  <

  • Value/Formula  <
  • Formula/Lock (keep the right-hand line visible) - move to the right  >
  • Right-hand side of Lock column - move it to the left  <
  • Formula/Lock again - move to the right  >


3.  Make sure you never have the horizontal scroll bar visible 

  • If you ever adjust the Parameter or Value column widths, check the right-hand side of the lock column title - make sure it is visible (and no scroll bar).


Conclusion

If anyone tells me that they have known about this for years, I'd like to know why they never informed me before!


If you would like Autodesk to fix this problem, please go to Revit Ideas and vote for the wishlist item that Dave Plumb recently posted.


Monday, 17 May 2021

Revit Family Error Automatically Resolved

Some of you may not be aware but Autodesk sneaked in a new "Feature/Enhancement" in about version 2018 (I think?) - I do not remember any discussion or announcement about this in the testing/release process:

Warning:  "Family Error Automatically Resolved"

When you try to place or modify a component using parameter values that break the family (eg. cause impossible geometry), Revit will now try to "Fix" the family.

In reality, what is most likely going to happen is that you (the BIM or Content Manager) will be in a "Fix" or "Fixed Up" . . . . .

So, what is going on here?  


 When Revit tries to "Fix" the family, it seems that :

  • Revit makes the requested change to the values
  • Gives a warning to the user
    • As we know, most users ignore the warning and keep going
    • User clicks on OK or presses Enter

  • Revit omits the elements that it cannot create
    • Nested components are particularly prone to this
  • This results in a component that is missing some (sub)elements
 
  • The end user may not know what has happened
    • They may not knotice that something is mssing
    • They may not care!
  • If the user makes further changes to the values that still break the family, Revit gives another warning - this one requires no user intervention.

  • If the user changes the values to something that no longer breaks the family, it appears to reinstate the elements that it could not create.  
    • When I first encountered this, I was sure that once it happened, Revit would never reinstate the missing elements - but on re-testing this it appears to work ok.


Warning

  • It seems that when Revit "Fixes" a family for you, it does NOT retain a warning in the list
  • I think that is a serious failing with this feature, as the BIM Manager has no easy way to find or track the problem

Old Revit Versions

Prior to this "enhancement", Revit would just give a message saying that it could not create the family:


This meant that the user had to either choose values that did not break the family, or else get the Content Creator to fix the family so it did not happen.


Opinions

What do you think of this "Enhancement"?

  • As a BIM, Model or Content Manager I don't think I like it much because it means I often don't get told about the error - so it goes uncorrected.
    • It is not easy to find later on
  • As a Revit User, you might think it is great as you can get on with my work and not be interrupted by having to seek help from the Content Creator
    • It may or may not come back to bite you - chances are that it will become someone else's problem.  
    • If it goes unnoticed for a while the ramifications of the problem could become more significant.


Saturday, 17 April 2021

Cut with Voids When Loaded - 'Cuts Geometry' Postscript

Following my earlier blog post on Cut with Void When Loaded in Revit, I have discovered another subtle exception to the rule:

It does not work properly with the new Revit 2021 feature "Void Cuts in Family Geometry" that allows you to turn the 'cutting capability' voids on/off in a family.  NB. This is sometimes referred to as turning off Void visibility, which is misleading.

Void in Family Editor

Here is a workflow that demonstrates the confusing behaviour:

  • In the family editor, create a new Generic Model family
  • Tick the 'Cuts with Void When loaded' family property
  • Create a solid with two more intersecting solids
  • Change the two outside solids to voids 
  • The voids will not cut the solid - this is a deliberate technique to carefully control what cuts what
  • Use the 'Cut' command to cut one of the voids from the solid (only one)
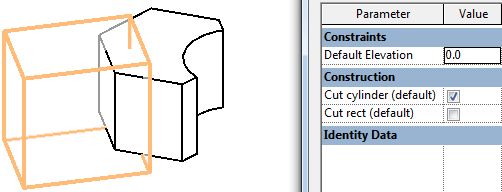
  • Select the visible void and link its 'Cut Geometry' property to a parameter - say "Cut Rect"
  • Select the invisible void (that is cutting the solid)
  • link its 'Cut Geometry' property to another parameter - say "Cut Cylinder"
  • In theory, this should allow you to turn off 'cutting capability' of each void independently, once in the project - and hence whether they cut or not.

Test this in the Family Editor

  • With both voids 'cuttable', the cylinder cuts but the rectangular void does not (as expected) - this is because the rectangular void was never told to cut the solid, so it has no effect in the family


  • Turn off the 'cutting capability' of the cylinder - it no longer cuts the solid;  it actually becomes visible, which may seem contradictory - but that is typical Revit behaviour (voids not cutting anything show orange;  voids already cutting a solid disappear)

Switch the cutting properties around so the cylinder can cut but the rectangular cannot - visually it looks the same as having both properties ticked.


 Voids in the Project

From my earlier blog post on Cut with Void When Loaded in Revit, we know that in order for it to work in a project, the cutting void must be set to not actually cut anything in the family - as the rectangular void is set up.
 
  • Load the family into a project

  • Place the family onto an element that it intersect with
  • Both 'Cut Geometry' checkboxes ticked

  • Untick both checkboxes, so the cylinder void is no longer cutting the family solid (rectangular void does not cut it regardless)
  • Both voids are ghosted when the family is selected, or in pre-selection

  • Use the project 'Cut geometry' command with the host element and family
  • Both voids will cut the host element (neither void is cutting the family solid)


  • Tick the 'Cut Rect' checkbox -
    • The cylinder is not cutting the family solid, so it cuts the host element in the project (this may not be what you want, but it cannot be avoided!)
    • the rectangular void is not cutting the family void, so it cuts the host


  • Tick both boxes - only the rectangular void cuts the host (as it is not cutting the family solid)
    • The cylinder now cuts the family solid but not the host (and is no longer visibly ghosted)

Conclusion

  • If the void cuts a solid in the family, it cannot cut an element in the project using the 'Cuts with Void When loaded' family property
  • If the void cuts a solid in the family,the new (in v2021) 'Cut Geometry' property has the potential to work in a project
  • If the void does not cut a solid in the family, it can cut an element in the project using the 'Cuts with Void When loaded' family property - but only when you use the 'Cut' command in the project
  • If the void does not cut a solid in the family,the new (in v2021) 'Cut Geometry' property has absolutely no effect in the project

This probably makes sense if you think really hard about decisions the programmers had to make about what is possible and how it might work.

However, it is mighty confusing for the end user.

To make matters worse, we now have two entirely different 'Cut Geometry' functions in Revit:

  • 'Cut Geometry' property in the family - a checkbox
  • 'Cut Geometry' command:
    • in the family- where you actively select which elements cut each other
    • in the project - where you actively select which family cuts which element but the results depend on all kinds of things in the family (as described above).

All clear now?  Or still confused?