BILT Speaker

BILT Speaker
RevitCat - Revit Consultant
Showing posts with label save. Show all posts

Tuesday, 15 June 2021

Family Types Dialog Column Widths in Revit

Does anyone find trying to control the column width in the Family Types dialog box annoying?

The "Lock" column in particular, has been driving me mad for the last 16 years!

About 7 or 8 years ago (?), Autodesk made a partial improvement to that dialog box: 

  • Revit remembers the size of the dialog box when you open or close the dialog - previous to that it always reset to a small default size & layout.  
  • However, it still behaves in an unpredictable way, which is intensely irritating.

I just discovered a trick that helps to get around the problem - so I spent a while analysing exactly what is going on:

Family Types Dialog Box Size Behaviour

  • When you close the Family Types dialog, and subsequently reopen it, Revit remembers the overall size and location of the dialog box.
 
  • This also happens between sessions:  When you close Revit, the next time you start Revit, it remembers the size and location of the dialog box.


Family Types Dialog Column Widths Behaviour

If you adjust the column widths in the dialog box:

  • When you close the Family Types dialog, and subsequently reopen it, Revit remembers the widths of the columns in the dialog box (even if you are editing a different family).
  • Not so between sessions:  When you close Revit, the next time you start Revit, it RESETS the widths of the columns in the dialog box to defaults below (albeit within saved overall width).

Default Column Widths:

    • Parameter = 26%
    • Value = 22%
    • Formula = 40%
    • Lock = 12%

Adjusting Column Widths

If you adjust the column widths, it follows strange and annoying rules:

  • Adjust between Parameter/Value:  It changes Parameter and Lock Column widths
    • This is not helpful as the lock column is wasted space!

  • Adjust between Value/Formula:  It changes Value and Lock Column widths
    • Even less helpful as the Lock column gets enormous

  • Adjust between Formula/Lock:  It changes Formula and Lock Column widths

When adjusting Formula/Lock columns, be careful:

  • If the right-hand "Lock" column vertical line disappears, it means the Lock column no longer fits in the overall width - this will cause much irritation (see below)
  • This makes a horizontal scroll bar appear at the base of the dialog box - yuk!
  • If you subsequently put the cursor anywhere in the "Value" column, as soon as you type a value and press enter, your dialog box may do a "crazy leprechaun dance"*
    • The focus moves into the Formula Column
    • In its infinite wisdom (/stupidity), Revit wants to display the column to the right in full - so it moves to show the whole of the Lock Column
    • You will probably no longer be able to see the Parameter name and/or Value

[*NB. this is what the first iteration of the ribbon menus in Revit 2010 was referred to as doing]

NB. This does not always happen - I think it depends on the overall dialog box width and the Lock Column width


Clever Trick

I only discovered this a couple of days ago:

  • Adjust the Formula/Lock column widths as close as you can to desired

  • Select the right-hand vertical line of the Lock column, drag it to the left until the cursor aligns with check-box
    • Nothing appears to happen
    • However, in its mind, Revit is actually making the column width smaller (it just doesn't show the change)

  • Adjust the Formula/Lock column widths again - to the right
    • it lets you get the Lock column width much smaller (without losing the right-hand line)
  • You can make the Lock column tiny - check-boxes will shrink

Once you have made the Lock column very small - it remains proportionally small when you increase the dialog box size - which is really useful.

Workaround to Avoid the Problem

If you always follow these rules, you are less likely to have a problem:

1.  Adjust your dialog box size to exactly what you will need for the entire Revit session - so if you are working with formulas a lot, then allow for a large width

2.  Adjust the column widths in this order:

  • Parameter/Value  <

  • Value/Formula  <
  • Formula/Lock (keep the right-hand line visible) - move to the right  >
  • Right-hand side of Lock column - move it to the left  <
  • Formula/Lock again - move to the right  >


3.  Make sure you never have the horizontal scroll bar visible 

  • If you ever adjust the Parameter or Value column widths, check the right-hand side of the lock column title - make sure it is visible (and no scroll bar).


Conclusion

If anyone tells me that they have known about this for years, I'd like to know why they never informed me before!


If you would like Autodesk to fix this problem, please go to Revit Ideas and vote for the wishlist item that Dave Plumb recently posted.


Wednesday, 23 March 2016

Copy Revit Model View Contents

Following on from my previous post on copying sheets between Revit projects, I figured out another tip that might be useful when copying views in Revit - this was prompted by a question about how to copy a 3D view and its contents.  This is a tricky workaround, but could be useful in some situations.

Copy View Contents

If you want to copy a 3D view or any model view for that matter, I have previously described how to do it here.  But supposing you want to copy the contents of that view too?

What you need to do is to save out the view as a Revit project, then insert it into the project that you want to copy it to.

You might try to use the official Revit command for saving a view - its in the Revit menu
But it is very clunky to use for two reasons (hint: if you are in a hurry, skip to 'Shortcut' below):
  1. It is really, really slow to open the cascading menus
  2. You have to be very dextrous and patient to get at the command - first click on 'Save As', then wait about half an hour, oh, I mean second;  then click on (or hover over) library; wait again; then move the mouse in the opposite direction to the little arrow pointing to the right, and choose 'View'
  • At the top of the Save As menu it claims that this can be used to save out ANY view.
  • Well, it simply is not true:  it does not seem to like saving 3D views.  And the list of model views can be very limited - it only a few model views are listed
  • Eventually I figured out that it only list orthographic views with annotation on them 
  • And it still won't allow you to save out a 3D view even if you lock it and annotate it.  Very frustrating!
  • And it won't list a dependent view either, even if annotated
  • Oh, I forgot to mention that the 'View' part of Save As will be greyed out if you try to access it in the middle of doing something else.  First you have to cancel that command, then try again.
  • During beta testing of the new ribbon back in v2010, we all told Autodesk how bad this part of the menu was, but it has never been fixed 7 years later.
  • Why would you bother to use this method, when there is a much quicker way?  Its your choice:

Shortcut

1.   Why not try the right-click menu in the project browser instead?
  • If you right-click on a plan view or an elevation/section, it will give you an option to 'Save View'
  • But, only if the view is annotated, otherwise it will be greyed out
  • A 3D view will also be greyed out
 
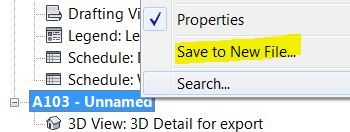
  • BUT, right-click on a sheet, and the 'Save to New File' option will be available.
  • So, all you need to do is place a 3D view onto a blank sheet, and it will let you save it out as a new Revit project file.  This will be a very lean file with only elements visible in the 3D view, plus anything hosted in the elements - like doors and windows (even if not visible);  curiously it also takes Revit linked files with it, even if they are not visible in the view (another Revit glitch)
2.  Select the view crop boundary of the 3D view (or camera if it is a perspective)
3.  Then go to the other project that you want to copy the view and elements to
4.  Paste the view/camera into the project
5.  A separate operation is required to import the elements in the view:  you need to insert the elements as a group, by one of two methods

a). Load as Group
  • From the Insert tab on the ribbon, 'Load as Group'
  •  Locate the file that you previously saved out.  Revit will default to looking for a project file (RVT), even though it can also load a 'Group' file
  • When loading a Group, it will not give you an option to place it in a specific location so you would need to place it then move as appropriate
If precision location is important, use method b):

b). Insert Revit Link
  • Link the Revit file using Origin to Origin, or whichever means you need to get the precise location
  • Select the linked file, and you get an option to 'Bind Link'
  • This will convert the link to a group
  • Then you can ungroup it to achieve the same status as in the original project


As I said, it is a little laborious but it should do the job.

Postscript

Michael Dunn has pointed out that this method transfers more hidden objects than I thought - not only does it export Revit links that are not visible in the export view (as I stated above), but it also exports hidden phases.  There could be other hidden elements exported when you 'Save As', so you'd best check the exported file before importing it to another project.

Links for Copying Sheets & Views

Copying views between Revit projects
Copying Sheets between Projects
Duplicating Views with Linework Overrides (within projects)