BILT Speaker

BILT Speaker
RevitCat - Revit Consultant
Showing posts with label copy. Show all posts

Saturday, 26 February 2022

Poor Man's Array in Revit

There are several situations in Revit where the Array tool is not available - one of those is when using the Sketch commands.  Here is a quick workaround.

Stair Sketch Example

In this example I wanted to create a stepped side to a stair in the sketch mode.


When I selected two of the stepped boundary lines, I discovered to my horror that the Array tool is greyed out.

Workaround

Instead of using the Array tool, use the Copy tool, making sure that the 'Multiple' setting is ticked on the Options Bar

Revit first asks for the Start Point

Make sure to snap to the first end point of one of the items being copied

Then snap to the second end point

Then snap to the third end point - being the end of the first copy

Keep snapping to the end of the most recent copy until you have created your array - it is pretty quick once you get going.
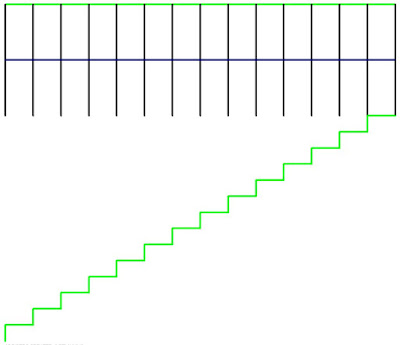
In this example I had to delete the last created line

If you need a lot of copies - say 100, you have two choices:

  • Concentrate hard and try not to fall asleep
    or
  • Make 20 copies then stop and select all 20 steps;  copy those 5 times

Array Done!

I figured this trick out many years ago, and I needed it to achieve the stepped side to a stair sketch for another blog post - so I thought I'd document it in case it helps someone out there.

This might get you thinking about other uses of this simple technique.

I tried it for radial arrays, for which you would need to use the Rotate tool - but unfortunately that tool does not allow multiple copies.


Wednesday, 24 November 2021

Revit Mirror Command is So Not BIM

 What is one of the first things that you teach people who are moving from Autocad to Revit?

"When making changes in Revit, DO NOT delete and replace elements - you should always modify the original elements even if it takes longer" 

Why is that?  Because you never know what data or hosted elements are attached to existing elements - so if you "Delete and Replace" you might lose the data or hosted elements.

  • What does the middle initial of BIM stand for?  "Information".
  • Without "Information" you are just working with a 3D Building Model

Revit Mirror Command

Revit is a BIM program, Right?

So you would imagine that it's fundamental command structure would work towards maintaining the BIM concept?

Unfortunately the "Mirror" Command in Revit doesn't follow the BIM rules.

It does not just mirror the selected element(s) - it copies and deletes original, even when Copy is unticked.

  • Select an element
  • Check it's Element ID

  • Mirror the element (with "Copy" unticked)
  • Check the Element ID of the mirrored element
  • Aargh, it is different

So what?  Well, it is just not BIM !


What does this Mean for your model?

Cut elements are no longer cut when mirrored

Joined elements are no longer joined when mirrored

etc

To test this:

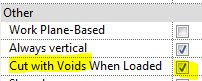
  • Create a new family that has "Cut with Voids When Loaded" enabled:

  • Place a solid and void in the family (not intersecting each other)

  • Load the family into a project
  • Place a component where it intersects with another element (in this example, a wall of the same material)
  • Join the component and the other element (wall)
  • Cut the component and the other element (wall)
  • Mirror the component (No copy)
  • Component is no longer joined or cut

Compare to other Revit Commands

  • Undo the mirror command
  • Test the Move and Rotate commands (no copy)
  • Join and Cut are maintained


These commands are BIM compliant - original elements are manipulated

Hosted Elements are Deleted by Mirror Command

  • Add a dimension (or tag) to the component
  • Mirror (no copy) the component
  • If you are lucky you might get a warning about the impending loss of the hosted dimension


What to Do?  Is there a Workaround?

The first thing to do is to contact Autodesk and request that they fix this un-BIM-like behaviour

Despite this problem having existed for over 20 years, it will surely be fixed promptly for you if you ask nicely.

In the meantime . . . . .

There is another way to mirror components in Revit:


Control the Mirror Command

Families can have their own built-in mirror/flip controls.

In the family editor, place a "Control"


  • Reload the family
  • Select the component
  • Check its Element ID


  • Click on the Mirror control
  • The component will flip around its origin point
  • Check the Element ID
  • Woohoo - it is the same! 
  • And the Join and Cut are maintained


Flipping Hosts

Test the flipping control with a hosted element (dimension)

  •  It is not guaranteed to maintain the dimension, but you have a much better chance

Conclusion

Is this going to help you?

Maybe:

  • Obviously it only allows you to flip components one by one.
  • As the flip controls will mirror about the component origin, it may not end up exactly where you need it - but you can then move it

  • It will try to maintain any cutting and joining that you have done
  • It may warn you that joined elements no longer intersect - and you should have the option to unjoin or maintain the join (if the elements will later intersect again)
  • I have not tested the implications for Dynamo - I have no idea if it is possible to access the flip controls within Dynamo.

Revit Ideas Wishlist

There are already a couple of ideas relating to this on the Autodesk Revit Ideas Wishlist

Mirror Not Copy (for mechanical elements but applies to all)

MirrorElement Not Copy API


Sunday, 3 December 2017

Weird Railing Stuff part 9 - Handrail supports on Multistorey Stairs

At first sight it seems that the new Multistorey tools in Revit look like a significant improvement over the old method.  However, as you delve deeper, there are some new problems that have been introduced with the new feature.

Weirdness #1

Once a regular component stair has been converted to multistorey that process cannot be reversed.  There is no command to 'Reset Stair' or 'Convert back to single storey'.  You can go to the 'Disconnect Levels' command, and select the other levels - this reverts it to a 'Single Storey Multistorey stair' - but it still identifies as a multistorey stair in the properties


So what, you might think?  Well, you can manipulate a multistorey stair by tab-selecting the stair inside the 'multistorey group', but that could be very confusing.  The more significant issue is what it does to railing supports:

Weirdness #2 Railing Supports

If you have a stair that has railing supports, and then you convert the stair to Multistorey it does something strange to the supports.  The original level stair railings behave normally - you can select a railing support and it will be pinned.

You can unpin individual supports then move them, swap to a different type or delete them


On the other levels, you can select the supports but they do not have a pin icon.  However, you can actually move, copy or delete them;  what you cannot do is swap their type (it is greyed out); nor can you change the hand clearance property.  They are in effect in some middling state between pinned and unpinned.

If you modify any of the railing supports, you can 'Reset' the railing so that all moved or deleted supports are reinstated to their original position.  Copied supports vanish.   

You might expect that supports on the original stair railing would become pinned again.  Well, not exactly:

Weirdness #3

If you 'Reset' the railing on the original stair level, it actually converts it to the strange middling state where none of the supports are pinned any more but there are reinstated to the original locations.


The moral of this tale is that you should probably try to adjust all the supports before you convert a stair to multistorey, especially if you want to swap any support types.  If that is not possible, you may still be able to do what you need to the supports after making the stair multistorey - notwithstanding all the other painful issues with railing supports.  One thing is sure - you will be confused.

More on this subject:

Tuesday, 4 April 2017

Transferring Global Parameters Between Revit Projects

In preparation for my upcoming presentation 'Power to the People - Global Parameters' at BILT ANZ 2017 in Adelaide (2.3 at 1.30pm Friday 26 May), I have done some in-depth analysis of how Global Parameters work. I don't want to spend too much time during the presentation on the nuts and bolts as there is much more exciting stuff to look at with what Global Parameters can achieve - so I plan to publish some of that research here . . . .

. . . . .Starting with how to copy Global Parameters between Revit projects:

There are two ways to achieve this, with varying results.

Transfer Project Standards

From v2017 it is possible to copy Global Parameters between projects  using the 'Transfer Project Standards' function.   However, it is 'all or nothing', as per usual for this feature - it copies every single Global Parameter in one project to the other one, along with all the values and formulas.  So it is like applying a sledgehammer - you could transfer two hundred parameters when you only want two. 


  • It does not copy any associations between modelled elements and Global Parameters - these would have to be re-associated to elements in the new project.
  • NB. If there are any materials selected for any material type global parameters, the materials will be transferred too.
  • If Global Parameters already exist in the project (with the same names), Revit will ask if you want to overwrite them - it will overwrite both values and formulas.
    Be careful not to lose any values or formulas if the names happen to be the same by coincidence.

Copy & Paste

Copy & Paste of elements between projects will also transfer any associated Global Parameters. This will in turn bring with it any formulas included in those Global Parameters, and any further GPs referred to within those formulas. This does not guarantee that the whole GP relationship will necessarily work properly once copied because there could be GPs that rely on such things as reporting parameters driven by dimensions that were not copied.

  • The benefit of this method is that it only brings with it the Global Parameters associated with the elements that you want to copy anyway.
  • It also maintains any associations between selected elements and Global Parameters.
If identically named Global Parameters already exist in the project:
  • It does not copy/overwrite existing Global Parameters
  • If the Global Parameter values and formulas are the same, it maintains them, and maintains the element associations to the Global Parameters.
  • If the Global Parameter values and formulas are different it will try to maintain associations, but using the new values - if this causes significant changes it will warn you that it needs to break the associations

Conclusion

Use whichever method best suits your purpose:
  • If you want to overwrite Global Parameters, use 'Transfer Project Standards - but it copies all your Global Parameters.  You may need to transfer them to an intermediate blank project, then delete the ones you don't need, keeping only the ones to transfer - then transfer those into the final destination project.
  • If you want to maintain associations with elements, or only want to copy specific Global Parameters - use Copy and Paste.

Tuesday, 29 March 2016

Duplicating Revit Views with Linework Overrides

Following on from recent tips about copying views between projects, here is another tip about copying views - this time within the same project.

Have you ever duplicated a view, and wanted to retain all the linework overrides that you laboriously did - then found that Revit does not do it?

  • Start with a view
  •  Use the Linework tool to override some lines
  • If you want to duplicate the view, you might imagine that 'Duplicate with Detailing' would preserve the linework overrides
  • Wrong
  •  The linework overrides disappear

The Solution:


  • Try duplicating the original view as a dependent view
  • The original linework overrides will be preserved
  • But you may not want the view to be dependent . . .
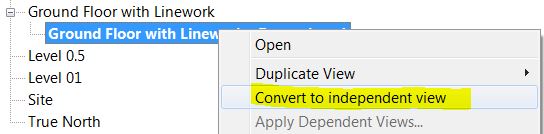
  • Right-click on the view and select the 'Convert to Independent view' function

  • The linework overrides will be maintained, and the view will no longer be 'dependent'.
 

You can thank Alex Dobysh & Slavica Ruzdic of Mirvac in Sydney for this tip