BILT Speaker

BILT Speaker
RevitCat - Revit Consultant
Showing posts with label mirror. Show all posts

Wednesday, 24 November 2021

Revit Mirror Command is So Not BIM

 What is one of the first things that you teach people who are moving from Autocad to Revit?

"When making changes in Revit, DO NOT delete and replace elements - you should always modify the original elements even if it takes longer" 

Why is that?  Because you never know what data or hosted elements are attached to existing elements - so if you "Delete and Replace" you might lose the data or hosted elements.

  • What does the middle initial of BIM stand for?  "Information".
  • Without "Information" you are just working with a 3D Building Model

Revit Mirror Command

Revit is a BIM program, Right?

So you would imagine that it's fundamental command structure would work towards maintaining the BIM concept?

Unfortunately the "Mirror" Command in Revit doesn't follow the BIM rules.

It does not just mirror the selected element(s) - it copies and deletes original, even when Copy is unticked.

  • Select an element
  • Check it's Element ID

  • Mirror the element (with "Copy" unticked)
  • Check the Element ID of the mirrored element
  • Aargh, it is different

So what?  Well, it is just not BIM !


What does this Mean for your model?

Cut elements are no longer cut when mirrored

Joined elements are no longer joined when mirrored

etc

To test this:

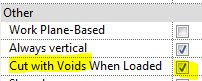
  • Create a new family that has "Cut with Voids When Loaded" enabled:

  • Place a solid and void in the family (not intersecting each other)

  • Load the family into a project
  • Place a component where it intersects with another element (in this example, a wall of the same material)
  • Join the component and the other element (wall)
  • Cut the component and the other element (wall)
  • Mirror the component (No copy)
  • Component is no longer joined or cut

Compare to other Revit Commands

  • Undo the mirror command
  • Test the Move and Rotate commands (no copy)
  • Join and Cut are maintained


These commands are BIM compliant - original elements are manipulated

Hosted Elements are Deleted by Mirror Command

  • Add a dimension (or tag) to the component
  • Mirror (no copy) the component
  • If you are lucky you might get a warning about the impending loss of the hosted dimension


What to Do?  Is there a Workaround?

The first thing to do is to contact Autodesk and request that they fix this un-BIM-like behaviour

Despite this problem having existed for over 20 years, it will surely be fixed promptly for you if you ask nicely.

In the meantime . . . . .

There is another way to mirror components in Revit:


Control the Mirror Command

Families can have their own built-in mirror/flip controls.

In the family editor, place a "Control"


  • Reload the family
  • Select the component
  • Check its Element ID


  • Click on the Mirror control
  • The component will flip around its origin point
  • Check the Element ID
  • Woohoo - it is the same! 
  • And the Join and Cut are maintained


Flipping Hosts

Test the flipping control with a hosted element (dimension)

  •  It is not guaranteed to maintain the dimension, but you have a much better chance

Conclusion

Is this going to help you?

Maybe:

  • Obviously it only allows you to flip components one by one.
  • As the flip controls will mirror about the component origin, it may not end up exactly where you need it - but you can then move it

  • It will try to maintain any cutting and joining that you have done
  • It may warn you that joined elements no longer intersect - and you should have the option to unjoin or maintain the join (if the elements will later intersect again)
  • I have not tested the implications for Dynamo - I have no idea if it is possible to access the flip controls within Dynamo.

Revit Ideas Wishlist

There are already a couple of ideas relating to this on the Autodesk Revit Ideas Wishlist

Mirror Not Copy (for mechanical elements but applies to all)

MirrorElement Not Copy API


Friday, 16 November 2018

Correcting the CL symbol in mirrored Revit links

The automatic 'Centreline' capability on Revit dimensions can be really annoying when they pop up unexpectedly.  But when you actually need them it is very useful to be able to just change a property of the dimension family to make the CL symbol appear.

I have seen people just placing many instances of two little pieces of overlapping text, one being C, the other L - all because they didn't know about this feature.  That is criminal!  And its a nightmare when dimensions need to be adjusted.

Mirrored Centreline Dimension Symbols

What happens when you mirror the elements and dimension?  In most situations, Revit handles it perfectly well, because the CL is a symbol family, and Revit automatically corrects the symbol orientation.  However, there is one situation where it does not work:
  • If the dimension is in a linked Revit file that has been mirrored - normally you would not see the annotation in the linked file, but if you set the view properties for that link to be 'By Linked View', then the dimensions in the mirrored linked file become visible.

  • In this situation, the symbol may not be displayed correctly, depending on how the symbol family was created:
CL symbol in Mirrored Link
  • The OOTB centreline family is actually made up of arcs and lines (not text) - this symbol does not display properly in mirrored linked files.
I was recently asked to solve this problem, so I searched high and low for settings in the dimension and in the symbol family that might solve this.  I found nothing.
  • Next I tried converting the symbol from lines to actual text in the family - I'm not sure why it was originally done as lines anyway?
  • This needs to be made up of two pieces of overlapping text - in the symbol family, not the project file.
  • In this example I made the text using a font that was clearly not lines - 'Algerian' was the first suitable windows font that I found, to make the demo clear.

  • In the original file it looks fine, as expected.
  • Once I looked at it as a mirrored linked file, another problem showed up:
  • Each letter was displayed correctly, but displaced sideways

  • Aha, it must be the text justification, I thought.
 
  • But no, that made no difference whatsoever when I tried centre, left or right Horizontal Align.  Revit is just mirroring each piece of text around the symbol centreline, then flipping the text back again around its own axis.

Weird Workaround

So what was the solution?
  • Edit the text in the symbol family - Put a space after the C and one before the L.
  • Shift the letters accordingly. 

  • It wasn't perfect to start with, so I had to shift the text around a bit, or add a second space after the L


Weird behaviour in Revit requires weird thinking workarounds!

Monday, 1 December 2014

Best Tall Building in the World Documented on Revit

One Central Park in Sydney recently won the "Best Tall Building Worldwide (2014)", awarded by the Council on Tall Buildings and Urban Habitat (Chicago).

Designed by Ateliers Jean Nouvel, in association with PTW Architects in Sydney.  All the architectural documentation was done by PTW using Revit in Sydney.  This was an extremely complicated Revit model to work on, partly because no two floor plans were identical.  The building consists of a six storey mixed-use podium with a partially underground retail level and several levels of basement parking; and two towers of different heights.  The lower tower has an array of heliostat mirrors mounted on top - these track the sun and bounce its rays up to the underside of a massive cantilevered roof garden;  the cantilever supports another series of mirrors, which reflect the sun back down into the public garden behind the building, and also into the shopping atrium in the podium.

Array of mirrors cantilevered from the upper tower
Cantilevered mirrors viewed from inside the podium atrium
A series of fixed green walls are located in varied positions and heights around the building;  the residential zones also have planter boxes which are arranged in a pattern that repeats every three floors.  The combination of the repeating pattern and the varied height green walls gives an overall irregular look to the building;  it also means that no two floors are exactly the same - an unusal feat on a building of this size.
Green planters on the balconies
The cantilever structure not only supports the mirrors but also a roof garden for the penthouse apartments.  From this roof garden is visible another building successfully documented on Revit by PTW Architects:  the Channel 7 studios and offices at the Australian Technology Park - visible through the glazed railing.

View of Channel 7 headquarters from the cantilevered roof garden
The roof garden is linked to the penthouse floors by a red-glazed bridge, which is not for the faint-hearted to walk through.

Link bridge to cantilevered roof garden - with red glazing
The documentation was started in Revit v2009 and completed in version 2011, on computers that only had about 8 to 12Gb RAM, so they really struggled with the large file sizes.  The size of the project and the differing floor heights of the towers meant that it was modelled in a series of linked Revit files - with all its attendant problems of linked views and tagging elements in linked files.  Worksets were an invaluable tool for handling all the different links on computers with limited RAM.

We also used RTV Tools "Drawing Manager" to handle Revision control and the complex sheet numbering system required by the building contractors.  It was invaluable for handling revisions across sheets on multiple linked files; and for batch generating PDFs and DWGs with the appropriate file names for uploading to Aconex.

Although this project was basically done as "Lonely BIM", there was some collaboration - particularly with the steel fabricators.  This project was a successful testing ground for how to handle such a large and complex project in Revit.  Many people worked on the project over the years, and are now applying that gained knowledge in different locations and on varied projects in Sydney and around the world.