
Copy View Contents
If you want to copy a 3D view or any model view for that matter, I have previously described how to do it here. But supposing you want to copy the contents of that view too?What you need to do is to save out the view as a Revit project, then insert it into the project that you want to copy it to.
You might try to use the official Revit command for saving a view - its in the Revit menu

- It is really, really slow to open the cascading menus
- You have to be very dextrous and patient to get at the command - first click on 'Save As', then wait about half an hour, oh, I mean second; then click on (or hover over) library; wait again; then move the mouse in the opposite direction to the little arrow pointing to the right, and choose 'View'


- At the top of the Save As menu it claims that this can be used to save out ANY view.

- Well, it simply is not true: it does not seem to like saving 3D views. And the list of model views can be very limited - it only a few model views are listed

- Eventually I figured out that it only list orthographic views with annotation on them

- And it still won't allow you to save out a 3D view even if you lock it and annotate it. Very frustrating!
- And it won't list a dependent view either, even if annotated
- Oh, I forgot to mention that the 'View' part of Save As will be greyed out if you try to access it in the middle of doing something else. First you have to cancel that command, then try again.
- During beta testing of the new ribbon back in v2010, we all told Autodesk how bad this part of the menu was, but it has never been fixed 7 years later.
- Why would you bother to use this method, when there is a much quicker way? Its your choice:
Shortcut
1. Why not try the right-click menu in the project browser instead?- If you right-click on a plan view or an elevation/section, it will give you an option to 'Save View'
- But, only if the view is annotated, otherwise it will be greyed out
- A 3D view will also be greyed out

- BUT, right-click on a sheet, and the 'Save to New File' option will be available.
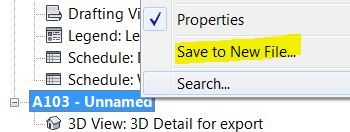
- So, all you need to do is place a 3D view onto a blank sheet, and it will let you save it out as a new Revit project file. This will be a very lean file with only elements visible in the 3D view, plus anything hosted in the elements - like doors and windows (even if not visible); curiously it also takes Revit linked files with it, even if they are not visible in the view (another Revit glitch)
3. Then go to the other project that you want to copy the view and elements to
4. Paste the view/camera into the project
5. A separate operation is required to import the elements in the view: you need to insert the elements as a group, by one of two methods
a). Load as Group
- From the Insert tab on the ribbon, 'Load as Group'

- Locate the file that you previously saved out. Revit will default to looking for a project file (RVT), even though it can also load a 'Group' file

- When loading a Group, it will not give you an option to place it in a specific location so you would need to place it then move as appropriate
b). Insert Revit Link
- Link the Revit file using Origin to Origin, or whichever means you need to get the precise location
- Select the linked file, and you get an option to 'Bind Link'

- This will convert the link to a group
- Then you can ungroup it to achieve the same status as in the original project

As I said, it is a little laborious but it should do the job.
Postscript
Michael Dunn has pointed out that this method transfers more hidden objects than I thought - not only does it export Revit links that are not visible in the export view (as I stated above), but it also exports hidden phases. There could be other hidden elements exported when you 'Save As', so you'd best check the exported file before importing it to another project.Links for Copying Sheets & Views
Copying views between Revit projectsCopying Sheets between Projects
Duplicating Views with Linework Overrides (within projects)
Thanks Tim.
ReplyDeleteI believe you also lose the phasing properties of elements if you save out the 3D view in the method you've described which can be a little painful (everything ends up on New Construction in the saved out view file).
Could you overcome the phasing issue by using two (or more) 3d views (1 per phase)
ReplyDeleteRoan - that's a possibility although you'd have to first isolate the elements in the view to export by phase and then hide them in view before exporting as Revit ignores the phase filter so, for example, if your phase filter was set to "Show New" it would still export all the existing elements unless they have been explicitly hidden in view.
ReplyDeleteYep, that's what I was thinking.
DeleteMichael,
ReplyDeleteWould it work if you select the elements to save out, group them, then save out the group instead of a view? Not forgetting to ungroup and then purge the group afterwards.