BILT Speaker

BILT Speaker
RevitCat - Revit Consultant
Showing posts with label value. Show all posts

Friday, 14 April 2023

Zoom in Family Types Dialog Box

Today I watched episode 99 of BIM After Dark, hosted by the Revit Kid.  The guest presenter was  Nicolas Catellier (Revit Pure), showing Advanced Revit Family Concepts.  However much you might think you know about Revit, there is always something new to learn.  

One tip that I picked up was the ability to zoom in the Family Types dialog box - this can be useful when you are editing families on a high resolution screen and the text is tiny.   Editing a complex formula is painful enough in Revit without having to squint to count the brackets at the end of a formula.

Family Editor Zoom

Just click in the Family Types dialog box, hold down the Ctrl key and use the mouse scroll wheel to zoom in or out.


There is one problem with doing this:  it plays havoc with the column widths.

  • The Lock column will most likely no longer fit in the dialog box 
  • A horizontal scroll bar may appear at the bottom of the dialog box

  • If you click in one of the formulas, it tries to display the whole formula column - which is logical
  • It also shifts everything to the left so it can display the Lock column - this is illogical and intensely irritating as you can no longer see the values.
  • You need to scroll left again to see the values

To resolve this you need to make the Formula column a bit narrower, and the Lock column much narrower (width of the checkbox).

It is not immediately obvious how to adjust the Lock column width:

  • Drag (to the left) the right-hand vertical line on the Lock column header - it seems like nothing is happening, but keep dragging it left until you align with the checkbox.

  • Drag the left-hand vertical line on the Lock column header to the right, until just before the right-hand line disappears.
  • You may need to make the Formula column narrower again until the horizontal scroll bar disappears from the bottom of the dialog box - but once you have minimised the Lock column width it should be easier to do that.


For a more detailed explanation of this workaround trick, refer to my blog post of a couple of years ago:

 Family Types Dialog Column Widths

 Thanks again to Jeff and Nicolas for the BIM After Dark presentation.


Tuesday, 15 June 2021

Family Types Dialog Column Widths in Revit

Does anyone find trying to control the column width in the Family Types dialog box annoying?

The "Lock" column in particular, has been driving me mad for the last 16 years!

About 7 or 8 years ago (?), Autodesk made a partial improvement to that dialog box: 

  • Revit remembers the size of the dialog box when you open or close the dialog - previous to that it always reset to a small default size & layout.  
  • However, it still behaves in an unpredictable way, which is intensely irritating.

I just discovered a trick that helps to get around the problem - so I spent a while analysing exactly what is going on:

Family Types Dialog Box Size Behaviour

  • When you close the Family Types dialog, and subsequently reopen it, Revit remembers the overall size and location of the dialog box.
 
  • This also happens between sessions:  When you close Revit, the next time you start Revit, it remembers the size and location of the dialog box.


Family Types Dialog Column Widths Behaviour

If you adjust the column widths in the dialog box:

  • When you close the Family Types dialog, and subsequently reopen it, Revit remembers the widths of the columns in the dialog box (even if you are editing a different family).
  • Not so between sessions:  When you close Revit, the next time you start Revit, it RESETS the widths of the columns in the dialog box to defaults below (albeit within saved overall width).

Default Column Widths:

    • Parameter = 26%
    • Value = 22%
    • Formula = 40%
    • Lock = 12%

Adjusting Column Widths

If you adjust the column widths, it follows strange and annoying rules:

  • Adjust between Parameter/Value:  It changes Parameter and Lock Column widths
    • This is not helpful as the lock column is wasted space!

  • Adjust between Value/Formula:  It changes Value and Lock Column widths
    • Even less helpful as the Lock column gets enormous

  • Adjust between Formula/Lock:  It changes Formula and Lock Column widths

When adjusting Formula/Lock columns, be careful:

  • If the right-hand "Lock" column vertical line disappears, it means the Lock column no longer fits in the overall width - this will cause much irritation (see below)
  • This makes a horizontal scroll bar appear at the base of the dialog box - yuk!
  • If you subsequently put the cursor anywhere in the "Value" column, as soon as you type a value and press enter, your dialog box may do a "crazy leprechaun dance"*
    • The focus moves into the Formula Column
    • In its infinite wisdom (/stupidity), Revit wants to display the column to the right in full - so it moves to show the whole of the Lock Column
    • You will probably no longer be able to see the Parameter name and/or Value

[*NB. this is what the first iteration of the ribbon menus in Revit 2010 was referred to as doing]

NB. This does not always happen - I think it depends on the overall dialog box width and the Lock Column width


Clever Trick

I only discovered this a couple of days ago:

  • Adjust the Formula/Lock column widths as close as you can to desired

  • Select the right-hand vertical line of the Lock column, drag it to the left until the cursor aligns with check-box
    • Nothing appears to happen
    • However, in its mind, Revit is actually making the column width smaller (it just doesn't show the change)

  • Adjust the Formula/Lock column widths again - to the right
    • it lets you get the Lock column width much smaller (without losing the right-hand line)
  • You can make the Lock column tiny - check-boxes will shrink

Once you have made the Lock column very small - it remains proportionally small when you increase the dialog box size - which is really useful.

Workaround to Avoid the Problem

If you always follow these rules, you are less likely to have a problem:

1.  Adjust your dialog box size to exactly what you will need for the entire Revit session - so if you are working with formulas a lot, then allow for a large width

2.  Adjust the column widths in this order:

  • Parameter/Value  <

  • Value/Formula  <
  • Formula/Lock (keep the right-hand line visible) - move to the right  >
  • Right-hand side of Lock column - move it to the left  <
  • Formula/Lock again - move to the right  >


3.  Make sure you never have the horizontal scroll bar visible 

  • If you ever adjust the Parameter or Value column widths, check the right-hand side of the lock column title - make sure it is visible (and no scroll bar).


Conclusion

If anyone tells me that they have known about this for years, I'd like to know why they never informed me before!


If you would like Autodesk to fix this problem, please go to Revit Ideas and vote for the wishlist item that Dave Plumb recently posted.


Monday, 5 August 2019

Using Count Parameter in Revit Schedule Formulas

Anyone who has tried to master Revit Schedules would have encountered all kinds of limitations.  One of those is the limitations on which parameter types can be used in a calculation:

These parameter types can be used in formulas:
  • Number
  • Integer
  • Length
  • Area
  • Volume
  • Angle
  • Yes/No
  •  <Family Type..>
  • etc
They are all basically a number or a choice between items that have a number hidden behind them (Y/N  or <Family Type..>

The following parameter types cannot be used in formulas:
  • Text
  • URL
  • etc
They are some kind of text, which is all too hard for Revit to cope with (poor little Revit).

There is another kind of schedule parameter, which is not listed above (because it is a system parameter that you cannot choose from a list of types): 

        "Count", which is just a number (always = 1 for each item).


However, if you try to use this in a schedule formula, Revit gets very uppity and says you cannot.


This is unprecedented in Revit - a message that actually explains why it can't do what you want!
  • In case its not obvious what this means, it is referring to when you uncheck "Itemise every instance" under the Sorting/Grouping tab.

However, it is quite likely that you do actually want to perform a calculation on the combined result when multiple elements appear on the same row.  If not that, you may want to calculate per item and then total up the results of your calculation.  Here is my workaround:

Count Dracula Formulas

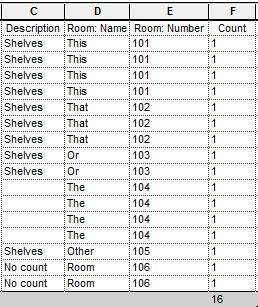
In your schedule, you can create your own "Count" parameter:
         a Calculated Value with a formula = 1

You could call it "Dracula", but that might confuse everyone later, so its better to use something more prosaic like "MyCount"
MyCount formatted to No Calculation

Don't forget to format your Count Dracula parameter to 'Calculate Totals' otherwise it will list only 1 even for multiple elements per row (as above).
MyCount formatted to Calculate Totals

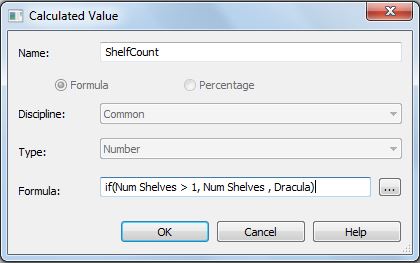
Once you have 'MyCount' working, you can include it in a formula:
  • You may have a numeric parameter - say 'Num Shelves', which represents the number of shelves in a unit.
  • This can be multiplied by your Count parameter in a new 'ShelfCount' calculated value

Revit is quite happy to include "Dracula" or "MyCount" in the formula even though it is doing the same job as the system parameter 'Count'.

The formula could include an if statement:

Or you could put a formula directly into your 'MyCount' parameter

NB  . The last two formulas were somewhat superfluous, but just shown to demonstrate that you can create formulas with your own Count parameter.  For a more realistic example, refer to my previous post on Hiding Zeros in Schedule Formulas

This workaround removes one of Revit's many limitations - the programmers obviously put that one in deliberately to prevent "wrong workflows", but in reality they didn't anticipate all our requirements with schedule formulas. [Yes, my spellchecker doesn't like "formulas", but then I never liked learning Latin, so I'm not changing it!]

For more information about Revit Schedules, refer to this index of Schedule blog posts
 

Thursday, 1 August 2019

Hide Zero Values in Revit Schedules

Revit likes to show a '0' or '0.00' in a schedule when the value is either zero or blank (sometimes).  This is not always desirable - in some situations you may actually want the schedule to show nothing when the value is zero.

There is a way to do this, although it is not in the units or display settings . . . . .

Blank Value Workaround

Let's suppose you have a 'Numeric value' field that is displaying zero values
  • The first thing to do in your schedule is to create a new Calculated field called 'Blank' (for example) - make it a Number type (if that is what your desired type is)
  • Do not put anything in the formula

  • Create another Calculated Value field - in this example I've called it 'Hides Zeros', but it can be whatever you want the title to display in your schedule
  •  This time give it a formula something like:
    if(Numeric value > 0, Numeric value, Blank)
  • This will hide all zero and negative values


  • If you want to display negative values and only hide the zero values, change the > in the formula to =:
    if(Numeric value = 0, Blank, Numeric value)

  • The next step is to hide the intermediate calculation columns:
  • Go to the Formatting tab and make the 'Numeric value' and Blank' columns hidden


Multiple Elements Per Row

What happens when you have a schedule that displays multiple elements per row, when you have unticked the grouping setting 'Itemise every instance'?
The zeros may return!
In which case refer to this post on Zero values in multiple elements per row Schedules