BILT Speaker

BILT Speaker
RevitCat - Revit Consultant
Showing posts with label calculate. Show all posts

Monday, 19 August 2019

PS - Update on Hide Zeros in Revit Schedules

Following on from my previous post about Hide Zeros in Multi-Element per Row Schedule, here is a simplified version of the schedule formulas - as noted in a comment by Kovyljan.

. . . . . When using the percentage formula, we can cut out one calculation field by changing which field the percentage is taken from:
"Schedule Count" instead of "MyCount" - since both of them have a value of 1 (or 0/Blank) when the schedule is expanded.

  • The 'MyCount' formula can then be changed to take on the role that 'MyCountTotal' had in my previous version:
    if(Schedule Count / MyPerc = 0, Blank, Schedule Count / MyPerc)

  • Make sure that 'MyCount' is formatted to not calculate totals - otherwise you'll get totals of totals per room.
 

  • Hide the 'Schedule Count',  'Blank' and 'Count' columns (Count is only required for checking anyway)
  • Rename 'MyCount' to whatever you need.

For more detail on this technique, refer to Hide Zeros in Multi-Element per Row Schedule
and Using Count Parameter in Schedule Formulas

Friday, 9 August 2019

Hide Zero Values in Multiple Item Rows in Revit Schedules

Hide zero values in schedules (Previous post)


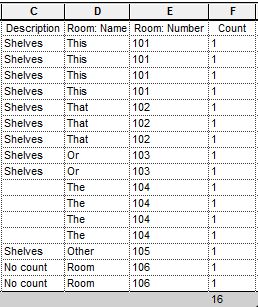
Following on from a previous post about how to Hide Zero Values in Revit Schedules, I have noticed that it does not work when you untick 'Itemise each Instance' (Multiple items per row) and you set the formatting to calculate totals - the zero returns.

Calculate Totals - Zeros shown
In the example above, you probably would want to show the zeros when calculating totals of different numbers - but there are situations where you legitimately do not want to show the zero.  Here follows an example, and yet another workaround to solve that problem.

Example of Workflow

A situation where you may not want to show the zeros might be when the field is a count of items.  As demonstrated in my previous "Count Dracula" post, it is not possible to include the system parameter 'Count' in a Schedule formula; nor is it possible to make a 'Count' value of zero - the workaround to that problem is to create your own 'MyCount' parameter, as described previously.

In this example,  items are to be listed in a schedule with consecutive room numbers - at this stage some of the rooms do not yet have any real items placed in them.  The schedule needs to show all the room numbers, even when not yet furnished.   In order for the rooms to appear in the schedule, a dummy item has to be placed in the room, but we do not want it to be formally counted.
This is where a 'MyCount' parameter is useful, as the dummy items can be forced to schedule with a count of zero.
  • First a 'Schedule Count' parameter has to be created for the nominated categories
  • Set the value to 1 for all items to be counted
  • Set the value to zero for those not to be counted
  • [NB. This could be a Y/N parameter, but that has complications - to be dealt with in another blog post]
  • If it does not yet exist, create a 'Blank' calculated value, with no formula
    (Refer to Hide Zeros)
  • Then create a 'MyCount'  calculated value (Number or Integer)
  • It can be given a formula of:
    if(Schedule Count' = 0, Blank, Schedule Count)

  • The schedule should list a 1 MyCount value for each item to schedule, and nothing for those Spare (dummy) items.

  • Group the schedule by Room Number (no footers)
 
  • Untick "Itemise every Instance"
  • Notice that the MyCount total values are not totalling up
  • Format 'MyCount' to calculate totals
  •  Untick "Itemise every Instance"
  • Aaaargh!   The zeros are back

Workaround

In order to get the number of items in each room to total, you have to add a couple more calculated values - this is where it starts getting crazy!
  • Add another Calculated Value 'MyPerc' or 'MyPercentage'
  • Make it a Percentage (not a formula)
  • Select the field 'MyCount' of which it is to show a percentage
  • Select the Grouping title - 'Room Number' (rather than Grand Total) - so it only calculates a percentage of that Room sub-total

  • Add another calculated value, with a formula:
    if(MyCount/MyPerc = 0, Blank, MyCount/MyPerc)

  • This will show the total count per Grouping (Room) in each row - which looks a bit crazy when each row is listed separately

  • Untick 'Itemise every instance' and it looks better - and without the zeros
  • Do not Calculate Totals for these two calculated values, otherwise it gives wrong totals

  • Hide the intermediate calculated values, and rename the 'MyCountTotal' as desired

Now, if you actually want to show Grand Totals for the Item Count, that is another story . . . .
  • You would probably need to create another schedule that shows 'MyCount' (which gives the correct total), but collapse it down to one row (no sorting/grouping; no grant total) - and align it on a sheet with the column for MyCountTotal.
  • That would also enable you to have bold text for the total
  • However, I am not going to try that here - you are on your own.
[Edit.  A comment from Kovyljan has pointed out that the last method above can be simplified by making the percentage calculate on 'Schedule Count' instead of MyCount - refer to ps Update on Hide Zeros ]

For more information on this technique, refer to an earlier post on using Totals in Formulas *
For more information on creating your own Count parameter

* Thanks to Martijn de Riet of BIMForce who initially posted on his blog a similar solution to another scheduling problem in Revit

Monday, 5 August 2019

Using Count Parameter in Revit Schedule Formulas

Anyone who has tried to master Revit Schedules would have encountered all kinds of limitations.  One of those is the limitations on which parameter types can be used in a calculation:

These parameter types can be used in formulas:
  • Number
  • Integer
  • Length
  • Area
  • Volume
  • Angle
  • Yes/No
  •  <Family Type..>
  • etc
They are all basically a number or a choice between items that have a number hidden behind them (Y/N  or <Family Type..>

The following parameter types cannot be used in formulas:
  • Text
  • URL
  • etc
They are some kind of text, which is all too hard for Revit to cope with (poor little Revit).

There is another kind of schedule parameter, which is not listed above (because it is a system parameter that you cannot choose from a list of types): 

        "Count", which is just a number (always = 1 for each item).


However, if you try to use this in a schedule formula, Revit gets very uppity and says you cannot.


This is unprecedented in Revit - a message that actually explains why it can't do what you want!
  • In case its not obvious what this means, it is referring to when you uncheck "Itemise every instance" under the Sorting/Grouping tab.

However, it is quite likely that you do actually want to perform a calculation on the combined result when multiple elements appear on the same row.  If not that, you may want to calculate per item and then total up the results of your calculation.  Here is my workaround:

Count Dracula Formulas

In your schedule, you can create your own "Count" parameter:
         a Calculated Value with a formula = 1

You could call it "Dracula", but that might confuse everyone later, so its better to use something more prosaic like "MyCount"
MyCount formatted to No Calculation

Don't forget to format your Count Dracula parameter to 'Calculate Totals' otherwise it will list only 1 even for multiple elements per row (as above).
MyCount formatted to Calculate Totals

Once you have 'MyCount' working, you can include it in a formula:
  • You may have a numeric parameter - say 'Num Shelves', which represents the number of shelves in a unit.
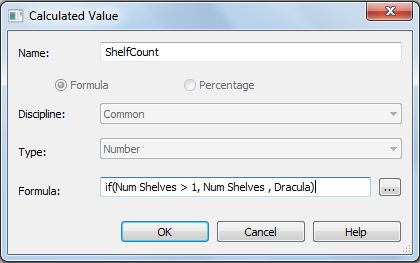
  • This can be multiplied by your Count parameter in a new 'ShelfCount' calculated value

Revit is quite happy to include "Dracula" or "MyCount" in the formula even though it is doing the same job as the system parameter 'Count'.

The formula could include an if statement:

Or you could put a formula directly into your 'MyCount' parameter

NB  . The last two formulas were somewhat superfluous, but just shown to demonstrate that you can create formulas with your own Count parameter.  For a more realistic example, refer to my previous post on Hiding Zeros in Schedule Formulas

This workaround removes one of Revit's many limitations - the programmers obviously put that one in deliberately to prevent "wrong workflows", but in reality they didn't anticipate all our requirements with schedule formulas. [Yes, my spellchecker doesn't like "formulas", but then I never liked learning Latin, so I'm not changing it!]

For more information about Revit Schedules, refer to this index of Schedule blog posts
 

Thursday, 1 August 2019

Hide Zero Values in Revit Schedules

Revit likes to show a '0' or '0.00' in a schedule when the value is either zero or blank (sometimes).  This is not always desirable - in some situations you may actually want the schedule to show nothing when the value is zero.

There is a way to do this, although it is not in the units or display settings . . . . .

Blank Value Workaround

Let's suppose you have a 'Numeric value' field that is displaying zero values
  • The first thing to do in your schedule is to create a new Calculated field called 'Blank' (for example) - make it a Number type (if that is what your desired type is)
  • Do not put anything in the formula

  • Create another Calculated Value field - in this example I've called it 'Hides Zeros', but it can be whatever you want the title to display in your schedule
  •  This time give it a formula something like:
    if(Numeric value > 0, Numeric value, Blank)
  • This will hide all zero and negative values


  • If you want to display negative values and only hide the zero values, change the > in the formula to =:
    if(Numeric value = 0, Blank, Numeric value)

  • The next step is to hide the intermediate calculation columns:
  • Go to the Formatting tab and make the 'Numeric value' and Blank' columns hidden


Multiple Elements Per Row

What happens when you have a schedule that displays multiple elements per row, when you have unticked the grouping setting 'Itemise every instance'?
The zeros may return!
In which case refer to this post on Zero values in multiple elements per row Schedules

Sunday, 12 November 2017

Scheduling Wall Heights in Revit

One of the new features in Revit 2015 was the ability to schedule wall heights - well, sort of.  More Wall parameters could be scheduled than previously:

  • Base Constraint
  • Base Offset
  • Top Constraint
  • Top Offset
  • Unconnected Height
What was not included in this list was "Top is Attached" or "Base is Attached". 
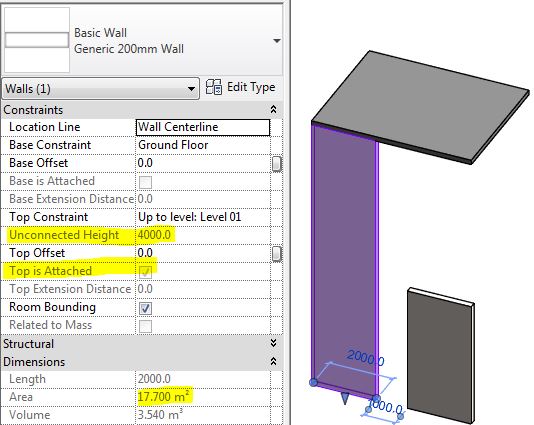
This is really worrying because it means that when a wall is attached at top or bottom, the "Unconnected Height" is almost certainly going to be displaying a false value in the properties dialog box, and in the schedule.  

Unattached wall with correct Unconnected Height property

Attached wall top with wrong Unconnected Height property
In the properties dialog you can see those "Attached" checkboxes so it might alert you to the issue, but that does not help in a schedule, as you cannot display those properties there.

This also occurs when a wall has been attached to a gable end roof (or any angled roof)


Edit Wall Profile

The same problem could also happen if a wall has had its profile edited - again the wall heights could be scheduling false values. 

This is not so simple to pick, as there is no property for "Profile is edited" - however, Revit knows if it has been edited or not because it displays a "Reset Profile" icon in the ribbon if a selected wall has had its profile edited .

 Schedules


Basically, when you schedule wall heights using the 'Unconnected Height' property, it could be a pack of lies!  If we could also schedule the "Attached" properties of a wall, then we could use the schedule to identify attached walls, and perhaps use conditional formatting to highlight possible false height values.


One alternative solution is to create a calculated value of Length x Unconnected Height to get the supposed area;  this can be compared to the actual reported area (built-in property).  If they are different then you know that the wall has been either attached or had its profile edited - therefore the 'Unconnected Height' property is unreliable.


You could take this a step further by adding a comparison calculation

You could then do some conditional formatting to make any dodgy wall heights easily apparent


One other thing you could do is reverese engineer the height by adding a calculated Average Height - This would only be accurate for rectangular walls, as those with sloping tops or edited profiles would still not be accurate - hence the use of the word 'Average' in the calculation name.  I would use this solution with caution - perhaps only where walls have accidentally been attached to floors above.


Attach Walls to Edited Floor Sketches?


One of the reasons that all of this is likely to be an issue for all of you is that when you edit a floor, Revit always asks if you want to attach walls below it.  The default answer is 'Yes', which means that a lot of walls will end up being accidentally attached to floors above - meaning that your wall heights will be wrong in schedules.  Wouldn't it be better if the default answer was 'No' and even better still if this dialog box never, ever appeared.

Please vote for this Revit Idea to encourage Autodesk to do something about this.

Wednesday, 15 February 2017

Tracking Which Area Scheme a Schedule Belongs to in Revit

Typical project browser names
Have you ever opened a Revit project and tried to understand the naming conventions (or lack thereof) for Area Schedules?  And then tried to figure out which Area Schedule belongs to which Area Scheme?  It can be tricky, particularly with names like the ones above, which people seem to like using.

When you create a new Area Schedule, it puts the Area Scheme in brackets at the end of the schedule name.  Many people rename it and remove that suffix because it shows up on the sheet, or they just don't realise how important it is for identifying the Area Scheme it belongs to.

Unless people leave the Area Scheme in the schedule name it is difficult to keep track of which is which - the only trick that I know is to use the 'Highlight in Model' function, which sometimes works:
To use this, first select an element in a particular area schedule, then click on the 'Highlight' icon.  If you happen to have an area plan view open that shows the area element then Revit will go to that view and select the Area.  You then need to deselect the Area to get to the View Properties for that view (or use the drop-down menu just below the Type Selector).  It should show you the Area Scheme name in the Type Selector

If you don't have that view open, Revit may figure out which view to open but usually it asks to search for a suitable view, which may take some time - it is probably worth a try. 
 

However, you may actually not have a view of that particular level for that particular area scheme, so Revit won't find a view.   Or the area may be unplaced so it won't show on a view, in which case the Highlight function is greyed out.  

To really track down the area schemes for troublesome areas/schedules, you may need to create the missing views for every level for every area scheme - then try the Highlight in Model function again.

If anyone knows a better way, please let me know.

Area Schemes

Prevention is better than cure:
Area Scheme names and descriptions are things that people are often very casual about - and it soon gets very messy.  In many cases, people just leave the default description, which is pretty meaningless.
Badly named and described Area Schemes
The first step in solving this issue is to train people to not only name the Area Schemes sensibly, but to give them a proper description so that others have at least some clue what they are for

Slightly improved Area Scheme naming and descriptions
 OK, so the example above is not a serious system, but you get the idea, I hope.

Area Schemes in Schedule (Workaround)

Since it is not always feasible to keep the area scheme in the name of the schedule, here is a workaround that might help you out:

  • Whenever a new Area Schedule is created, add a calculated parameter
  • Call it 'Area Scheme' 
  • Make it a text calculation
  • For the formula, put the Area Scheme name in quotes
  • In the schedule it will display the Scheme name in every row, even for elements in linked files
 
  • You can hide this column, but it remains there so you can check the scheme name later on
Of course this method is not foolproof as someone could rename the Area Scheme at any time - but it should work in the majority of case.

If anyone knows a better way, please tell me.

[Edit] - As Dmitry Chubrik has pointed out in the comments, here is a good technique for changing the Area Schedule titles: 

Renaming Area Schedule Titles

As it is strongly advisable to keep the Area Scheme name in brackets within the schedule name, there is a way to do that without it showing up in the schedule title that appears on the sheet.  If you want change the title, do not rename the schedule in the Project Browser;  also, do not just edit the text in the schedule title cell, as this will rename the schedule too.
Instead, you should click in the schedule title cell, then click on the "Clear Cell" icon that appears in the ribbon - this literally removes all text from the title cell.  You can then type in new text, which will not have the effect of renaming the schedule in the Project Browser.

Once the link has been broken between schedule title and schedule name, the title can be changed just by editing the text in the title cell.

Using this method you can keep the Area Scheme name in the Project Browser for multiple schedules of the same Area Scheme - and keep track of which is which.  It would be good practice to teach all Revit users to do this as a matter of course.

Thanks for the tip, Dmitry