BILT Speaker

BILT Speaker
RevitCat - Revit Consultant
Showing posts with label title. Show all posts

Wednesday, 15 February 2017

Tracking Which Area Scheme a Schedule Belongs to in Revit

Typical project browser names
Have you ever opened a Revit project and tried to understand the naming conventions (or lack thereof) for Area Schedules?  And then tried to figure out which Area Schedule belongs to which Area Scheme?  It can be tricky, particularly with names like the ones above, which people seem to like using.

When you create a new Area Schedule, it puts the Area Scheme in brackets at the end of the schedule name.  Many people rename it and remove that suffix because it shows up on the sheet, or they just don't realise how important it is for identifying the Area Scheme it belongs to.

Unless people leave the Area Scheme in the schedule name it is difficult to keep track of which is which - the only trick that I know is to use the 'Highlight in Model' function, which sometimes works:
To use this, first select an element in a particular area schedule, then click on the 'Highlight' icon.  If you happen to have an area plan view open that shows the area element then Revit will go to that view and select the Area.  You then need to deselect the Area to get to the View Properties for that view (or use the drop-down menu just below the Type Selector).  It should show you the Area Scheme name in the Type Selector

If you don't have that view open, Revit may figure out which view to open but usually it asks to search for a suitable view, which may take some time - it is probably worth a try. 
 

However, you may actually not have a view of that particular level for that particular area scheme, so Revit won't find a view.   Or the area may be unplaced so it won't show on a view, in which case the Highlight function is greyed out.  

To really track down the area schemes for troublesome areas/schedules, you may need to create the missing views for every level for every area scheme - then try the Highlight in Model function again.

If anyone knows a better way, please let me know.

Area Schemes

Prevention is better than cure:
Area Scheme names and descriptions are things that people are often very casual about - and it soon gets very messy.  In many cases, people just leave the default description, which is pretty meaningless.
Badly named and described Area Schemes
The first step in solving this issue is to train people to not only name the Area Schemes sensibly, but to give them a proper description so that others have at least some clue what they are for

Slightly improved Area Scheme naming and descriptions
 OK, so the example above is not a serious system, but you get the idea, I hope.

Area Schemes in Schedule (Workaround)

Since it is not always feasible to keep the area scheme in the name of the schedule, here is a workaround that might help you out:

  • Whenever a new Area Schedule is created, add a calculated parameter
  • Call it 'Area Scheme' 
  • Make it a text calculation
  • For the formula, put the Area Scheme name in quotes
  • In the schedule it will display the Scheme name in every row, even for elements in linked files
 
  • You can hide this column, but it remains there so you can check the scheme name later on
Of course this method is not foolproof as someone could rename the Area Scheme at any time - but it should work in the majority of case.

If anyone knows a better way, please tell me.

[Edit] - As Dmitry Chubrik has pointed out in the comments, here is a good technique for changing the Area Schedule titles: 

Renaming Area Schedule Titles

As it is strongly advisable to keep the Area Scheme name in brackets within the schedule name, there is a way to do that without it showing up in the schedule title that appears on the sheet.  If you want change the title, do not rename the schedule in the Project Browser;  also, do not just edit the text in the schedule title cell, as this will rename the schedule too.
Instead, you should click in the schedule title cell, then click on the "Clear Cell" icon that appears in the ribbon - this literally removes all text from the title cell.  You can then type in new text, which will not have the effect of renaming the schedule in the Project Browser.

Once the link has been broken between schedule title and schedule name, the title can be changed just by editing the text in the title cell.

Using this method you can keep the Area Scheme name in the Project Browser for multiple schedules of the same Area Scheme - and keep track of which is which.  It would be good practice to teach all Revit users to do this as a matter of course.

Thanks for the tip, Dmitry

Thursday, 12 January 2017

Underline Revit Schedule Headings

I was recently asked if it is possible to just underline the Revit schedule column titles without having all the lines/boxes below.  At first I thought it was not possible, so I figured out a crazy workaround.  As I was checking the workflow for documenting it on this blog I discovered something I didn't know (or at least had forgotten but once knew), which made the solution quite easy.  I have always found that preparing conference presentations is a great way of learning a subject thoroughly - instead of thinking that you know it all.  It seems that writing a blog has the same benefit.

I decided to document the workaround here anyway because someone might learn something in the process, or be able to use it for some other purpose.  If you just want to know the best solution, skip to 'The Correct Workflow'

Underline Workaround Method

When you first place a schedule on a sheet, you get some pretty uninspiring looking graphics - all boxed in, with the heading text centre justified and the body text left justified.
Default schedule appearance
If you look at the schedule 'Appearance' properties, the default settings show Grid lines on, Outlines off.  Depending on your project template, you may have the same text type for all three aspects of the schedule text - in which case it is wise to create separate text types for title, header and body text, making sure they are named clearly.
Default schedule appearance settings
 You could try turning on the Outline and hiding the gridlines to see if it underlines the title/header.
Outline on, gridlines off
Unfortunately it does not underline either the title or headers - those settings are very crude, giving us very little control at all.  The end result is a box around the whole schedule.
Outline on, gridlines off
The next thing to try is to switch off the outline box, then underline the header text itself.  You could select the header text in the schedule view, and change its font properties
Selected text font properties
However, it is much better practise to use a specific text type for the header and edit the type properties for it - so you can change them all at once without having to select the text in the schedule cells.
Text type properties
The end result is that individual header text words are underlined, which looks awful - we are trying to get one single line under the whole lot.
Header text underlined
How about using the schedule formatting tools introduced in Revit 2014?
  • First edit the Schedule Header text type to remove the underline.
  • Then highlight all the header cells by dragging the cursor across them - this has to be done in Schedule edit mode, not in sheet view.

Select all the header text cells
  •  Click on the Borders icon on the ribbon.
  • This opens the Edit Borders dialog box
  • Select the linestyle you want the underline to be
  • Click on the border box to the lower left with cells underlined
  • Click OK
  • Assuming that you switched off the 'Gridlines' and 'Outline' checkboxes, you still won't see the borders on the header cells (or any borders at all).
  • Enable the 'Gridlines' checkbox, and you get all the gridlines back again (not just the header underline borders.
  • This was the point at which a gap in my knowledge caught me out, so I devised the crazy workaround.  I thought that you could not control the borders on individual cells in the body of the schedule because the Borders icon was greyed out as soon as you select one or more cells - more on that later.

Crazy Workaround

Don't follow these steps!
  • First I created a white coloured linestyle
  • Then set the linestyle for 'Gridlines' to be the white linestyle
  • For this to work it requires the 'Blank row before data' checkbox to be ticked
White line gridlines plus blank row before data
  • Hey presto - the gridlines are there, but you can't see them as they are white on a white screen (of course it won't work if you changed your background colour).
  • The header cells should be underlined because those cells had a black border

The Correct Workflow

This is how you should do it - so much simpler:
  • Set the gridlines linestyle back to something sensible like 'Thin Lines', making sure that 'Gridlines' is ticked
  • What I didn't realise earlier is that you can modify the border lines on all the cells by selecting the columns at the top of the schedule, by clicking on the letters at the top - just like Excel.  Duh!
  • Select all the columns by running the cursor along the row of letters
Select all columns
  •  Click on the Borders icon on the ribbon
  • Click on the 'None' icon
None borders on all cells
  •  Select the Title cell and set its cell borders to None
  • Select just the header cells
Select all the header text cells
  • Click on the Borders icon on the ribbon
  •  Select the linestyle you want the underline to be
  • Click on the border box to the lower left with cells underlined
Underline border
  • Make sure that 'Blank row before data' is ticked otherwise the Header cell underline borders will not show - this is the useful tip I discovered in my crazy workaround that also applies to this method
Grid in headers/footers/spacers
  • Also untick the 'Grid in headers/footers/spacers' checkbox otherwise you'll get vertical gridlines in the blank row (as above)
Appearance formatting
  • Select each column and change its horizontal alignment as you require
Align columns
  • Finally you should get the desired result
Underlined headers
  • If you want to have some fun you can shade alternate columns.  I don't believe there is a way to shade alternate rows, which is something people do in Excel occasionally.
Alternate columns shaded

The moral of this tale is that we now have two different ways of controlling the gridlines on Revit schedules - they do not work well together.  Basically you can opt not use the old controls unless you want very simple formatting that happens to match the old options (All gridlines or just an outline box).  If you want to use the new border tools then you need to make sure the old gridline checkboxes are set to the default settings (as shown above).

Wednesday, 20 July 2016

More on Parameter Grouping in Revit

Following my earlier post on the sort order of parameter grouping, here is another tip:

Weird sort order of parameter group headings


If you have a lot of calculations going on in a family or in Global Parameters, there is an easy way to make your own titles to the parameter grouping:
Just create a text parameter, that has a name beginning with an underscore - that puts it at the top of  the group;  I have made these ones all Caps to make it really stand out.
You could even add a formula that is just text giving it a description, but I prefer to use a tooltip.


Wednesday, 29 June 2016

Postscript to Parameter Grouping in Revit

Following my earlier post on the sort order of parameter grouping, here is another weird sort order issue:

There is a grouping that exists in the family editor (not in Global Parameters) called "Analytical Properties".  I am not sure if it exists for all categories but it is there for Windows.  However, it is not available for us to use - it does not show in the grouping list when creating a new parameter.  It is populated with some built-in (system) parameters that we cannot change, although the alphabetic sort order does work on the parameters within the group, as does the Move Up/Down function.

There is a small hint of alphabeticality about it though:  it does slot in just below 'Analytical Model', even if above 'Analytical Alignment'.

Wednesday, 22 June 2016

Revit 2017 Global Parameter Grouping Titles

Working with global parameters in v2017 has quite a number of advantages over doing so in Revit 2016 R2.  One of those is the ability to assign global parameters to groupings so that they are segregated in the Global Parameter dialog box under each grouping title - much the same as we can do with parameters in the family editor.
In the family editor this is really important because when you load the family into a project, those groupings are visible in the properties dialog - and the parameters more or less stay where you put them * 
(* there is a bug such that sometimes it does not move them to the desired grouping in a project even if you change them in the family editor and reload).

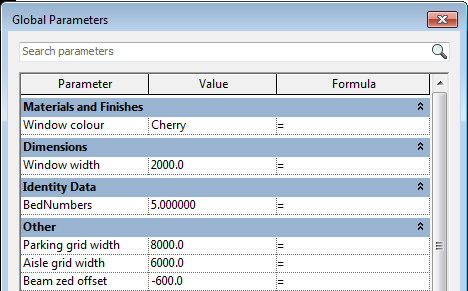
Global Parameter Grouping

With Global Parameters, you only ever see the grouping when you open the dialog box;  when associating properties to Global Parameters you just see an alphabetic list of the appropriate parameter type (Length, text, number etc).  When you have a lot of Global Parameters in a project it is handy to use the grouping to organise your parameters into related items - you may have numerous groups of different parameters doing completely unrelated tasks, and they all get jumbled up, making it hard to track a particular operation or sequence of formulas.

I have taken to using these groupings for purposes unrelated to the actual titles, in much the same way that people often use 'Other' to hide calculations in the family editor because it is always last on the properties dialog box.  You cannot rename the groupings - they are hard-coded into Revit;  nor can you change the order of them.  And what a strange order they are in!

After a while I got fed up with assigning global parameters to a particular grouping and finding them jump way up or down the list in a totally unpredictable way.  Anyone remember the 'jumping lechrechaun' ribbon when it first came out in v2010?  Well it isn't quite that bad, but is annoying.  So I decided to document the order of the grouping titles, so I would have some chance of anticipating the location when assigned to particular groups - and here it is:

And how logical is that? 
  • It isn't alphabetical
  • It isn't discipline related
  • It isn't logical
But what I do know is that Constraints and Construction remain at the top, as the always have;  'Other' remains firmly at the end, which will be comforting to many people.  I find it disturbing that 'Dimensions' is languishing down in 20th spot; and as for 'Rebar Set', how did that muscle its way into third spot?
Visibility is way down near the end, as befits its alphabetic status - much the same as I was always close to last for anything at school, with a 'W' surname.   But Visibility is actually a useful grouping, that I'd like to make more use of (in the family editor too), but since it is at the end, users are unlikely to ever find it.

Oh well, at least I now have this list to help me predict where the parameters will jump to.  I hope it helps other Revit users out there too.