BILT Speaker

BILT Speaker
RevitCat - Revit Consultant
Showing posts with label area. Show all posts

Sunday, 12 November 2017

Scheduling Wall Heights in Revit

One of the new features in Revit 2015 was the ability to schedule wall heights - well, sort of.  More Wall parameters could be scheduled than previously:

  • Base Constraint
  • Base Offset
  • Top Constraint
  • Top Offset
  • Unconnected Height
What was not included in this list was "Top is Attached" or "Base is Attached". 
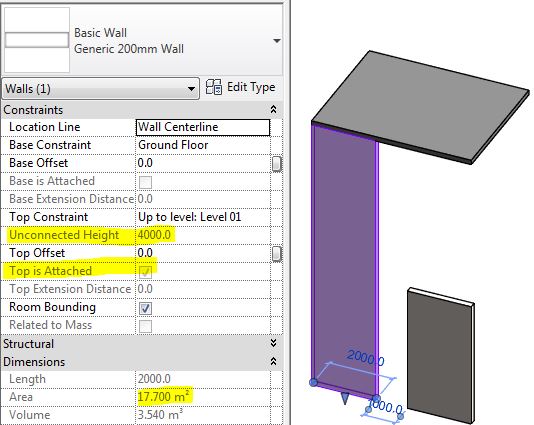
This is really worrying because it means that when a wall is attached at top or bottom, the "Unconnected Height" is almost certainly going to be displaying a false value in the properties dialog box, and in the schedule.  

Unattached wall with correct Unconnected Height property

Attached wall top with wrong Unconnected Height property
In the properties dialog you can see those "Attached" checkboxes so it might alert you to the issue, but that does not help in a schedule, as you cannot display those properties there.

This also occurs when a wall has been attached to a gable end roof (or any angled roof)


Edit Wall Profile

The same problem could also happen if a wall has had its profile edited - again the wall heights could be scheduling false values. 

This is not so simple to pick, as there is no property for "Profile is edited" - however, Revit knows if it has been edited or not because it displays a "Reset Profile" icon in the ribbon if a selected wall has had its profile edited .

 Schedules


Basically, when you schedule wall heights using the 'Unconnected Height' property, it could be a pack of lies!  If we could also schedule the "Attached" properties of a wall, then we could use the schedule to identify attached walls, and perhaps use conditional formatting to highlight possible false height values.


One alternative solution is to create a calculated value of Length x Unconnected Height to get the supposed area;  this can be compared to the actual reported area (built-in property).  If they are different then you know that the wall has been either attached or had its profile edited - therefore the 'Unconnected Height' property is unreliable.


You could take this a step further by adding a comparison calculation

You could then do some conditional formatting to make any dodgy wall heights easily apparent


One other thing you could do is reverese engineer the height by adding a calculated Average Height - This would only be accurate for rectangular walls, as those with sloping tops or edited profiles would still not be accurate - hence the use of the word 'Average' in the calculation name.  I would use this solution with caution - perhaps only where walls have accidentally been attached to floors above.


Attach Walls to Edited Floor Sketches?


One of the reasons that all of this is likely to be an issue for all of you is that when you edit a floor, Revit always asks if you want to attach walls below it.  The default answer is 'Yes', which means that a lot of walls will end up being accidentally attached to floors above - meaning that your wall heights will be wrong in schedules.  Wouldn't it be better if the default answer was 'No' and even better still if this dialog box never, ever appeared.

Please vote for this Revit Idea to encourage Autodesk to do something about this.

Tuesday, 6 June 2017

Global Parameters Enhancement Wishlist - Revit Ideas

All my recent research work on Global Parameters has created a list of enhancement requests.  Although a lot of new global parameter features were released with Revit 2017, we only had one enhancement and one bug fix in v2018:
  • Associate global parameters to Radius and Diameter dimensions (2018)
  • Global parameters vs Equals dimension conflict removed (bugfix 2018)
Here is my list of enhancement requests, plus a few other ideas from other people already on the wishlist - please vote for them if you'd like these to be fixed:


Enable global parameters to associate to Array Numbers

Enable creation of an Area Reporting Parameter for use in Global Parameters

Enable global parameters to associate to Floor ‘Height Offset from Level’ system property

Allow association of global parameters to material properties of system families 

Allow access to Global parameter of linked model

Allow the use of Shared Parameters in Global Parameters

While we are on the subject of shared parameters, I really really wish we could use them in Key Schedules so please vote that up too.

Ability to "Paint" using a Global [material] Parameter

Please note that requests to enable us to associate global parameters to ALL system parameters will probably not get far because each and every one has to be programmed separately, so it is better to create a wishlist item for each parameter that you want access to (frustrating, I know).

Wednesday, 15 February 2017

Tracking Which Area Scheme a Schedule Belongs to in Revit

Typical project browser names
Have you ever opened a Revit project and tried to understand the naming conventions (or lack thereof) for Area Schedules?  And then tried to figure out which Area Schedule belongs to which Area Scheme?  It can be tricky, particularly with names like the ones above, which people seem to like using.

When you create a new Area Schedule, it puts the Area Scheme in brackets at the end of the schedule name.  Many people rename it and remove that suffix because it shows up on the sheet, or they just don't realise how important it is for identifying the Area Scheme it belongs to.

Unless people leave the Area Scheme in the schedule name it is difficult to keep track of which is which - the only trick that I know is to use the 'Highlight in Model' function, which sometimes works:
To use this, first select an element in a particular area schedule, then click on the 'Highlight' icon.  If you happen to have an area plan view open that shows the area element then Revit will go to that view and select the Area.  You then need to deselect the Area to get to the View Properties for that view (or use the drop-down menu just below the Type Selector).  It should show you the Area Scheme name in the Type Selector

If you don't have that view open, Revit may figure out which view to open but usually it asks to search for a suitable view, which may take some time - it is probably worth a try. 
 

However, you may actually not have a view of that particular level for that particular area scheme, so Revit won't find a view.   Or the area may be unplaced so it won't show on a view, in which case the Highlight function is greyed out.  

To really track down the area schemes for troublesome areas/schedules, you may need to create the missing views for every level for every area scheme - then try the Highlight in Model function again.

If anyone knows a better way, please let me know.

Area Schemes

Prevention is better than cure:
Area Scheme names and descriptions are things that people are often very casual about - and it soon gets very messy.  In many cases, people just leave the default description, which is pretty meaningless.
Badly named and described Area Schemes
The first step in solving this issue is to train people to not only name the Area Schemes sensibly, but to give them a proper description so that others have at least some clue what they are for

Slightly improved Area Scheme naming and descriptions
 OK, so the example above is not a serious system, but you get the idea, I hope.

Area Schemes in Schedule (Workaround)

Since it is not always feasible to keep the area scheme in the name of the schedule, here is a workaround that might help you out:

  • Whenever a new Area Schedule is created, add a calculated parameter
  • Call it 'Area Scheme' 
  • Make it a text calculation
  • For the formula, put the Area Scheme name in quotes
  • In the schedule it will display the Scheme name in every row, even for elements in linked files
 
  • You can hide this column, but it remains there so you can check the scheme name later on
Of course this method is not foolproof as someone could rename the Area Scheme at any time - but it should work in the majority of case.

If anyone knows a better way, please tell me.

[Edit] - As Dmitry Chubrik has pointed out in the comments, here is a good technique for changing the Area Schedule titles: 

Renaming Area Schedule Titles

As it is strongly advisable to keep the Area Scheme name in brackets within the schedule name, there is a way to do that without it showing up in the schedule title that appears on the sheet.  If you want change the title, do not rename the schedule in the Project Browser;  also, do not just edit the text in the schedule title cell, as this will rename the schedule too.
Instead, you should click in the schedule title cell, then click on the "Clear Cell" icon that appears in the ribbon - this literally removes all text from the title cell.  You can then type in new text, which will not have the effect of renaming the schedule in the Project Browser.

Once the link has been broken between schedule title and schedule name, the title can be changed just by editing the text in the title cell.

Using this method you can keep the Area Scheme name in the Project Browser for multiple schedules of the same Area Scheme - and keep track of which is which.  It would be good practice to teach all Revit users to do this as a matter of course.

Thanks for the tip, Dmitry

Sunday, 22 January 2017

Using Totals in Formulas in Revit Schedules

This has been a frequently asked question on the various forums over the years:
"Is it possible to use a grand total from a schedule in a formula in Revit".  The first response is always No!  Then eventually someone will mention the arcane workaround but it is not always clearly explained so I have decided to show a simple example of what the problem is, and how the workaround might be applied.

I must confess that this is not my original idea - in fact I have found references to the workaround, as far back as 2006 on AUGI by Leonard Raiz (one of the Revit Founders).  More recently (2011), Martijn de Riet published a description of how to calculate a ratio between two area types - this includes the workaround but does a few extra tricks of calculating a ratio of two different sub-totals after first separating them from one grand total, so it is not that easy to understand just the 'totals in formulas' workaround.  Many thanks to Martijn, as I originally learnt the technique from his blog posting.


The Problem With Schedule Totals

Let us suppose that you want to schedule a series of floor areas for a multistorey building and then calculate the ratio between the total of those floor areas against the site area - in Australia we call that the 'Floor Space Ratio'.  There are actually two problems that Revit presents us with here:
  • Revit apparently does not allow you to insert a total of several values into a formula- it only performs the calculations on individual values in each row
  • You can't create a schedule that combines 'Areas' and 'Property Line Areas' because they are different categories - this is another topic so we'll use another quick workaround to deal with that here.
In this example I will use Mass Floor Areas, but they could easily be normal Areas

The Floor Space Ratio calculation is defined as:   'Gross Floor Area' divided by 'Site Area'
It is usually represented as the 'number : 1'   eg. 2.5 : 1

Step 1

  • The first step is to create a Mass Floor schedule, and add the Levels plus Floor Areas
 
  • The first problem we encounter is that you cannot combine a Mass Floor schedule with Site category schedules - so you cannot include the site area value that Revit automatically calculates from your property lines

Workaround 1

  • Create a shared parameter and apply it to the Project Information category
  • This will be a value that you have to type in to the project information page once - and update it if the site area changes, which is obviously a technique prone to user error.  If your site area is not yet settled, and is constantly changing, I would not recommend this method.
  • Once the value is in, you can add the shared parameter to your schedule just by changing the category from the drop-down list and choosing Project Information
 
  • The same value for Site Area will appear in each row, so make sure not to calculate totals for this parameter.
 

Step 2

  • Add a calculated parameter to the schedule, called 'Calc Ratio' (or some such) 
  • Make it a 'Number' type with this formula:
    Floor Area / Site Area
  • Note that each row has its own calculation of the ratio - none of which is correct.
  • If you make the parameter 'Calculate Totals', the Grand Total value of the Ratio will actually be correct - but it makes for a very confusing schedule
  • You could of course collapse the schedule down to one line (untick 'Itemise Every Instance'), and hide the totals - this would display the correct Ratio - but you may require the schedule to show individual floor areas
 
However, there is a way to get Revit to display all the rows of data and to perform calculations on the total value - it requires the following workaround:

Workaround 2

  • In the schedule, add a new calculated parameter called 'F Area Percentage'
  • This time, make it a percentage calculation - click on the 'Percentage' radio button
  • Then select 'Floor Area' as the parameter to calculate 'Of'
  • Leave it to calculate 'By' Grand Total
  • This will list each floor area as a percentage of the total
  • Create another new calculated parameter, called 'Total Floor Area'
  • leave it as a Formula calculation, with type 'Area'
  • Add the Formula:
    Floor Area / F Area Percentage
  • This will give you the correct overall floor area in each row 
  • Be sure not to calculate totals for this parameter.
 
  • Now change the Ratio formula to calculate using the Total Floor Area:
    Total Floor Area / Site Area
  • This will give the correct ratio in each row
  • Remove the Calculate Totals setting for this parameter as the total would be a crazy value

  • You can then hide the two intermediate calculations (Total Floor Area and F Area Percentage) to get a schedule showing the correct site area, floor area and ratio in every row
 

Tidy Up

  • To make the schedule read a little more cleanly, you could sort it by Site Area, with a Header, and then hide the Site Area parameter column - but it only shows the value of the Site Area, not its parameter title, which is not clear enough

  • Then add another Calculated Parameter at the beginning - a text type with a formula:
    "Site Area :"
  • Sort by that parameter before the Site Area, and hide that one too
  • It puts them on two different lines but at least it removes some repetitive information from the body of the schedule
 
 
  • You could try the same with the Floor Space Ratio but unfortunately Revit does not like to sort a schedule by such a formula  - it does not show in the Sort by or Filter list (a bug perhaps? or just a special feature?)
  • You could also put in a few extra text formulas (with blank headings), although they will repeat the same information

Workaround 3

If you can cope with two schedules, it is a lot easier: a simple one liner schedule for the Floor Space ratio calculation, plus a separate schedule list of all the floor areas.
  • You can either create two similar schedules as described above, but collapse one of them down to one line (untick 'Itemise every instance'), and remove the calculations from the full list.
    or
  • Revit makes it simpler to do this operation on Mass Floor areas because you can just create a Mass schedule (as opposed to Mass Floors) that already has a property called 'Gross Floor Area', in which it automatically calculates the total of the Mass Floors - thus you can do a direct calculation on it


I hope this explains the technique clearly.  If you want something more complex, then refer to Martijn de Riet's blog posting on how to calculate a ratio between two area types

Friday, 5 June 2015

Tagging what is in a Revit Key Schedule

What, no Shared Parameters in Key Schedules?  It is a total pain.  If you'd like Autodesk to fix this Revit Roadblock, please vote for the enhancement on their Revit Ideas:
Please Fix Key Schedules
 This request has been 'Under Review' for several years, and it needs kicking along.

I have been endlessly frustrated by the fact that you cannot include shared parameters in Key Schedules in Revit.  This means that anything you put into a key schedule can only be used in other schedules - it cannot ever be tagged.
Or so I thought. . . . .

I recently discovered that you can add some system parameters to key schedules, which means that you can use those in schedules and tag them too.  As with most things Revit, the rules for this are weird and (not so) wonderful.


Rule no. 1:   

Shared parameters, have a secret GUID that ensures their uniqueness - you have to add them to schedules by picking them from a list of already available parameters or by adding them from the shared parameter list.  Likewise system parameters in a schedule or key schedule need to be picked from a list of available ones.  It is only too easy to create new parameters by typing in names that seem to have the same name as system parameters - you won't know which is which, as they appear together in lists.  It is only when you start populating them or using them in (key) schedules when you realise your mistake.
For this reason it is really important never to create your own parameters that are the same name as system (or shared) parameters.  With shared parameters it is a little easier as you can go into the definition and check if it was shared or not.

Rule no. 2:  

Once you use a system parameter in one key schedule, it cannot be used in other key schedules of the same category

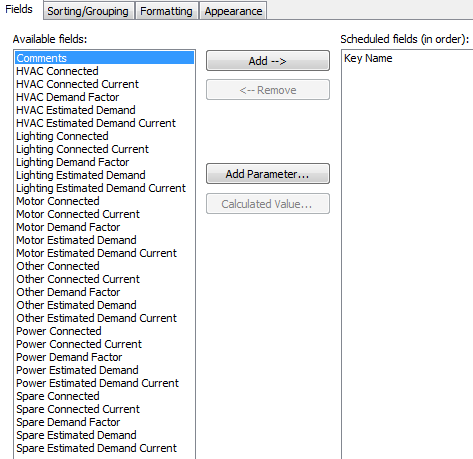
When you first create a key schedule, you get a list of available fields on the left.  This is a jumble of system parameters and project parameters that you might have created (but not shared parameters).  Because the list is radically different for each category (and varies with subsequent key schedules), I never realised the significance of that list

Rule no. 3:  


Different categories allow different system parameters to be used in key schedules.  There is no rhyme or reason as to which ones will work - you just have to know.  For most categories it is just "Comments".

Categories that do not allow any system parameters in a key schedule include:
  • Grids 
  • Levels

Categories that allow 'Comments' as a system parameter in a key schedule include (NB. I only checked the ones that show up when listing "Architecture" categories):
  • Assemblies
  • Casework
  • Ceilings
  • Columns
  • Curtain Panels
  • Curtain Systems
  • Curtain Wall Mullions
  • Detail Items
  • Electrical Fixtures
  • Entourage
  • Floors
  •      Floor Slab Edges
  • Furniture
  • Furniture Systems
  • Generic Models
  • Lighting Fixtures
  • Mass
  •      Mass subcategories (I only checked Mass Floors)
  • Mechanical Equipment
  • Parking
  • Parts
  • Planting
  • Railings
  •      Handrails
  •      Supports
  •      Top Rails
  • Ramps
  • Roofs
  •      Fascias
  •      Gutters
  •      Roof Soffits
  • Site
  •      Pads
  •      Property line segments
  •      Property Lines
  • Specialty Equipment
  • Stairs
  •      Landings
  •      Runs
  •      Supports
  • Structural Beam Systems
  • StructuralColumns
  • Structural  Connections
  • Structural Foundations
  • Structural Framing
  • Structural Rebar
  • Structural Stiffeners
  • Topography
  • Walls
  •     Wall Sweeps
  • Windows
Categories that allow multiple system parameter in a key schedule include:
  • Areas
         Wow, the programmers really spoiled us by allowing the use of the Name System Parameter - but don't get too excited because this has to be shared across all Area Schemes.  So if you use it for a Rentable Area Key Schedule, it will not be available for a Gross Building Area key schedule
  • Doors
         Out of all the 40+ door system parameters, they gave us those!  How useful.
  • Electrical Equipment
          It looks like the Electrical engineers are being favoured for a change.  But not the mechanical engineers who only get 'Comments' for their equipment.
  • Plumbing Fixtures
  • Rooms
Now this should give us something to work with - although we only get text and material parameters, that should be very useful as those are the ones we most likely want to tag.  I can't imagine wanting to put the finishes into a key schedule as most likely each room could have different finishes - but if you have say a hospital where there are many similar rooms, you might create a key schedule of room types, and those could have preset finishes in a key schedule?
The list of categories/system parameters above is not comprehensive - structural and MEP engineers will need to do some inestigation on the categories that do not show up when the list is restricted to "Architecture" categories.

Conclusion

Well, at least we do have some system parameters we can use in Key Schedules.  However the list is very limited, so use them wisely - plan your schedules and tagging needs before you start creating key schedules.  Don't forget that if you have multiple key schedules for a category, the available system parameters can only be used once per category (not once per key schedule).

An example of when you might use one of these precious system parameters could be for rooms or areas - naming the apartment type as say '1 BED' or '2 BED'.  This value could then appear in a schedule, a tag and in properties.  Associated with each apartment type could be all sorts of standards such as minimum areas, rates and parking requirements etc - these would only appear in schedules and properties (and they could be there just for use in calculations).  Things you would not include in the key schedule would be unique information that varies per room or area.