BILT Speaker

BILT Speaker
RevitCat - Revit Consultant
Showing posts with label space. Show all posts

Tuesday, 25 January 2022

They Broke Their Own Cloud Space in Revit 2022

Way back in Revit 2015, Autodesk gave us a really nice enhancement:

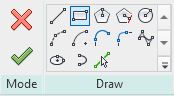
  • Ability to use all the sketch line drawing tools to quickly create Revision Clouds.


Prior to v2015 we had to laboriously draw each arc of the cloud as a segment (2 clicks:  for start and end of the arc) - the longer the segment, the larger the arc radius.  For those who never experienced it, that was a really tedious workflow.

I remember from Beta testing that we requested for the Rectangle to be the default drawing tool (it was not initially - I think the original default was either the line or circle.  Luckily we asked for that request before the code was finished so it was quickly implemented.

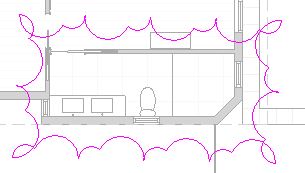
One of the other little features they added was the ability to reverse the direction of the cloud using the space bar - as it was being drawn:


This allowed the user to create a reverse or inside-out cloud - it may look ugly but it has a very specific use:  To indicate "Hold" on part of the drawing or model.

They Broke it in 2022

I am not sure if it happened in v2022 or 2022.1, but the spacebar trick no longer works for placing rectangular reverse clouds.   Aaaargh.

It still works for circles and both polygon types.

That means you could use a 4 sided polygon to get a square cloud - but the chances of needing that shape are slim.  The only other option is to use the line tool and create a rectangle by drawing the 4 sides in an anti-clockwise direction.

The good news is that it is still waaaay better than the old method pre-v2015.

Let's hope that Autodesk fix this in the next update?


Thanks to Frank Crisp of Koichi Takada Architects in Sydney for pointing this out to me.


Sunday, 22 December 2019

Revit 2020 Install Postscript

I recently tried to install the latest SP2 update to Revit 2020, and had some difficulties:


The dialogue box above did not give sufficient information about which file it could not modify - but it is apparently part of the unpacked install files.
The problem was nothing to do with Administrator privileges.


The advice I received from Autodesk was to do a full uninstall of Revit 2020, and then reinstall.  It turns out that may not have been necessary - but it did eventually work . . . .

Hard Disk Space

My computer has a solid state drive (SSD), which used to be very expensive, hence it is only 200Gb.  That means that disk space is valuable - not an uncommon situation.  This is apparently of no significance to Microsoft or Autodesk - every version of their software consumes more and more disk space.  200Gb gets eaten up very fast by their software, but also by their upgrade/install process.

Space Junk

Each time that Windows has an upgrade, it often demands at least 10 or 20Gb.  Autodesk is not much better.  What this means is that I frequently need to remove junk files that have been installed or are part of the installer software.

  • The Revit 2020 download is 12.2Gb
  • When unpacked it expands to 15.7Gb
The unpacked software has many files for various different languages.  Having chosen English as my install language, I assumed that the installer would have no use for any of the other languages.  Wrong!
I like to keep a copy of the unpacked installer file on the disk, in case I need to fix or reinstall.  In order to minimise the "Space Junk" I often remove all the other language folders from the installer (but I keep a full copy elsewhere, just in case).

During the reinstall process that I had to go through recently, I discovered that Revit actually does need some of those different language files - it will not proceed until you put them back into the install folders.

  • It needs some dll files from every single language folder
German dll files missing (and all the 13 other languages)

  • It needs every single rfa Steel Connection family template  from every single language folder
Czech Steel Connection Family Templates missing

  •  It needs all of the Sample files, even if you choose not to install any content.

371Mb of sample files

  • There are 761Mb of Steel Connection family template files in your installer.  If you delete any of them, any future re-install will fail.
761 Mb of Advanced Steel Connection Family Templates

Installed Files

  • There's 1.37Gb of steel connection files installed, whether you want it or not.
1.37Gb of Advanced Steel Connection Files


During the install process you can stop Revit from including MEP Fabrication - but you have to actively search for the settings and disable them (Default is to install).  It seems that you cannot stop it from installing Advanced Steel - and if you try (like I did), your install will fail.

What this means is that you have all those unwanted 14 language files and MEP/Advanced Steel files in your installer (several Gb);  And then you get exactly the same files installed in C:\ProgramData\...   its  "Double Space Junk"

If you ask me, this is very sloppy programming from the people handling the install software.  I believe that this is outside the control of the Revit team - but it sure as hell makes life difficult for the end-users.  If one person at Autodesk had written some more careful code that checks your chosen install language, and only uses that language to install the relevant files - just think how much disk space would be made available around the world.

All the hard work by the Revit programmers trying to speed up Revit is being undermined by the Installer team who are slowing down your computers.

As it is, we all need to spend time removing unwanted files.  Or we have to buy more hard disk space - not so easy if you have to retrofit a laptop with SSD.

If you need 700Mb space in a hurry, and you don't use 'Revit Steel Connections', look right here:
C:\ProgramData\Autodesk\Revit Steel Connections 2020
Remove all the languages except your own (which will be about half of the whole lot)

(NB. Be careful! and make sure you have a backup somewhere before you start removing Space Junk - its at your own risk).

Edit:  If you don't want all these different language files to be installed, please vote for Dave Plumb's Revit Wish over on the Autodesk Revit Ideas website:
Stop Installing Other Languages

Sunday, 22 January 2017

Using Totals in Formulas in Revit Schedules

This has been a frequently asked question on the various forums over the years:
"Is it possible to use a grand total from a schedule in a formula in Revit".  The first response is always No!  Then eventually someone will mention the arcane workaround but it is not always clearly explained so I have decided to show a simple example of what the problem is, and how the workaround might be applied.

I must confess that this is not my original idea - in fact I have found references to the workaround, as far back as 2006 on AUGI by Leonard Raiz (one of the Revit Founders).  More recently (2011), Martijn de Riet published a description of how to calculate a ratio between two area types - this includes the workaround but does a few extra tricks of calculating a ratio of two different sub-totals after first separating them from one grand total, so it is not that easy to understand just the 'totals in formulas' workaround.  Many thanks to Martijn, as I originally learnt the technique from his blog posting.


The Problem With Schedule Totals

Let us suppose that you want to schedule a series of floor areas for a multistorey building and then calculate the ratio between the total of those floor areas against the site area - in Australia we call that the 'Floor Space Ratio'.  There are actually two problems that Revit presents us with here:
  • Revit apparently does not allow you to insert a total of several values into a formula- it only performs the calculations on individual values in each row
  • You can't create a schedule that combines 'Areas' and 'Property Line Areas' because they are different categories - this is another topic so we'll use another quick workaround to deal with that here.
In this example I will use Mass Floor Areas, but they could easily be normal Areas

The Floor Space Ratio calculation is defined as:   'Gross Floor Area' divided by 'Site Area'
It is usually represented as the 'number : 1'   eg. 2.5 : 1

Step 1

  • The first step is to create a Mass Floor schedule, and add the Levels plus Floor Areas
 
  • The first problem we encounter is that you cannot combine a Mass Floor schedule with Site category schedules - so you cannot include the site area value that Revit automatically calculates from your property lines

Workaround 1

  • Create a shared parameter and apply it to the Project Information category
  • This will be a value that you have to type in to the project information page once - and update it if the site area changes, which is obviously a technique prone to user error.  If your site area is not yet settled, and is constantly changing, I would not recommend this method.
  • Once the value is in, you can add the shared parameter to your schedule just by changing the category from the drop-down list and choosing Project Information
 
  • The same value for Site Area will appear in each row, so make sure not to calculate totals for this parameter.
 

Step 2

  • Add a calculated parameter to the schedule, called 'Calc Ratio' (or some such) 
  • Make it a 'Number' type with this formula:
    Floor Area / Site Area
  • Note that each row has its own calculation of the ratio - none of which is correct.
  • If you make the parameter 'Calculate Totals', the Grand Total value of the Ratio will actually be correct - but it makes for a very confusing schedule
  • You could of course collapse the schedule down to one line (untick 'Itemise Every Instance'), and hide the totals - this would display the correct Ratio - but you may require the schedule to show individual floor areas
 
However, there is a way to get Revit to display all the rows of data and to perform calculations on the total value - it requires the following workaround:

Workaround 2

  • In the schedule, add a new calculated parameter called 'F Area Percentage'
  • This time, make it a percentage calculation - click on the 'Percentage' radio button
  • Then select 'Floor Area' as the parameter to calculate 'Of'
  • Leave it to calculate 'By' Grand Total
  • This will list each floor area as a percentage of the total
  • Create another new calculated parameter, called 'Total Floor Area'
  • leave it as a Formula calculation, with type 'Area'
  • Add the Formula:
    Floor Area / F Area Percentage
  • This will give you the correct overall floor area in each row 
  • Be sure not to calculate totals for this parameter.
 
  • Now change the Ratio formula to calculate using the Total Floor Area:
    Total Floor Area / Site Area
  • This will give the correct ratio in each row
  • Remove the Calculate Totals setting for this parameter as the total would be a crazy value

  • You can then hide the two intermediate calculations (Total Floor Area and F Area Percentage) to get a schedule showing the correct site area, floor area and ratio in every row
 

Tidy Up

  • To make the schedule read a little more cleanly, you could sort it by Site Area, with a Header, and then hide the Site Area parameter column - but it only shows the value of the Site Area, not its parameter title, which is not clear enough

  • Then add another Calculated Parameter at the beginning - a text type with a formula:
    "Site Area :"
  • Sort by that parameter before the Site Area, and hide that one too
  • It puts them on two different lines but at least it removes some repetitive information from the body of the schedule
 
 
  • You could try the same with the Floor Space Ratio but unfortunately Revit does not like to sort a schedule by such a formula  - it does not show in the Sort by or Filter list (a bug perhaps? or just a special feature?)
  • You could also put in a few extra text formulas (with blank headings), although they will repeat the same information

Workaround 3

If you can cope with two schedules, it is a lot easier: a simple one liner schedule for the Floor Space ratio calculation, plus a separate schedule list of all the floor areas.
  • You can either create two similar schedules as described above, but collapse one of them down to one line (untick 'Itemise every instance'), and remove the calculations from the full list.
    or
  • Revit makes it simpler to do this operation on Mass Floor areas because you can just create a Mass schedule (as opposed to Mass Floors) that already has a property called 'Gross Floor Area', in which it automatically calculates the total of the Mass Floors - thus you can do a direct calculation on it


I hope this explains the technique clearly.  If you want something more complex, then refer to Martijn de Riet's blog posting on how to calculate a ratio between two area types