BILT Speaker

BILT Speaker
RevitCat - Revit Consultant
Showing posts with label Stair Tool. Show all posts

Friday, 31 July 2015

RTC Asia - The Best Tall Building in the World Needs lots of Multistorey Stairs


This year I will be presenting two sessions at RTC Asia 2015 at the Singapore.  I hope to see you all in Singapore from 10 - 12 September 2015 for the inaugural Asian Revit Technology Conference - for all things BIM in the construction industry.

The first session will be 'The Best Tall Building in the World - Documented in Revit' describing the trials and tribulations we went through in Revit to document the project 'One Central Park' in Sydney.  I will be describing the building itself and some of the techniques that we used to handle construction documentation for such a large and complex building in Revit starting six years ago (completed in 2013, and given the 'Best Tall Building Worldwide' award in 2014).
One Central Park cantilevered heliostat mirrors
This presentation will be one of the first sessions after the keynote speaker.  You will get to see lots of photos of the building inside and outside;  and you will hear about the massive cantilever 29 storeys up in the air.

Stairway to Heaven 

 
I will also be running a Lab Session  titled 'Stairway to Heaven'

This session will look at ways of making the new Stair & Railing tools in Revit work better for you.  It will start you off on the 'Stairway to Heaven' instead of languishing in the 'Stair & Railing Hell' that most Revit users live in.*   We will be covering such topics as multistorey stairs and railings, winder stairs, stair sketches.


* Disclaimer:  The aims stated above are of course restricted by the limitations of Revit software.


With thanks to the artist who designed this image for Led Zeppelin

Thursday, 27 February 2014

Revit Stairs & Railings Index Page


Grenada - stairway to nowhere


In late 2011 I started beta testing the new Revit component based stair tools, and I learned a lot about the subtleties - both good things and shortcomings.  In early 2012, the new tools were released as part of Revit 2013.  In May 2012 I did a presentation on the new stair tools at the Revit Technology Conference in Wollongong, NSW, Australia.
In Revit v2014, very little changed - just a few minor tweaks that developed in response to beta testing feedback.
Since then I have published sections of my RTC presentation on this blog, along with a few tricks I have learned since then.
Here is a summary index to all my posts on stairs and railings.

Index

Revit Stairs 


Stair Sub-Categories 

Stair Annotation

Railings


Revit Stair and Railing Enhancement Requests

Autodesk  now have a 'Revit Ideas' website that allows you to add your own enhancement requests and vote for those posted by others.  If any idea gets sufficient votes, Autodesk might just implement the feature, so I have compiled a list of stair/railing related ideas - why not head over there and vote for some of these requests, in the hope that they finally get fixed.  We are getting a little fed up with temporary solutions . . . .


Temporary Bamboo Staircase - Myanmar

Stairs with No Railings

We are still waiting for an overhaul for the railing tools.  In the meantime, we have to live without - so here are some stairs with no railings:

Cappadocia, Turkey

Bayamo, Cuba - No railings to impede the morning dash for the train

Malaga, Spain

Sint-Maarten

    Ahungalla, Sri lanka
Elbe Mountains, Nr Dresden, Germany
Stepwell, India

Stair Path Arrows
In my series of blog posts, by far the most popular has been the one on Stair Arrows.  What that tells me is that my initial gut feelings about the change of method from inbuilt stair arrows to stair direction tags was correct - it is clunky and not intuitive!  The pity is that it is not such a bad idea to use tags - it just isn't well executed.  It could easily be improved by:


Pailon Del Diablo, Ecuador
Ladder Via Crucis, Spain

Wednesday, 19 February 2014

Revit Multistorey Railings - Story 2

Go to Revit Stair & Railings Index Page


Apologies to Kevin Costner (hidden behind the railings)

[Edit: Revit 2018 has a new method for creating multistorey stairs & railings, so the issues described here may not be relevant once you upgrade to v2018;  However, if you have a stair with 3 flights that run over the top of each other it may be relevant; or if you are using v2017 or earlier, read on]

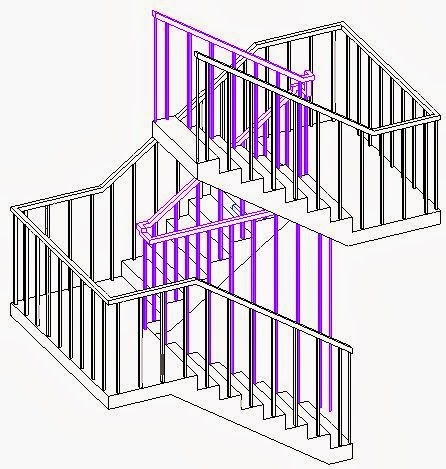
In the previous post, I described creating a multistorey stair using "Method 2" in Revit 2013 (or later) - ie. one that has runs or landings modelled above of each other.  Using that technique, you would certainly encounter this warning message when you finish the stair:
  • The reason for the warning is that the automatically created railings contain sketch lines that overlap each other.  Revit will break its own rules and allow this to happen in this situation only.
Revit will happily create these "railings with warnings" but will seldom let you change the railings.  If you need to modify the railing sketch lines there are some tricks that you can employ to change the right sketch line, and untangle the overlaps.  We'll start with the process for a simple railing, then go on to the tricky stuff later.

Three Flight Railing
Let us look at the railings on the three flight example described in the previous post, where the top run sits above the lowest run
  • When you complete the stair, Revit will go ahead and create the railings, along with the warning - it may be a warning for the internal railing only, or else both railings, depending on the extent of run overlap
 
  • In this example the the base of the top run sits above the base of the lowest run;  the top run is shorter so the tops of the runs do not align - so there is only one warning
  • Let us suppose that you need to extend the lowest railing by one tread (as required by the building codes in Australia)
  •  First edit the inside railing.   Note the overlapping sketch lines for the first and third runs
 
  • You need to select the line related to the lower run - in this case we are lucky because the runs are different lengths, so we can select the longer one relatively easily
  • Extend the line to the left by one tread depth (250mm in this case) - it will now line up with the return on the landing.  When you try to finish the sketch it will give an error - this time it will not complete the railing because you have joined a sketch line belonging to the lowest run to a landing line at a different height (much too confusing for Revit to handle)
  • The only way around that is to undo;  try again but stop the line short of the landing return - the closest it will let you get is 26mm (just over an inch) before it automatically snaps to the corner. 
.
  • Well, that isn't quite good enough because the railing is still an inch short.  I guess you could fudge it by adding a railing termination, but that is not going to work in every situation - so that is not acceptable either.  Looks like we'll have to resort to another workaround.

  • NB. If runs one and three were the same length exactly above each other, you probably wouldn't even get to this stage because both ends of the sketch line would align with the end point of other lines - you'd get the error message whatever you do

Warning: here follows another bizarre Revit workaround to get you out of trouble with multistorey railings (not for the faint-hearted).

Dances With Wolves (or Railings With Warnings)

We need to untangle the sketch lines so that you can distinguish each one and make sure that they remain linked only to the correct line in the chain when you modify them.  The solution comes from nature - a spiral.
The way to achieve the untangling is to make each overlapping run in the stair a bit smaller than the one below it, so that you end up with a spiralling railing sketch.  NB. it is better to make the runs smaller as you go up (for reasons explained later).


In our three run stair example it is very simple:
  • You may need to start with the railings as they were automatically created - either undo any changes or else delete the railings and replace them using the Place On Host command

  • Select the top run of the stair;  change its width property to 1mm less than it was (or try 1/32nd inch for you imperials) - in stair edit mode or just tab-select the run without editing the stair
  • You may get a warning that the Actual run Width is less than the Minimum, but you can ignore this for the moment
  •  Edit the inside railing - notice that you have two distinct lines only 1mm apart
 
  •  You can drag the end of the lower run all the way until it meets the landing line (no need to leave a 26mm gap this time)
  • When you try to finish the sketch it will probably give an error;  so you will need to drag the line back so it stops 1mm short of the landing line - hopefully acceptable;  if not, you can make the gap even smaller: anything less than 0.4mm will show dimensions rounded down so they appear correct.
  • This time it should work when you complete the sketch
  • Once the railing is fixed, you probably need to reset the run width back to its original dimension.
Rules of engagement
  • Note the Location Line of the stair run before you change its width - it needs to be set to the opposite side of the run from the railing that you are trying to change (or center if you want to change both railings
  • Normally, if a stair is modified, then its automatically generated railings will update to match - except:
  • Once you edit an automatically generated railing sketch in any way it breaks the connection between stair and railing - so that modifications to the stair layout will no longer be applied to railings automatically
  • Because of this behaviour, you need to apply the run width trick before editing the railing sketch, so that the railing sketch becomes a spiral pattern
  • If you have already edited the sketch, the trick would only work if you delete the railing and place a new automatic one
  • Once the railing is fixed, set the run width property back to its original dimension.   The stair will correct itself, and the railing will maintain its 1mm offsets - but only if you did edit the sketch
  • This is the reason for making upper runs smaller - when they are corrected, the railing sketch lines are not dropped off the edge of the stair runs (which would happen if you initially made upper stair runs larger).  In other words, your sketch spiral needs to remain on the stair runs not in the stair well.
 
  • You are much better off working with the sketch lines that Revit creates - modify those rather than creating new lines, so that you have a better chance of Revit understanding which lines relate to which runs or landings
  • It is ok to let railing sketch lines cross over each other.  The important thing is to keep the correct lines joined to each other at corners
 

Troubleshooting (Horizontal Railing Segments)
Most likely you will have runs/landings on exactly on top of each other, so it won't be so simple: either it will not complete the sketch or else you might get the "horizontal railing problem".
It quite often happens that one segment of the railing becomes inadvertantly hosted on something other than the run - it may be on one of the two adjoining landings or else the base level.   There are several things to watch out for to avoid this:
  • Make sure that the sketch line segment is on the run component in plan (or on its edge);  if it moves off the run it will lose its hosting; if the run moves the railing segment may not move with it.
  •  The railing sketch line has "Slope" properties when selected (on the Options Toolbar) - make sure it is set to By Host or Sloped
 
  • If the sketch line is set back from the edge of the run, then the corresponding landing railing line should also be set back from the landing edge (even with only one landing).  Sometimes offsetting the landing sketch line by 1mm will correct the horizontal run railing line problem

Multi-Level Multistorey Railings

Once you have mastered this technique for three run stairs, you can apply the same technique to stairs with four or more runs.  All you need to do is make each pair of runs smaller as you go up the stair.

Landings
Don't forget that the landing sketch lines also need to be offset.
  • You could do this by adjusting the landings themselves - but it gets fiddly as landings don't have depth properties so you need to drag the shape handles, which will not snap to increments.  Refer to modifying landings
  • Alternatvely you can just offset the landing sketch lines yourself - it is easy to distinguish which is which because their lengths are different due to changed run widths
I hope this technique helps someone to get their railing sketches to work correctly - it is not as bad as it sounds once you get the hang of it.  It won't help resolve the railing junctions, but that is another story!
Go to Revit Stair & Railings Index Page 

Monday, 10 February 2014

Revit Multistorey Railings - Story 1


[Edit: Revit 2018 has a new method for creating multistorey stairs & railings, so the issues described here will not be relevant once you upgrade to v2018;  if you are using v2017 or earlier, read on]

Here is a curious story to tell:  This is a description of how to manage railings on a multistorey stair that has been created using the "Multistory Top Level" stair property in Revit (Method 1 in my previous post), and where you have incorporated intermediate landings on each building level of the stair.  The resulting railing will be a single closed loop - both inside and outside joined together. 

The description below assumes that you followed the steps in the previous blog post  to get to this stage.  If your multistorey stair does not include landings at the storey levels (maybe you used floor slabs instead), none of this applies.

Edit Railing
If you try to edit the railing to get rid of the section running across the landing/run junction or the outside edge of the landing, you will run into problems in Railing edit mode

After you delete the unwanted lines and then finish the sketch it will give an error message – it requires a single continuous chain of sketch lines, not a loop within a loop (even if you remove all overlapping lines)


To solve this the railing needs to be first separated into two parts. This can be done by two different methods:
1.  You could duplicate the single railing and then edit each one separately, stripping them back to an inner and an outer railing (Process not described here).
2.  Alternatively, take a few steps back in the stair creation process, to edit the railings before you delete the temporary top flight:

  • Edit the outside railing (because of the top run there are two separate railings). 
  • Delete the segment associated with the extra run

  • Make sure there is a break in the loop by dragging the end of the landing rail line away from the first run line; the gap must be at least 32mm otherwise the lines will automatically rejoin! (That is about 1 ¼ inches in that quaint imperial system used in the USA).

  • NB. If you want the sloping section of rail to extend one tread beyond the lowest riser (common practise), then you need to extend that line by one tread depth before making the 32mm gap.  It may give you a slope warning, but it is not clear why because the railing will be parallel to the flight
  • One method to stop that warning is to make the sketch line overrun dimension just short of a tread depth – by 1mm say (for a 250mm tread, the railing sketch line should extend 249mm past the lowest riser)
  • Then you need to do something similar for the inside loop railing – delete unwanted segments and make a gap. You might again want to extend the sloping rail line by one tread (minus 1mm), and then make the gap in the short landing line

  • Another alternative is to extend the short landing line by at least 32mm, and leave a gap of 1mm to avoid the sloping railing warning. The best option depends on how your rail is defined relative to the sketch line location and how you want the join to work
  • Finish the railing sketch

  • Edit the stair to delete the top flight – the railings should now be separate. NB. This process does break the automatic nature of the railing sketch – it will no longer update when the stair changes

Once you make the stair multistorey again, the railings should behave better. The small gaps may not be perfect but they are a whole lot better than the junctions that Revit makes normally

If you don’t want the railings to run across the back of the stair landings (eg. doors onto landing), you can edit the railing to remove segments but you'll lose the side railing of the landing (because you need a continuous chain of sketch lines in the railing)

Then you need to add a new railing to the landing sides: host it on the stair if you want it to be the same on both levels (it will become multistorey if the stair is); or host it by level if you want different railings on each landing
 

Watch out for the “Tread/Stringer Offset property for the railing so that it will align properly with the other railings (defaults are different for automatic railings and manually created railings)

Non-multistorey railings must be hosted by level, not on the stair – that way they can be different on each level

However, if you find all this is too fiddly, or else you need the top landing to be different then you may need to try Method 2 for multistorey stairs.
You could also lobby Autodesk to fix the railing tool so that it works better with the new stair by component tool!  Maybe one day we won't have to invent these horrible clunky workarounds.