
Have you ever tried to create a Revit railing with a split or break in it? You'd have seen the warning that tells you it is not possible in Revit:

Split Revit Railings
Well, there is a way to do it - yes you can split railings (with lots of provisos, of course).WARNING: this is another crazy workaround, so use it with caution . . .
In this example, a railing runs through a column, which is not desirable

You may want to break the railing and have a gap either side of the column

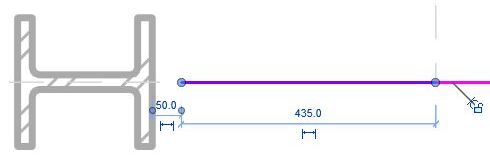
The first thing to do is edit the path of the railing, remove the top segments and stop it short of the column by say 50mm.

Once the top part of the railing is removed, Tab-select the 'Top Rail' (or Handrail) - it is important to select one of these sub-elements, not the overall railing. NB. if your railing does not have either of these sub-elements, this technique won't work (eg. old style top rails)

Once selected, click on 'Edit Rail'

Then click on 'Edit Path' for the Top Rail

This will allow you to add lines to either the top or bottom end of the Top Rail element; but first it is important to set the workplane depending on whether you are adding to the beginning/bottom or end/top.

Select the name of the workplane. I don't think that either of the 'Pick' options work here.

The workplane will be parallel to the first or last segment of the overall railing - so you'll need to work in either a 3D view or an elevation/section view. It may be easier to start in 3D so that you can see exactly what you are doing and where.
This command is not explicit about what is going on - in fact Revit is waiting for you to draw some lines, which will become extensions to the Top Rail (or Handrail)

These lines do not need to be directly linked to the ends of the Top Rail - in fact they can be almost anywhere (in the same plane as the end of the Rail). Start drawing a line the other side of the column from the end of the railing; at this stage it may be easier to go into a section/elevation view to ensure that it aligns with the railing on the other side of the stair (but keep an eye on the active workplane).

Trace over the other railing (it should snap to it).

Once the Top Rail extension is complete, it will have a gap where the column is.

Be warned: This is an extension to the Top Rail only - so balusters will not be attached to the underside of the extension.

Supports will not be attached to a Top Rail, so if you require supports on the extension, make sure before you start that your railing has a 'Handrail' sub-element, and add the extension to the Handrail, not to a Top Rail. If you switch the railing to a type that does not have a Top Rail, the entire extension will disappear (if it was attached to a Top Rail in the first place). Plan ahead!

Not surprisingly, this workaround is fiddly and not particularly robust - but I am showing it just in case it helps someone out. In this example, it would probably have been much easier (and safer) to have two separate railings, but it might give people ideas about a use for this technique, so go for it.
Downsides:
- Only works with a Top Rail or Handrail in the railing
- Top Rail and Handrail extensions are not interchangeable
- Top Rail cannot host supports
- Will not host balusters or posts beyond the split
- Will not turn corners in plan
- Will not automatically adjust heights/angles if the stair changes
- Is quite confusing for anyone not familiar with railing extensions
SO, the easiest way to make a hole in the railing in the example, should be to have two different paths of railings? How can it be related with multi-storey stairs?
ReplyDelete