
Following my earlier blog post on Cut with Void When Loaded in Revit, I have discovered another subtle exception to the rule:
It does not work properly with the new Revit 2021 feature "Void Cuts in Family Geometry" that allows you to turn the 'cutting capability' voids on/off in a family. NB. This is sometimes referred to as turning off Void visibility, which is misleading.
Void in Family Editor
Here is a workflow that demonstrates the confusing behaviour:
- In the family editor, create a new Generic Model family
- Tick the 'Cuts with Void When loaded' family property

- Create a solid with two more intersecting solids
- Change the two outside solids to voids
- The voids will not cut the solid - this is a deliberate technique to carefully control what cuts what

- Use the 'Cut' command to cut one of the voids from the solid (only one)

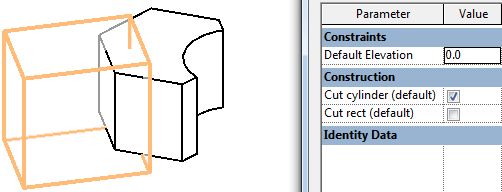
- Select the visible void and link its 'Cut Geometry' property to a parameter - say "Cut Rect"

- Select the invisible void (that is cutting the solid)
- link its 'Cut Geometry' property to another parameter - say "Cut Cylinder"

- In theory, this should allow you to turn off 'cutting capability' of each void independently, once in the project - and hence whether they cut or not.
Test this in the Family Editor
- With both voids 'cuttable', the cylinder cuts but the rectangular void does not (as expected) - this is because the rectangular void was never told to cut the solid, so it has no effect in the family

- Turn off the 'cutting capability' of the cylinder - it no longer cuts the solid; it actually becomes visible, which may seem contradictory - but that is typical Revit behaviour (voids not cutting anything show orange; voids already cutting a solid disappear)

Voids in the Project
- Load the family into a project

- Place the family onto an element that it intersect with
- Both 'Cut Geometry' checkboxes ticked

- Untick both checkboxes, so the cylinder void is no longer cutting the family solid (rectangular void does not cut it regardless)
- Both voids are ghosted when the family is selected, or in pre-selection

- Use the project 'Cut geometry' command with the host element and family

- Both voids will cut the host element (neither void is cutting the family solid)

- Tick the 'Cut Rect' checkbox -
- The cylinder is not cutting the family solid, so it cuts the host element in the project (this may not be what you want, but it cannot be avoided!)
- the rectangular void is not cutting the family void, so it cuts the host

- Tick both boxes - only the rectangular void cuts the host (as it is not cutting the family solid)
- The cylinder now cuts the family solid but not the host (and is no longer visibly ghosted)

Conclusion
- If the void cuts a solid in the family, it cannot cut an element in the project using the 'Cuts with Void When loaded' family property
- If the void cuts a solid in the family,the new (in v2021) 'Cut Geometry' property has the potential to work in a project
- If the void does not cut a solid in the family, it can cut an element in the project using the 'Cuts with Void When loaded' family property - but only when you use the 'Cut' command in the project
- If the void does not cut a solid in the family,the new (in v2021) 'Cut Geometry' property has absolutely no effect in the project
This probably makes sense if you think really hard about decisions the programmers had to make about what is possible and how it might work.
However, it is mighty confusing for the end user.
To make matters worse, we now have two entirely different 'Cut Geometry' functions in Revit:
- 'Cut Geometry' property in the family - a checkbox
- 'Cut Geometry' command:
- in the family- where you actively select which elements cut each other
- in the project - where you actively select which family cuts which element but the results depend on all kinds of things in the family (as described above).
All clear now? Or still confused?
