BILT Speaker

BILT Speaker
RevitCat - Revit Consultant

Friday 16 December 2016

Applying colours and Materials in Rhino for Revit Import

Following on from my previous post about importing Rhino materials in Revit 2017.1   here is a brief description on how to set up the colours/materials in Rhino:

I am new to using Rhino, so my understanding of the UI and functions is pretty basic but I managed to figure out how to apply colours and materials to objects without reading any manuals.  I am happy to be corrected if there are better ways to do this.

Once you have created an object (or multiple objects), you can select the object and view its properties.  Unless you tell it otherwise, it will be on the 'Default' layer, with Color, Linetype etc set to 'By Layer', which means that it will behave according to the layer settings.  During the new import process, Revit 2017.1 considers the default layer & colour not to be a material.
 

You can change the layer of the object from the Layer drop-down list, providing you have created new layers

By default, your file most likely will have no layers, so you need to create them, using the 'Edit Layer' function, available from the Edit menu.

Once the layers menu has been opened, it will be available under a Layers tab.  It has typical columns showing the name, show/hide, lock, display colour (just a box) and material properties for each layer.  New layers will have default settings (no colour or material defined), but these can be changed by clicking on the colour box or adjacent space under the material column.
If you are creating layers just to manage export to Revit, the names are irrelevant to Revit, but the colour and material are important - you don't need to get the colour/material right for its end use in Revit, as long as each object has a different colour, it will become a different material when imported to Revit.  The materials can then be edited in Revit.

If you expand the width of the menu it shows the material name (if defined), linetype and print width/colour - the print colour does not seem to be relevant for Revit imports.

Materials

You can define a material for use in Rhino, but the only thing that Revit takes note of is the material colour.
Rhino Material Properties

Object Properties

Normally, objects will display according the the 'By Layer' settings, which means that all objects on a given layer can have their properties changed together easily.
Object properties By Layer

You can override individual 'Display Color' for any selected object
Object properties By Object
If you choose a non-standard colour, it will show the colour name as 'Other'


SAT files

I tried exporting a coloured Rhino file to SAT format, then importing it to Revit, but sadly it did not bring the colours in as materials - so I am not sure what the trick is to assigning colours to objects in a SAT file.  I tested various ACIS versions of SAT format, to no avail.
Rhino Export SAT options
Does anyone know how to define colours for objects in a SAT file from Rhino?  Or from any other 3D modelling software?

Import Colours to Revit

For details on how these colours are imported to Revit, refer to importing Rhino materials in Revit 2017.1

  • It seems that Revit uses the display colours set in Rhino, not the print colours.
  • If you import two different Rhino files that have identical colour definitions, it treats them as different materials
  • If you import the same Rhino file twice, it seems that Revit assigns the same materials to objects in both instances
  • However, if you rename a material, or change its definition before importing the second instance, Revit will create new materials with a suffix of (2) added to the original name.  You could use this to your advantage if you want multiple instances of the same object but with different materials.

Sunday 20 November 2016

Revit 2017.1 Import Rhino Materials

Following on from my post about the new Revit 2017.1 feature 'Import 3D Shapes', I have done some more testing on how to import Rhino files with materials (colours) into a Revit family.

If you import a Rhino file that has no colours or materials defined in it, you just get a dumb object in Revit that has no capability for controlling materials.


However, one of the subtleties of the new import shape feature is that it will recognise assigned colours in the Rhino file.  It will then create a new material in Revit for each colour.


To assign a material or colour in Rhino, you can either select an object and choose a colour/material;  or else you can create layers and assign a colour/material to the to the layer, then put the object on that layer and leave its object properties set to 'By Layer'.
Once you import the Rhino file to Revit, it will take just the RGB value of the defined colour or material and use that to create a new material in Revit - any other material properties will be ignored, so don't expect textures, reflectivity or anything else.
If you do not assign a colour/material to any object by either method, it will not be given a material in Revit (not even 'Default') - so you cannot subsequently change it.  Hopefully this will change in future versions of Revit.

The materials in Revit are given names such as 'Material 2' etc.  This is a big improvement over the confusing naming of imported Autocad materials (eg. Render Material 255-255-255).

The only property that the new materials have is a 'Graphics' colour definition.

It has default 'Appearance' settings (grey), meaning that realistic or rendered views will show grey objects.

You can of course change the material definition and give it 'Appearance' colours, tints, bump maps etc. 

This will only affect the part of the imported Rhino file that had that original colour (and now Revit material).
Realistic view with only one material Appearance edited

It would make sense to rename the materials so that they refer specifically to the individual objects within the imported file.  I like to set the 'Appearance' colour to match the Graphics colour, so that not only do the material previews show in colour but also any realistic views will display the colours rather than default grey.


I have not yet succeeded in testing this functionality with an imported SAT file (as I can't figure out how to apply colours in a SAT file), but hopefully it will work as a viable alternative workflow to the old method of importing/linking SAT files, as described in an earlier post.

For details on how to apply colours/materials to objects in Rhino, click here

Thursday 10 November 2016

Separating Model and Detail Lines in Revit - part 2

A couple of years ago I posted a description of how to distinguish between model and detail lines in Revit.  An anonymous comment rightly pointed out a method that I had missed - probably because it was right in front of me I completely forgot about an extremely useful view property:

View "Display Model"

The default setting for this property is "Normal", which displays both 3D model elements and 2D annotation, so you don't necessarily know which is which.


One very common problem I find with dodgy Revit models is that people have 'drawn' floor penetrations using model lines rather than using shaft openings, or even worse, have used detail lines, which would only show in that view.

If you select across the whole model and filter out everything except lines, you can at least tell which ones are lines - but not which are model vs detail lines.  This is where the 'Display Model' property comes in handy:

Set it to 'Do Not Display' and all the model elements are hidden

Interestingly, it keeps displaying grids & reference planes, which are neither model elements nor annotation - despite being lumped in with annotation on the Visibility Graphics dialog box.  They are in fact  what I call 'datum' categories.

One problem with this setting is that all the hosted annotation disappears too, so it is not easy to see things in context, nor can you be sure which hosted annotation is now hidden too.  This does have an added benefit of being able to check for 'dummy tags' (generic annotation symbols) and text that has been placed to look like real tags - all the real tags are hidden, and what is left visible is fake (or garbage as far as BIM is concerned).

There is a third option, which is extremely useful:  'Halftone'

This displays the model elements in halftone, and all the annotation as normal.  Now you can clearly see which lines are detail lines - they could be selected and converted to model lines, or better still, replaced by shaft openings.


As a 'Model Manager' you should be using this technique all the time to make sure that users are doing the right thing.  However, it is important to remember to set the Display setting back to normal when finished - better still, set it to normal in the view template and use the 'Enable Temporary View Properties' setting to do a temporary over-ride, which will reset itself when you finish.

Sunday 30 October 2016

2017.1 Import 3D Shapes - Swings and Roundabouts

The new 'Import 3D Shape' feature in Revit 2017.1 seems like an improvement - but it is not necessarily all good.  In previous versions we could link or import 3D SAT into Revit.  In v2017.1 the import engine for SAT files has changed (it is not just a UI change);  in addition, we can also import Rhino files (but not link them).
The underlying import engine for this new feature is different to the previous one used for importing SAT files.  I have heard anecdotal evidence that SAT files imported in v2017.1 perform better than in v2017; and that it may import more (of the) models, or sometimes not at all - at this stage it is too early to tell, so I will concentrate on the changes in functionality.

Sat vs Rhino


What is SAT?  It is not a satellite.  It stands for 'Standard ACIS Text' file format.
ACIS is a 3D geometric modelling kernel used by various different softwares (currently owned by Dassault) - but since it is open-source, its data file structure has become a commonly used industry 3D model translation format.  Revit can only import/link SAT v7 or earlier (as of 2017.1).
A rhino file is the native file format (3dm) of the 'Rhinoceros' 3D modeling program (by McNeel & Associates).  Until Revit 2017.1 it was not possible to import rhino files directly - you had to use a whole menagerie of software such as Dynamo, Rhynamo, Chameleon, Hummingbird and who knows what other creatures.

The Old SAT Import Method

Before evaluating the relative merits of the old vs new methods of importing SAT files, it is important to understand how people might use the old method - particularly in terms of managing materials and subcategories.

During the import CAD process, once you chose the SAT format, the dialog box options were the same as other CAD formats (DWG, DXF etc) - allowing you to choose units, origin points.
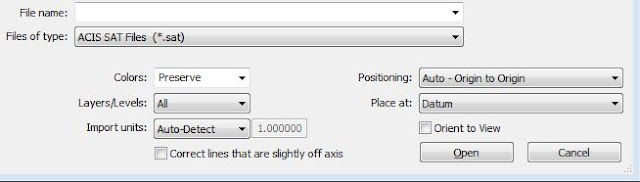
Old import SAT options
 Once the SAT file was imported, it had base constraints - a level that you could change.
Old SAT import Instance Properties in project

In the family editor, you had all the visibility controls and even a direct subcategory property, which the imported model can be assigned to.
Old SAT import Instance Properties in family
It also had type properties that allowed you to change the scale if the import scale was not quite right
Old SAT import Type Properties


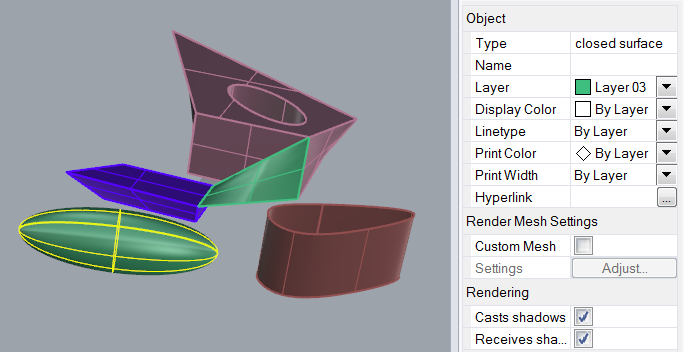
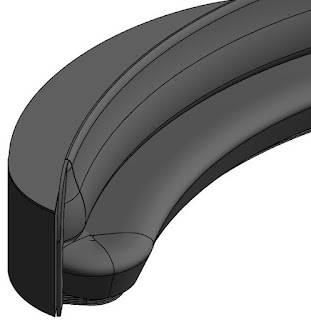
Imported SAT shaded view

Subcategories

In the project, like any other imported/linked CAD file, the imported SAT file had a default subcategory of  "0", which could be accessed from the 'Imported Objects' tab of the 'Object Styles' dialog box - from there the line weights and patterns could be changed

The subcategory could be renamed - so that multiple imported SAT files could each have a different subcategory.

Materials

The object style material could also be changed, so that the imported SAT looked different in all views
Imported SAT with material over-ride in Object Styles
All these settings behaved pretty much the same regardless of whether you linked or imported a SAT file.  The relative merits of link vs import are for another discussion.  Linked/imported SAT files would not section correctly when placed directly in the model (just gave a projection view) because imports were not considered to be of a 'Cuttable' category - to get around this we always used to create an in-place generic family and link/import to that, so that it would cut sections properly.

New SAT Import Method

During the new 'Import SAT' procedure, we have lost all those options for controlling units, origin points, correcting off-axis lines etc.  All that is replaced with just one 'Category' drop-down menu. 


What this means is that we can no longer control units/scale or location.  You have to know the units in advance, and make sure that they match the units of your current file exactly.  However, you may occasionally get a dialog prompting you for import units if the units are not defined in the SAT file

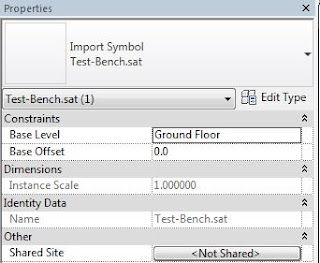
Once the file is imported, the instance properties have lost the base level & offset, which is extremely unfortunate;  we have gained Image, Comments, Mark and Phasing - all of which may come in useful, particularly when tagging.


The type properties have lost the scale settings, but gained a whole swathe of standard system properties, again useful for scheduling and tagging:

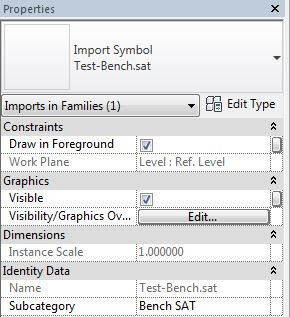
In the family editor, we now have the same properties as in the project, although I can't see the benefit of having them here, as they will change in the project with every instance.

Once the SAT (or Rhino) file has been imported, it is not possible to apply a material, although the new import engine supposedly should support materials if they are defined in the original file (even if only as a colour). [Edit - Rhino colours/materials applied to objects will import as materials to Revit - read about it herefor info on how to apply colours in Rhino click here]

If you choose a 'cuttable' category such as casework or generic, then you can cut section correctly through directly imported SAT/Rhino files without having to first host them in an in-place family.  Once imported, you cannot change its category in the project environment;  in the family editor you can change the category.

Swings and Roundabouts

What have we gained with the new method:
  • Can import a rhino file directly (if it works)
  • Apply a category directly to import
  • Can over-ride surface pattern by element per view
  • Can schedule imported elements
  • Can tag imported elements
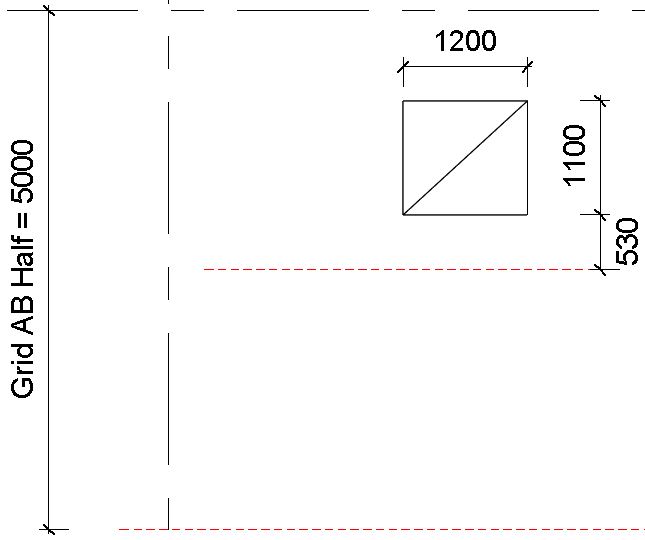
  • Can dimension imported elements - where edges are parallel or have arcs
  • Use imported elements for bounding rooms, providing they are put in a suitable category (such as walls, floors, ceilings) - the imported element has a 'room-bounding' checkbox, but I could not get it to work!
  • [Edit - Colours/materials applied to objects in Rhino will import as unique materials to Revit]

What capabilities have we lost with the new method:
  • No scaling on insertion (unless the file is unitless)
  • No rescaling after insertion
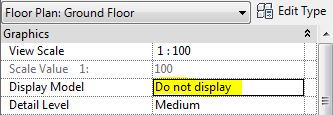
  • No base level or offset
  • No location control - presumably just uses Origin to Origin?
  • No 'Current View Only' checkbox, if for some reason you wanted to flatten your SAT file to 2D
  • No subcategory
  • No material per subcategory (can only edit materials if applied as colours in Rhino first) [edit]
  • In the family editor - no visibilty controls (Visible checkbox and Detail Level)
We now have two very different workflows for linking and importing CAD files.  Presumably this is a work in progress, and the old method of linking will become just like the new importing process.  Hopefully we will have the old capabilities reinstated to the new method in some fashion, and applied to Rhino files too.

Many people will have devised their own workflows when importing SAT files.  If those workflows rely on any of the capabilities that have been lost, you might be cursing version 2017.1 after the upgrade.  Here are some workarounds for dealing with the problem (with SAT files, not Rhino):

Import SAT Workarounds

1.  You could just use Link CAD instead of Import - this uses the old method, and has many advantages over importing.

2.  You could link the SAT file into a DWG file, and assign layers to it before importing - I have not tested this as it requires the use of another piece of software that I don't ever use.

3.  If you must have the SAT file imported, you could link the SAT file; then assign it to a subcategory (as described above) and a material;  then 'bind' it.  How do you bind a linked SAT file, you might ask?  Unlike linked Revit files, there is no "Bind" command on the ribbon when you select a linked CAD/SAT file.

The command is hidden away on the Manage Links dialog box, and it is not called 'Bind' - it is called Import.  I guess that is because you are converting a linked file into an imported CAD file.  Oh, why do we have these obscure inconsistencies in Revit?


Once you select a linked CAD file (be it DWG, SAT), the 'Import' button becomes available

Once you click on that button and then OK (or Apply), the linked file disappears from the Manage Links list and becomes just like a SAT file imported by the old method.

This workaround is obviously not available in the family editor, as you cannot link CAD files of any type in that environment.

[Edit - Rhino colours/materials applied to objects will import as materials to Revit - read about it herefor info on how to apply colours in Rhino click here]

For more on Revit 2017.1 features, click here

Monday 17 October 2016

What's New in Revit 2017.1

Autodesk recently released Revit 2017.1 - an interim release giving us new features as well as bug fixes.  In the last two years we had similar interim releases: 2015 R2 & 2016 R2; and now we get another change naming .  Like those two releases, what we do not get is a file format change - for which we are very thankful.  It also looks like we have one and only one upgrade file for all flavours of Revit - either just plain Revit or Building design suite - that is a big improvement on previous versions where it became very confusing as to which flavour to download and apply.

Those previous R2 releases were a big deal - they were chock full of small/medium enhancements that made it really worthwhile to upgrade as soon as possible.  In fact they gave a big push to those who had not yet upgraded to the major annual release, and made it worth going through the pain of a file format change.
This year I am not so excited by the interim release enhancement list.  There will be some things that are a big deal to some people but most of the enhancements don't happen to interest me much.  Here are a few comments on some of them - full list over at Inside the Factory:

New in Revit 2017.1

Dynamo Player

'Dynamo Player' has an icon on the ribbon that allows users to run scripts without opening Dynamo or knowing where the scripts are saved (providing you set it up correctly for them).  This promises to be extremely useful for all those Dynamo scripts that you have created and have floating around.  Now you should be able to get non-Dynamo users to make use of them very easily - providing your Dynamo scripts are robust of course.  This is the first iteration - it does not handle all situations yet:  scripts that require user input may work, depending on how they have been set up - refer to discussion over at DynamoBIM

Updated Dynamo

It is not clear whether that is just part of the ongoing process of improving Dynamo?  Would you still get the same functionality by just installing the latest version of Dynamo - or have there been some underlying changes to Revit that enable more functionality?

Import 3D shapes (Rhino/SAT files)

You can now import Rhino and SAT files directly, and assign a category to them, using the 'Import CAD' command.  You could previously import SAT files (not Rhino), but not assign them to a category.  This is available in the project environment or family editor, although many people would not recommend importing any CAD  files directly to a project (better to keep them within a loaded family).


This option is not available with 'Link CAD', although you can link SAT files as previously.
Assigning a category gives you better control than we had previously when importing SAT or DWG files (it does not apply to DWG now).
Choosing a category allows you to:
  • subsequently schedule imported files by category
  • Cut section properly (for cuttable categories) - previously you had to link the 3D CAD files within a family to make this work.
  • If you import into a family, you can change the category later on - this is probably better practise anyway.
The first Rhino file that I tried to import using this method failed, where the equivalent SAT file worked well.

Element Override has been improved so that an imported Rhino or SAT file can now have its surface pattern overridden (this was not previously possible for SAT files).   Surface pattern overrides does not work on imported 3D DWGs.


You can now dimension imported Rhino & SAT files directly - providing they have parallel edges or arcs.

What it does not let you do is:
  • Assign subcategories to imported elements (in family editor or in-place family)
  • Assign a material
Both of these would be very useful - let us hope it follows soon with further improvements.

[Edit] This new capability has in fact replaced the old method of importing SAT files, and in the process lost some functionality - this may affect your workflows.
For a more detailed analysis of exactly what has changed between the old and new methods of importing SAT files, click here

High-Resolution monitor support

If you use 4K monitors then this will be popular - otherwise it is of little interest to the average user? Something for the future for most people, I guess.

Repair Central Model Tool

New tool to fix the corruption in a central model and create a new central model - this sounds very useful for those rare occasions when a model gets corrupted.  You might be able to fix it right away instead of sending it to Autodesk.


Model in perspective views 

Add, move, copy, rotate, or align elements in a live 3D perspective view - many people will disagree with me but I think this is a complete waste of development time and energy.  The nature of Revit perspective views is such that they are so hard to navigate in that they are effectively static plotting views.  Until you can move around in perspective like you can in other 3D environments, I can't see why you'd want to actually work in perspective.


Stairs & Railings

Here are two very minor little stair and railing enhancements - neither will revolutionise the way you use the tools but just make your life a little easier.

Railings: Top Rail & Handrail Type Properties more accessible

The Top and Handrail properties can now be accessed directly from within the Railing Type Properties dialog - by clicking on the hidden link button to the right hand side of the property.
Previously there was a drop-down menu that appeared when you clicked in the 'Top Rail Type' property, which allowed you to choose a predefined Top Rail.  Now there is a link button - not to be confused with the Global Parameter associate buttons that could potentially be in the column to the right (but they are not activated here so the column is blank).

Click on the button and it takes you to another dialog box:  the Top Rail Type properties.

This allows you to either just select a type from the drop-down menu at the top, or else duplicate to create a new type and modify it.

This may confuse users who are not familiar with this UI technique of linking from one type property to another (it does happen elsewhere in Revit, but not in every situation, sadly).  It would have helped to avoid confusion if they had automatically offset the dialog box so that you could see the other one is still behind - you can do this manually yourself.

Once you have chosen/changed the Top Rail type properties, click OK and it returns you to the Railing type property dialog.

All this means that you no longer have to go searching in the project browser to chnage or create new Top Rails and Handrail types.  A welcome change, but I would like to see some more significant tidying up of the Rail/Top Rail/Handrail train crash - so that we don't have multiple ways to create these things, and that the workflow is clear and predictable.  Currently the old Rail definition works quite differently from the new Top Rail definition, and the end results are not consistent.  Neither of them is capable of turning a tight corner at a landing!!

Stairs Parameters Tooltips

"New detailed tooltips include illustrations and helpful hints for stair elements settings and controls" - this is of minimal usefulness in my opinion.  It only works if you have Tooltip Assistance options set to 'High', which most people would disable due to irritating videos that fly out over the ribbon and get stuck there.  So, most people will never even see this new feature.
These new tooltips only explain a little about individual properties, not how the whole matrix of properties relate to each other - that is where most people struggle.

I would much rather that the Factory spent time fixing things that affect us daily - like the bug that prevents us copying and pasting stair arrows.

Structural & MEP

For the full list go to Inside the Factory:

Conclusion

As always, any enhancements are welcome, but you will need to decide if the ones here are compelling enough for you to make the upgrade.  If you are already running v2017, then it is a minimal disruption upgrade, and you might as well go ahead.  If you are still on v2016, holding out for all the goodies in v2017 R2 (.1), then it would only be worth the disruption if you see something here that will dramatically affect your workflow.