The underlying import engine for this new feature is different to the previous one used for importing SAT files. I have heard anecdotal evidence that SAT files imported in v2017.1 perform better than in v2017; and that it may import more (of the) models, or sometimes not at all - at this stage it is too early to tell, so I will concentrate on the changes in functionality.
Sat vs Rhino
What is SAT? It is not a satellite. It stands for 'Standard ACIS Text' file format.
ACIS is a 3D geometric modelling kernel used by various different softwares (currently owned by Dassault) - but since it is open-source, its data file structure has become a commonly used industry 3D model translation format. Revit can only import/link SAT v7 or earlier (as of 2017.1).
A rhino file is the native file format (3dm) of the 'Rhinoceros' 3D modeling program (by McNeel & Associates). Until Revit 2017.1 it was not possible to import rhino files directly - you had to use a whole menagerie of software such as Dynamo, Rhynamo, Chameleon, Hummingbird and who knows what other creatures.
The Old SAT Import Method
Before evaluating the relative merits of the old vs new methods of importing SAT files, it is important to understand how people might use the old method - particularly in terms of managing materials and subcategories.During the import CAD process, once you chose the SAT format, the dialog box options were the same as other CAD formats (DWG, DXF etc) - allowing you to choose units, origin points.
 |
| Old import SAT options |
 |
| Old SAT import Instance Properties in project |
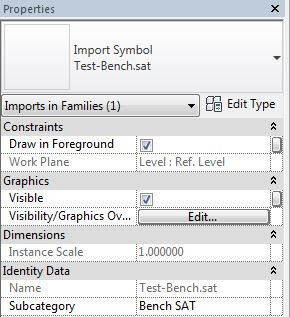
In the family editor, you had all the visibility controls and even a direct subcategory property, which the imported model can be assigned to.
 |
| Old SAT import Instance Properties in family |
 |
| Old SAT import Type Properties |
 |
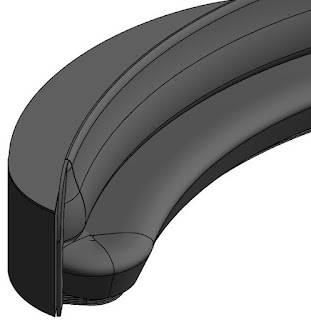
| Imported SAT shaded view |
Subcategories
In the project, like any other imported/linked CAD file, the imported SAT file had a default subcategory of "0", which could be accessed from the 'Imported Objects' tab of the 'Object Styles' dialog box - from there the line weights and patterns could be changedThe subcategory could be renamed - so that multiple imported SAT files could each have a different subcategory.
Materials
The object style material could also be changed, so that the imported SAT looked different in all views |
| Imported SAT with material over-ride in Object Styles |
New SAT Import Method
During the new 'Import SAT' procedure, we have lost all those options for controlling units, origin points, correcting off-axis lines etc. All that is replaced with just one 'Category' drop-down menu.What this means is that we can no longer control units/scale or location. You have to know the units in advance, and make sure that they match the units of your current file exactly. However, you may occasionally get a dialog prompting you for import units if the units are not defined in the SAT file
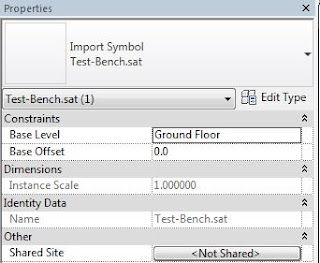
Once the file is imported, the instance properties have lost the base level & offset, which is extremely unfortunate; we have gained Image, Comments, Mark and Phasing - all of which may come in useful, particularly when tagging.
The type properties have lost the scale settings, but gained a whole swathe of standard system properties, again useful for scheduling and tagging:
In the family editor, we now have the same properties as in the project, although I can't see the benefit of having them here, as they will change in the project with every instance.
Once the SAT (or Rhino) file has been imported, it is not possible to apply a material, although the new import engine supposedly should support materials if they are defined in the original file (even if only as a colour). [Edit - Rhino colours/materials applied to objects will import as materials to Revit - read about it here; for info on how to apply colours in Rhino click here]
If you choose a 'cuttable' category such as casework or generic, then you can cut section correctly through directly imported SAT/Rhino files without having to first host them in an in-place family. Once imported, you cannot change its category in the project environment; in the family editor you can change the category.
Swings and Roundabouts
What have we gained with the new method:- Can import a rhino file directly (if it works)
- Apply a category directly to import
- Can over-ride surface pattern by element per view
- Can schedule imported elements
- Can tag imported elements
- Can dimension imported elements - where edges are parallel or have arcs
- Use imported elements for bounding rooms, providing they are put in a suitable category (such as walls, floors, ceilings) - the imported element has a 'room-bounding' checkbox, but I could not get it to work!
- [Edit - Colours/materials applied to objects in Rhino will import as unique materials to Revit]
What capabilities have we lost with the new method:
- No scaling on insertion (unless the file is unitless)
- No rescaling after insertion
- No base level or offset
- No location control - presumably just uses Origin to Origin?
- No 'Current View Only' checkbox, if for some reason you wanted to flatten your SAT file to 2D
- No subcategory
- No material per subcategory (can only edit materials if applied as colours in Rhino first) [edit]
- In the family editor - no visibilty controls (Visible checkbox and Detail Level)
Many people will have devised their own workflows when importing SAT files. If those workflows rely on any of the capabilities that have been lost, you might be cursing version 2017.1 after the upgrade. Here are some workarounds for dealing with the problem (with SAT files, not Rhino):
Import SAT Workarounds
1. You could just use Link CAD instead of Import - this uses the old method, and has many advantages over importing.2. You could link the SAT file into a DWG file, and assign layers to it before importing - I have not tested this as it requires the use of another piece of software that I don't ever use.
3. If you must have the SAT file imported, you could link the SAT file; then assign it to a subcategory (as described above) and a material; then 'bind' it. How do you bind a linked SAT file, you might ask? Unlike linked Revit files, there is no "Bind" command on the ribbon when you select a linked CAD/SAT file.
The command is hidden away on the Manage Links dialog box, and it is not called 'Bind' - it is called Import. I guess that is because you are converting a linked file into an imported CAD file. Oh, why do we have these obscure inconsistencies in Revit?
Once you select a linked CAD file (be it DWG, SAT), the 'Import' button becomes available
This workaround is obviously not available in the family editor, as you cannot link CAD files of any type in that environment.
[Edit - Rhino colours/materials applied to objects will import as materials to Revit - read about it here; for info on how to apply colours in Rhino click here]
For more on Revit 2017.1 features, click here


This has killed my work flow.
ReplyDeleteBecause of Revits poor modelling tools I am often designing parts in Inventor or Rhino and bringing them into the family editor - explode cut assign subcat / materials / visability LOD etc. Very frustrating!
Thanks for the clear view of the new "features" and analysis of work arounds.
Thanks for your thorough analysis of this new "feature" in Revit 2017.1. Hopefully the development team do make the improvements required to restore the previous functionality. I would be happy to get the ability to assign sub categories, then we could create a subcategory for each SAT/3DM import and subsequently assign a material override.
ReplyDelete