Working with global parameters in v2017 has quite a number of advantages over doing so in Revit 2016 R2. One of those is the ability to assign global parameters to groupings so that they are segregated in the Global Parameter dialog box under each grouping title - much the same as we can do with parameters in the family editor.
In the family editor this is really important because when you load the family into a project, those groupings are visible in the properties dialog - and the parameters more or less stay where you put them *
(*
there is a bug such that sometimes it does not move them to the desired grouping in a project even if you change them in the family editor and reload).
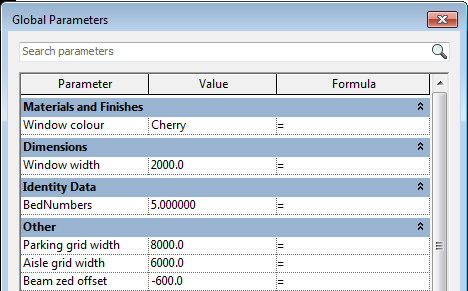
Global Parameter Grouping
With Global Parameters, you only ever see the grouping when you open the dialog box; when associating properties to Global Parameters you just see an alphabetic list of the appropriate parameter type (Length, text, number etc). When you have a lot of Global Parameters in a project it is handy to use the grouping to organise your parameters into related items - you may have numerous groups of different parameters doing completely unrelated tasks, and they all get jumbled up, making it hard to track a particular operation or sequence of formulas.
I have taken to using these groupings for purposes unrelated to the actual titles, in much the same way that people often use 'Other' to hide calculations in the family editor because it is always last on the properties dialog box. You cannot rename the groupings - they are hard-coded into Revit; nor can you change the order of them. And what a strange order they are in!
After a while I got fed up with assigning global parameters to a particular grouping and finding them jump way up or down the list in a totally unpredictable way. Anyone remember the 'jumping lechrechaun' ribbon when it first came out in v2010? Well it isn't quite that bad, but is annoying. So I decided to document the order of the grouping titles, so I would have some chance of anticipating the location when assigned to particular groups - and here it is:
And how logical is that?
- It isn't alphabetical
- It isn't discipline related
- It isn't logical
But what I do know is that Constraints and Construction remain at the top, as the always have; 'Other' remains firmly at the end, which will be comforting to many people. I find it disturbing that 'Dimensions' is languishing down in 20th spot; and as for 'Rebar Set', how did that muscle its way into third spot?
Visibility is way down near the end, as befits its alphabetic status - much the same as I was always close to last for anything at school, with a 'W' surname. But Visibility is actually a useful grouping, that I'd like to make more use of (in the family editor too), but since it is at the end, users are unlikely to ever find it.
Oh well, at least I now have this list to help me predict where the parameters will jump to. I hope it helps other Revit users out there too.


