Last month I posted opinions about the pros and cons of doing sketched stairs using the old tools or the new Component Sketch tools. Now we are going to look at some of the detailed differences between the two methods:
Stair by Sketch
As I mentioned last time, when you first start a 'Stair by Sketch', it seems to be more efficient because you only need to click start and end of a run and it places all the lines for risers, boundaries and run. From that moment on, you will start losing time to the component sketch method, as you discover how unforgiving the old sketch tool is - one tiny infringement of the rules and it will not complete the sketch. Most likely you will spend hours trying to resolve it.
 |
| Old sketch tool - 2 click run creation |
Stair by Component Sketch
When you start the component sketch tool, it does not draw any lines for you - which is why I recommend using the Run tool then converting the run to a sketch. Once you have a component sketch, Revit is more forgiving about how you complete the line work and finish the sketch. Revit also gives you better warning messages when the sketch is not good enough. The rules are a little mysterious, but I have tried to learn them by seeing what I could get away with or not - so here are some of the examples:
Stair Path Lines
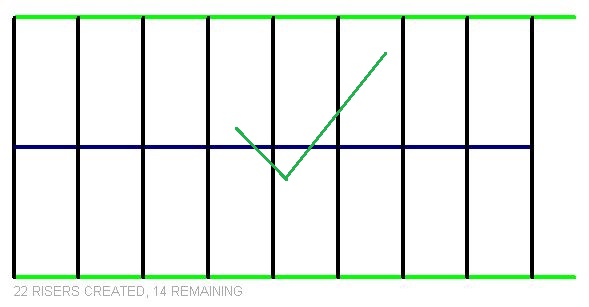
The stair path lines define the plan extent of the risers - they also define exactly where the stair path arrow will go. On stair Runs they have to be very precise, as the error message will tell you:
"
Invalid stair path. Stair path should connect both start and end riser, and cross all other risers."
- The Stair Path line must start on the first riser
- The Stair Path line must finish on the last riser
- The Stair Path line cannot stop short or go past the riser lines
- Two intersecting run lines must meet perfectly at a corner on a cranked or winder run (not cross over each other)
- Landings also have a Stair Path line, but its only purpose is to locate the stair path arrow will go. For the penalty of no longer having an automatic landing, you could convert it to a sketch in order to get your stair paths right.
 |
| Edit landing to create T-shaped stair path |
- In fact you can pretty much do what you like with them on a sketched landing.
Boundary Lines
Boundary lines define the edges of a stair run.
- Boundary lines are actually displayed dark blue, but you have to zoom in really, really close to see that they are not black lines.
- They must extend up to or beyond the last/first risers, but not stop short
 |
| Boundary line overruns OK |
 |
| Boundary line shortfalls will not work |
- They do not have to join with the last/first riser, as long as they line up with the end - there can be a gap as Revit treats the riser lines as infinite (or at least very long)
 |
| Risers do not need to join boundary lines |
 |
| Risers can overlap boundary lines |
 |
| Stair run created from previous sketch |
- Two boundary lines meeting at a corner must intersect (cannot have a gap or overlap)
- Stair boundaries can be curved
 |
| Curved stair boundaries |
 |
| Maybe not such a good design |
In the above example it would be better if the curved lines were riser lines not boundaries
Riser Lines
It is not possible to change lines from boundary to riser (or vice versa), so you need to choose the correct line type before drawing them.
 |
| Curved riser lines |
- Riser lines can meet at a corner, but not overlap
Warning Messages
Be sure to read exactly what the warning says.
- If it says 'Invalid Sketch. Can't create run from this sketch' then it is a problem with the sketch (not surprisingly)
- If it says 'Invalid stair path' don't waste time looking at the boundary or riser lines - just check the stair path lines (you know, the blue ones!)
- If it says 'Cannot make stair' - then it is not a sketch problem, but most likely a 3D geometry problem - maybe an impossibly thin riser element (in which case try changing it to a monolithic stair just to check).
What Can You Get Away With?
 |
| Could this possibly work as a stair sketch? |
 |
| With the component sketch tool, no problem |
Link to Stair Sketch Tool
Link to Stair Index Page


good advice I will try and come back to you
ReplyDeleteThanks it helped me...!!
ReplyDelete