BILT Speaker

BILT Speaker
RevitCat - Revit Consultant

Sunday, 11 March 2018

The Revit Pin Icon

So you think you know what the pin icon in Revit looks like, and exactly what it means?  Think again - the icon actually changes all the time, depending on the situation and sequence of events.


Most elements can be 'Pinned' in Revit to make them more stable:  when an element is pinned in Revit, it cannot be moved, deleted or edited without unpinning it – but there are exceptions . . .

The Ribbon Pin Icons

When you select an element in Revit, the ribbon displays a 'Modify' panel with two icons for pinning/unpinning (top right of the panel):

These icons are used as command functions to operate on the selected element(s); they also indicate what command is possible on those elements - in effect, showing the current 'pin state' of the  element, but in a confusing way:  the greyed out icon indicates the current state.
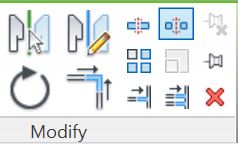
  • The lower right 'Pin' icon will be available if the element is not pinned
  • If the element is already pinned, it will be greyed out
 
  • The upper right 'Unpin' icon will be available if the element is already pinned
 
  • If the element is not already pinned, it will be greyed out
  • If multiple elements are selected, and some are pinned, some not, then both pin and unpin icons become available, so you can no longer tell the state of any of them from the ribbon icons.
 

Element Selection Pin Icons

The icons that display on the selected element operate in the more logical (but reverse) fashion - as well as being command functions when clicked on, they do actually indicate the current 'pin state' of the  element(s).
  • Each element has its own icon, so you can tell the state of each one.
  • Pinned elements show a blue 3D pin icon
  • Elements that were once pinned but are now unpinned sometimes show a blue pin with red cross - but it depends on how it was unpinned.
This is where it starts getting tricky:
  • If you click on the blue pin icon on the element, Revit now will show a red line through the pin to indicate it is now unpinned but was previously pinned - this can be a good reminder that you should repin it after performing some edit operation on it.
  • Revit remembers this 'previous pin state' even when you close the session and open the model again later - when you select the element it still shows the blue unpinned icon - I like to refer to this as temporary unpinning.
  • However, if you use the ribbon command icon to unpin, then the blue element pin icon totally disappears - I like to refer to this as permanently unpinning.
The keyboard shortcut to permanently unpin elements is ‘UP’. Multiple elements can be unpinned at one time using the UP shortcut.  There is no keyboard shortcut for the temporary unpin command.

This difference between the two operations is almost like a partly implemented idea for a proper temporary unpin command - I wish that Autodesk would take it one step further and give us a proper temporary unpin (or persistent pin):  this would allow us to unpin an element, then edit it, after which it would automatically repin itself.  There is a precedent for this in Revit with the temporary 'Exclude Options' selection checkbox (which rechecks itself automatically).
Feel free to vote for my Revit wishlist idea for Persistent Pins


Selection Settings

In the bottom right corner of the Revit window are the orange selection pin icons, although these perform a totally different function:
  • They display the status of whether you will be able to select pinned objects or not - they also operate as switches between the two modes.
  • The red cross on the icon means that you cannot select any pinned elements.

Refer to Hidden Commands - Selection Locks

Pin Visibility

Element pin icons are not always visible:
  • In a workshared model, when you select an element, it displays the 'Workshare puzzle' icon - this will obscure any pin icons
  • To see the pin icons you have to take ownership of the element(s)
  • you can click directly on the icon to remove it (and take ownership of the element), or right-click ‘Make Element Editable’ to take ownership and remove the puzzle icon.


Pin icons may also be hidden by group add/remove icons if you select an element inside a group without editing the group.


The way around this is to edit the group

Chain-Pins


Chain-Pinned ‘hosted elements’ (eg. Curtain panels) behave completely differently to normal pinned elements.  However, the icon for this is very similar - it has a chain link next to the pin.
The same pin/unpin commands and ribbon icons are used but they operate in a quite different way

Refer to Chained / Pinned Hosted Elements


Thursday, 15 February 2018

Selecting Pinned Elements in Revit

Following on from an earlier post about 'Chain-Pinned' elements in Revit, it is useful to point out the implications of different kinds of pinning when selecting elements.

Selecting Chain-Pinned Elements

Different hosted elements can be selected in different ways:
o        Tab-select to individually select chain-pinned elements.
o        Click-and-dragging across curtain walls or railings will also select individual hosted elements such as curtain grids, panels, mullions, top rails, handrails or supports  (regardless of whether they are chain-pinned or not).


You may find that you cannot select chain-pinned elements by either method.  This may be due to the ‘Selection Controls


‘Select Pinned Elements’ can be turned on or off as desired;  it may be useful to disable selection so that chain-pinned elements cannot be selected when click-and-dragging across curtain walls (such as curtain grids or mullions)

 or


If ‘Select Pinned Elements’ is disabled, it applies to both pinned (parent elements) and chain-pinned (hosted elements) – thus, if a curtain wall is pinned, you would not be able to select the wall or the hosted mullions etc This is particularly noticeable when you click-and-drag across many curtain walls – you will see a forest of chain-pins


In this situation, it is well worth using the selection filter to select only the parent categories (eg. Walls)


Thursday, 8 February 2018

Revit Chain-Pins

Revit has two entirely different ways of pinning elements, but they share the same UI commands & icons, so this is a recipe for confusion.  I will try to shed some light on the differences here:

Most elements in Revit can be manually pinned by a user.  This will lock an element in place to prevent it being moved, rotated or deleted.
 Pinned elements can be unpinned  to free them up to be moved, rotated or deleted

Chain-Pin

Some Revit elements host other elements that can be locked / unlocked in place on the host – this also uses a ‘Pin’ icon with a chain-link symbol beside it.  The difference in icon to a normal pin is very subtle, and easily missed - but is really important to see and understand.
I like to call these ‘Chain-Pinned’ elements, because of the chain-link symbol - and we need some kind of phrase to differentiate them from regular pinning.  They could also be described as host ‘Type-Driven’ because some of their parameters are controlled by the Type Properties of the parent.

Examples of Chain-Pinned elements are:

Element / Category types
o        Curtain Wall Grids (only if spacing is set in curtain wall type)
o        Curtain Wall Mullions (only if mullion type is set in curtain wall type)
o        Curtain Wall Panels (only if panel type is set in curtain wall type)
o        Handrail Supports

Unpin

When a ‘Chain-Pinned’ element is selected it can be unpinned by clicking on the element pin or the unpin symbol on the ribbon.  This can be confusing because the pin symbol on the element displays its current status (pinned, with chain-link);  while the icon on the ribbon is an action, showing what you can and might want to do to it (but no chain-link, because the command doubles up for both kinds of pin):

o        The element symbol will change to unpinned status, with the chain-link cleverly hidden behind the red cross - you have to look carefully!

o        It makes no difference to the behaviour which pin icon is clicked on – element or ribbon (unlike regular user pins);  the unpinned icon always shows up when the element is selected.

Chain-Pinned Element Behaviour

When a Chain-Pinned element is selected (but has not been unpinned): 

o        Some of its properties may be locked (eg. Hand Clearance on Handrail Supports)
o        Its type is locked
o        It cannot be moved or otherwise manipulated
o        It cannot be deleted

When a Chain-Pinned element is unpinned:
o        Some locked instance properties are available to be changed (eg. Hand Clearance on Handrail Supports)
o        Its type is available to be changed to others of the same category
o        It can be moved (Curtain Wall Grids & Handrail Supports)
o        It can be deleted (Curtain Wall Mullions & Handrail Supports)

An unpinned Chain-Pinned element can be re-pinned:
o        Its properties will revert to those dictated by the parent (eg. Hand clearance on Handrail Supports)
o        Its type will revert to that set in the parent family type.
o        It will be moved back to its original position
o        Deleted unpinned hosted elements cannot be directly replaced to their original position.  This has to be achieved by alternative methods: 
  • Mullions can be added to curtain grids; 
  •  Handrail Supports can be reinstated by copying another one or by resetting the whole handrail (Be very careful with this - all other modifications will be lost too!)


Editing Chain-Pinned Elements

The only Chain-Pinned elements that can be edited after unpinning are curtain panels – using the ‘Edit In-Place’ functionality, which allows you to change the outline of the curtain panel using sketch tools.

I hope this sheds some light on a confusing Revit topic.  Go forth and unchain those pinned hosted elements.  Or don't, as the case may be - sometimes it is important for them to remain chain-pinned so that global changes can be quickly made.  Once unpinned, you lose that capability.

Wednesday, 31 January 2018

RevitSpeak

It has concerned me for some time now that "RevitSpeak" is slowly but surely entering into common usage in the building industry around the world.


What do I mean by "RevitSpeak"?  Well, I mean the usage of words in the Revit User Interface that are not technically correct, or they are specifically American words that were not previously in common usage in other English speaking countries - some of these are now very commonly (mis)used in architects offices around the world.  One of the confusing things for me is that I no longer know if these words are 'incorrect', 'specific to Revit' or just common American words that are different to British, Australian, New Zealand etc construction terminology.

These days it is no good doing a search on the Internet because many of the results come up with examples from Revit models or drawings - so it does not clarify which are incorrect or just different.

Here are some examples:

1.   "Mullion" is defined as:
  • A mullion is a vertical bar between the panes of glass in a window (Oxford dictionary)
  • A mullion is a vertical element that forms a division between units of a window, door, or screen (Wikipedia)
  • In Revit, a Mullion can be a vertical or horizontal element between panes of glass (or other panels) on a curtain wall.  Now, this is just plain wrong!  A mullion should be strictly vertical.
  • A transom is the horizontal member in a curtain wall or window - although it seems that the American definition of a transom is the window pane over a door (ie. a "Fanlight" in correct English)
  • And what is a Muntin - pray tell?  Luckily that one doesn't appear in the Revit UI.
A random selection of images from the internet shows various conflicting results:
Image result for mullion definition
British definitions
Correct Curtain Wall Definitions
RevitSpeak Window


2.  Casework:
This may mean kitchen cabinetry in the USA, but to me it could mean, maybe working on a legal case?  The correct word is/was "Joinery" - I resolutely have all my libraries organised with a folder for Joinery families (with a 'Join' or 'JN' prefix/abbreviation).  However, more and more non-American Revit using people talk about Casework.


3.  Mark:
As far as I'm concerned Mark is a man's name; or maybe a spot or line (in the sand).  Somehow in Revit it refers to a Number (or #?) - I guess that is another Americanism?
Luckily its very easy to create a Shared Parameter called "Lot Number" or whatever you need - and that also avoids all those pesky "Duplicate Marks" (some kind of Revit twins?)

Or maybe it is a clever literary reference to the author of Huckleberry Finn?
Mark Twain?


4.  Family:
Talking of Twins, does anyone know what Family Planning in Revit is all about?   How many families have you created recently?  No one in a Revit using architect's office seems to think that is amusing any more.

I could go on . . . .