BILT Speaker

BILT Speaker
RevitCat - Revit Consultant
Showing posts with label unable. Show all posts

Friday, 7 August 2015

Part 1 - Creating Sinuous Curve Swept Blends in Revit Adaptive/Massing Environment

Loch Ness monster created in Revit

In a recent blog post I was trying to create a swept blend (or loft) along a single spline path
and I encountered a few problems, which were mostly (but not all) solved by including the spline path as part of 'Create Form' process.  That was just a preliminary test for what I ultimately wanted to create:   A swept blend along a sinuous multi-segment path made up of arcs and lines - not a spline (as seen above).
Here follows the next instalment in my trials and tribulations.  I will start simply by comparing the traditional methods and conceptual massing creation of a sweep, before moving on to a swept blend.

Traditional Sweep

In the traditional family editor, Revit can easily create a sweep along a sinuous multi-segment path, unless the radius of a curve on the path is too small and causes impossible geometry.  This example below is a simple sweep of one profile along several linked arcs and lines.  It creates a pretty good looking form if the arcs/lines are at perfect tangents to each other (in both the path and profile) - it does not show any join lines.
Traditional family editor sweep

CME Sweep

Try creating it in the Adaptive/Conceptual Massing Environment (CME) and you don't get such a good result - and there is less likelihood of Revit actually creating the form at all.  The example below is created using the same geometry as the one above, with some provisos:
  • The sweep path of perfect tangent lines and arcs had to be traced as reference lines with the pick line tool as you cannot copy sketch lines from the traditional family editor into the Adaptive/Massing environment (Grrrr - why not?).
  • The profile had to be recreated as an adaptive component profile as you cannot use regular Revit profiles in CME.  Refer to Swept blend using profiles in Adaptive Components for how to create and host the profiles.
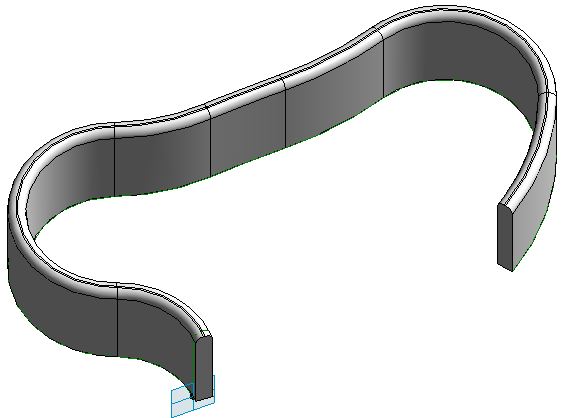
CME Sweep using one profile and reference lines/arcs as path
Notice the nasty join lines at every change of line/arc in the path;  likewise in the profile, which again has perfect tangent transitions.

CME Swept Blend

If you try something similar as a swept blend you run into roadblocks very quickly:
  • Host another profile (similar or in this case same shape, lower height) at the other end of the path
  • In this example the easiest way to do that is to place a point on the reference line/arc;  then host the adaptive profile onto the point
  • Select the two profiles and the chain of lines
  • Create Form
  • Computer says 'No'.  Refer to Unable to Create Form for more variations on this dialog box
CME Swept blend on multiple arc/line path - failure
  • If you try moving the host points further around the arcs on the path so that the path is less sinuous it still fails
  • Try putting the host points and profiles on almost straight section but hosted on different lines - still no go
Another swept blend failure
  •  It is not until you put the two profiles onto the same line or arc segment that it actually succeeds in creating a form (if you select only that segment and two profiles)
This technique is getting painful and is obviously not going to work - Revit cannot create a swept blend on multiple segment paths!  What a major limitation on a sophisticated 3D modelling program.

Another approach is required:

How to convert the arcs and lines into one path?  Well you could try tracing a spline over the top - but that has several problems:
  • A spline is not easy to set out on a drawing for construction;  it cannot be dimensioned
  • A spline will not follow the original path accurately - it will bulge out when there should be a smooth transition from arc to straight line
  • The spline will not update if the reference line path is changed

Divide Path

Another option is to use an inbuilt Revit technique:  'Divide Path' - this creates a single element that sits on top of multiple lines/arcs selected in a chain.
The divided path has an added benefit of automatically generating nodes on which to host the profiles.  The next roadblock is that when you select the profiles and then the divided path, the 'Create Form' icon disappears - it cannot use a divided path as a sweep path.  Aaaaargh!
You could start placing profiles along the path, and try to link them as a form - by selecting them all and 'Create form' (without defining a path).  Sadly it does not work - it is unable to create form.  Even if it could, if they are too far apart it might take shortcuts between each profile (ie. it does not respect the order they are on the path).
If you select only some of the profiles, and create a form, you can see that it will not follow the path at all closely, especially if they are not close together.

 If you create separate forms for each pair (or trio) of profiles you get pretty awful results:
Even if it could get the order right it also cannot do all the profiles in one go as the curves are too tight for it.

So, is the answer to increase the number of nodes on the divided path and add more profiles?
It gets a bit tedious placing adaptive profiles, and sometimes they flip for no apparent reason.

So maybe we can use another Revit tool to place multiple profiles:  Repeaters

Repeaters

If you place just one profile on a divided path node, you can use the 'Repeat' command to array the profile onto every node (they still sometime flip!).
If you select all the profiles, Revit should have a better chance of more closely following the path as it joins them all, right?
The next problem is that you cannot create forms directly from a repeater - you have to first dissolve the repeater using the new (in v2015 r2) 'Remove Repeater' command.
This command was wrongly named in my opinion, as it dissolves the repeater back to individual profiles rather than removing it altogether.
If you select all the profiles, Revit still cannot create a form as the path is too sinuous for it, and it still gets the order of profiles wrong even though they are closer to each other

Unable to create Form
The next trick I tried was to push the profiles back along the divided path so that each was closer together, and did not try to go around such a sinuous curve.  This is simple enough on a Divided Path by changing its 'Beginning and End Indent' properties
 
 I then selected all the profiles and 'Create Form'.  Finally some success:
By hiding the profiles, it showed that the form does not have vertical joints - this is because we did not actually define the path by selecting arcs in the path.  that probably means the resultant form is not following exactly along the arcs, but it is close.  We still get joints running along the top because the profile is made up of arcs and lines.  That would not have happened in the traditional Revit family environment - Harrumph!
But this is still effectively a sweep, not a swept blend.  That part is easy to solve:  each profile has a height instance property (because I made them that way - it could be a type property).  So the heights of each one can be adjusted, and the form follows along.
 
 The profile heights could have been adjusted before creating the form
Once you hide the profiles, it is starting to look like the Loch Ness monster that I was trying to create
The next problem to solve is how to get the form to spread along the whole length of the path . . . .

That is an issue to be solved in the next post Part 2 - sadly it is not as simple as you might guess (if you have followed the process so far)


Monday, 20 July 2015

Tightly Curved Swept Blends in Revit Adaptive/Massing Environment

Following on from my last post about 'Unable to Create Form Element' in the Revit Adaptive / Conceptual Massing Environment, here are a few ideas about how you might just solve the problem.

In the conventional family editor, Revit does not have any major problems in creating swept blends along a single path (one spline or arc or line), unless the radius of a curve on the sweep is too small and causes impossible geometry.  For example this simple sweep of a profile along a spline takes a minute or two to create:

In the Adaptive/Conceptual Massing Environment (CME) you have the added ability to loft shapes - to create blends of more than two shapes/profiles.  However, the rules for getting them to work are immensely more complicated, and often quite baffling.  Below is a particular workflow that I was using just to test a process, and it caused all kinds of issues.  Hopefully it might give you some clues as to how to solve similar problems - particularly if the path is more complex.

Creating Swept blends / Lofted Forms along a tightly curved path in CME

Workflow:
  • Place three points 
  • Select the points
  • Create a spline through the points
 
  • Adjust the spline to have a fairly sharp transition by dragging the middle point
  • Host some new points on spline
  • Host some adaptive profile components on the points
  • Select just the profiles
Select Profiles
  •  Create Form - it fails
  • Try pushing points closer together

  •  Select profiles; then create form - it might work if you are lucky
  •  Maybe you can pull the points back along the curve
  • At some point you get the 'No Entry' sign (circle with line through it), meaning it will not allow you to push the point that far along the spline
  • Try picking the control point for the spline and make it less of a tight curve
 
  •  Then maybe you can extend form by pushing the points out
  • If it is still not creating the form, you may need the spline to be really gentle to start with before you extend the points out to the ends of the spline
  • Point locations along the spline can be controlled by properties, or you can even make it parametric - using the 'Normalised Curve Parameter'.

  • Intermediate points may also need to move to get a better spread along spline
  •  Then try pulling the spline back to a tighter shape - Revit will most likely allow you to create a much tighter shape than it would originally
  • At some stage you'll notice that the form does not follow the spline, it just creates its own shape by linking the profiles
This may or may not be what you want.
  • If you do want it to follow the spline exactly, your life will be easier:
  • Dissolve the form
  • Select the profiles and the spline
  • Create Form again, and Revit will be much more forgiving - it is more likely to create the form with a tighter curve or one that turns more than 180 degrees on itself.  The obvious difference here is that it knows which order to link the profiles.
  • It uses the spline as a path but only extends between the first and last profiles
If you adjust the spline further, until the shape is too tight it will eventually tell you that it cannot create the form.  I have not figured out yet what the rules are.

What I have figured out is that if you go away for a while and drink a delicious cup of coffee brewed by your local barista (preferably a cappuccino), and come back to try again, you will usually have much more success with pulling the spline around into tighter curves with ends that even extend past each other (but not crossing).

Honestly, it is true that if you are too ambitious with the shapes initially Revit cannot cope.  But try adjusting them later and it works much better.  So the moral of the tale is that Revit gets a boost from caffeine just as much as you do.
More thoughts on lofting and swept blends to follow . . . .
Part 1 - Creating Sinuous Curve Swept Blends in Revit Adaptive/Massing Environment
Part 2 - Creating Revit Swept Blends along sinuous multi-segment paths

Saturday, 18 July 2015

Unable to Create Form Element in Revit Massing Environment


Unable to Create Form Element

No doubt anyone who has worked in the Revit Adaptive or Conceptual Massing Environment (CME) has encountered this hated error message, that simply 'cannot be ignored'?

I have recently been the victim of several variations on this error message, some of which were quite puzzling, and even had disastrous results.   Here is a typical scenario of when it might happen, and the sequence of dialog boxes:

Create a framework for a swept blend using profiles on a sweep path
 Refer to 'Creating Swept blends with adaptive profile' and 'Creating Hollow Sweeps' for more details on how to do this:
  • Create a spline in the adaptive/massing environment (external family, or in-place mass family)
  • The spline (or other path) needs to have a fairly tight angle change or else turn through more than 180 degrees over its length in order to demonstrate this issue.
  • Host several points on the spline;   
  • host a profile on the workplane of each point
  • Select each profile component and 'Create Form'
  • Depending on the relationship between the profiles, it might create a lofted form (swept blend), or most likely it will give the following message:
Self-Intersecting Geometry Error
  •  If you click on the 'Expand' button, it tells you nothing except the ID of the form that it cannot create.  
  • It gives you the option to 'Delete Instance', which is not helpful either, as it cannot create the form that it is offering to delete.
  • Try clicking on the 'Show' button and it leads to another series of useless dialog boxes:
  • Click OK to continue
  • Well of course it cannot find a view that shows the form with that ID - because it cannot create the form so it does not exist!  Yes it is sort of consistent with other Revit warnings where it occasionally can find a view showing the offending element - but in this case it is a pointless workflow, and it should not offer us the false hope of showing something it cannot show.

Here is another variation on the error message:
In this case it does not give you any clues about the problem (not even self-intersecting geometry).  At least the Show button is greyed out, because Revit knows it is pointless to try that option.  
No doubt there are plenty of situations where this particular error message might occur, but one I know of is when your profiles have loops inside them - refer to the hollow sweeps post for a solution. 

 (Partial) Solution

Those of you who have some experience with lofting or swept blends in the Massing environment might have already figured out how to solve this issue:
You might have picked up that I only suggested selecting the profiles before create form, but did not include a sweep path - congratulations to those who knew that one.  So, you need to pick the profiles, and the spline (or whatever path) before attempting to create a form.  Revit will then have a much better chance of figuring out what you want to achieve.

However, it still may not work.  In some situations you may not actually want the host framework to dictate the exact form - sometimes you want Revit to directly interpolate between the profiles, which may give a different result.

More on how to achieve this in the next post . . . .


Reorder Profiles Button

  • When creating a form you might be lucky and get a bonus message that seems to offer you a way out:
  • What or where is the 'Reorder Profiles' Button?
  • I spent hours (days, weeks, . . . .) searching for this function in the ribbon, on options bar, in the pantry, under the bed . . . . .
  • Eventually I figured out that someone at Autodesk must have planned to put in a functionality whereby Revit could analyse the order that each of the selected profiles might be changed such that it could actually build the form without self-intersecting geometry - sadly the functionality never eventuated but the dialog message was left hidden in the software. 
  • This functionality does actually exist in some other 3D applications - but not in Revit. . . . .
  • Then one day a few weeks ago, I got this slight variation on the dialog box:
  • Wow - so there is the 'Reorder Profiles' Button:  on the actual dialog box.
  • So, of course I did as I was told, and clicked on it.
  • Bang! Revit imploded and shut down quicker than you can imagine.  No chance to save the files or anything like that.
  • I am not 100% sure about this but it seemed like it actually deleted the Revit file from my hard disk - I can't be certain but I thought I had previously done a 'Save As', and there was no sign of the saved as file.  Maybe we can put that down to the fallibility of human memory?
The moral of the tale is:  If you ever see that 'Reorder Profiles' button, make sure you have a backup of the file before you try it out!

Unable to Create Form Elephant

If you ever see this error message, you are in serious trouble.  But don't worry, all you need to do is to get Marcello Sgambelluri to help out . . . . .