
[Edit: Revit 2018 has a new method for creating multistorey stairs, so the issues described here will not be relevant once you upgrade to v2018; if you are using v2017 or earlier, read on]
Following on from the last couple of posts, here is an alternative method for creating multistorey stairs in Revit - typically where you need the runs and landings to be different to each other on each building level. However, this method could also be used even when upper levels of the stair are the same as lower levels
 |
| Staircase up the Rock of Guatape, Columbia |
Three flight One-Storey Stair
This example assumes an overall stair height greater than a typical floor to floor (4 metres in this case); or else you may need the stair to end up on the opposite directions at top and bottom.- Start with placing two runs, and it will create the first landing. Note that Revit numbers the first and last riser on each run

- Then place another run starting on top of the lowest run (this was not possible prior to Revit v2013); it starts getting confusing already - it tells you how many risers are remaining to finish but its hard to distinguish visually where you are at
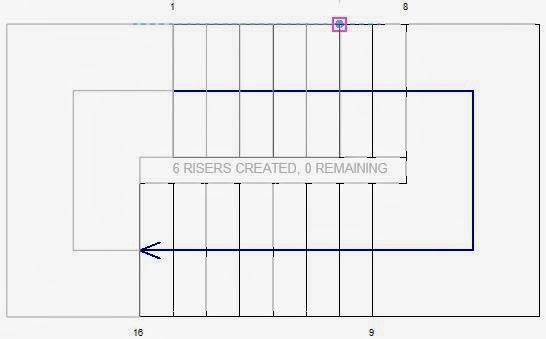
- The top run will display riser numbers when selected, but only after it is placed - this helps you distinguish which run you have selected

- It is much easier to see what is happening in section, elevation or 3D, although riser numbers are not displayed; you do get the shape handles in section/elevation

- When you finish the stair, you will get the inevitable warning message as Revit creates the railings (the stair itself is fine)

- Revit will go ahead and create the railings, with only the usual glitches as it tries vainly to go around the inside corners

- The reason for the warning is that the automatically created railings contain sketch lines that overlap each other. Revit would not normally allow this to happen - certainly if you tried to sketch it that way yourself it would not let you.
So, Revit will create these "railings with warnings" but woe betide if you need to modify the railing sketch lines - it is almost impossible to untangle the overlapping lines.
If you do need to modify the railing, refer to the next post Multistorey Railings - Story 2.

Multi-Level Multistorey Stairs
Once you start going past three flights and over multiple building storeys it gets more interesting. There are two approaches to defining the overall stair height and riser height - the options are somewhat akin in principle to the Array command in Revit:
If all your building storeys are the same height, it should be fairly straightforward, because riser heights would be identical for the entire stair. However, if some storey heights vary, you may run into trouble, as seen below. Both techniques will not allow you to vary riser heights for different storeys, so that aligning landings to storey levels may be a problem.
Define Second Storey Technique
For the Top Level of the stair, you can define the upper level of the first building storey that the stair spans, even though you intend for the stair to keep going above that level. Revit will calculate the riser height and number of risers for that building storey only.

- After placing the first couple of stair runs, you will reach the desired number of risers; Revit lets you keep adding more runs - when you start placing more overlapping runs, the automatic riser numbers in plan will display the Desired Number of Risers + the additional number, which can be a little confusing

- Just for the record, the size of these automatic riser numbers is controlled by the view scale - if you want to be able to read them, just bump up the scale temporarily

- The riser height will be constant for every run - this means that on the runs above the defined Top Level, you may not be able to align the stair exactly with levels where upper storey heights vary

- Once the stair is complete, you will be able to label the step numbers using the "Stair Tread Number" annotation tool. The numbers will display the correct riser number within the whole stair rather than the "Desired +" that you get with the automatic riser numbers. This is a different result to method 1 (virtual upper level runs created using the Multistory Top Level setting) where the upper levels cannot be numbered at all

Define Last Storey Technique
For the Top Level of the stair, you could define the highest level of the stair. Revit will calculate the riser height and number of risers for the whole stair

- The riser height will again be constant for every run - this means that intermediate landings may not be able to align exactly with middle levels where any storey heights vary

- The automatic riser numbers in plan will be the actual number within the whole stair

Once you complete the stair, you will get the inevitable warning message


How do I create a multi story stair with continuous railings when I have different floor to floor heights? Thanks!
ReplyDeleteYes I think that would be a good post. matching railing from one flight to another is very hard to do.
ReplyDelete