BILT Speaker

BILT Speaker
RevitCat - Revit Consultant
Showing posts with label nosing. Show all posts

Tuesday, 20 October 2015

Weird Stair Stuff - part 5 - Top Riser Line Missing

Following on from my post about Revit Stair Subcategory Visibility, I noticed another strange anomaly with stairs in plan.
If you have a stair that ends with a riser and has projecting nosings, the very top riser line of your stair will not display in plan.

Run type properties for tread and riser
Run instance properties

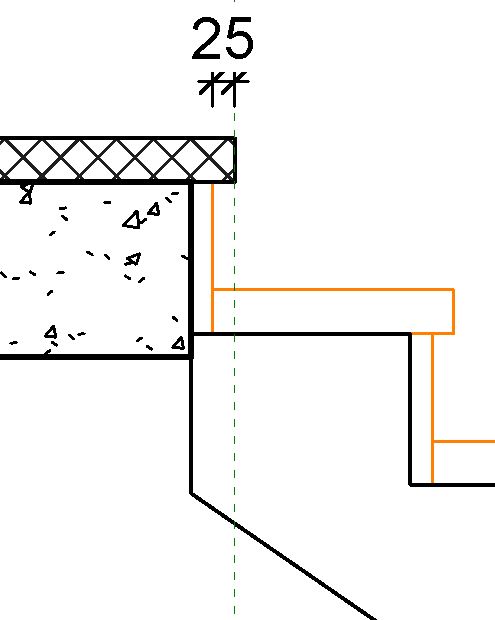
Top tread / riser in section

Instead of showing the top riser and nosing lines, Revit will display an 'Outline' line - this represents the actual top nosing line, or where it would be if your run ended in a tread.

End With Tread

If your stair run does actually need to end with a tread, then the subcategory visibility graphics presents you with a different problem:

Run ends with a tread


It displays correctly in section but then you have a top tread that may or may not be the same material as the floor finish - and you get a joint line between the floor and the top tread.  If they are the same material you probably don't want to see the joint line;  if they are different materials you may want to see the joint at detailed views but not in general arrangement views. 
Run ends with a tread
It cannot be controlled by subcategory because you would lose all the outlines (including sides of stair) if you turn off the 'Outlines' subcategory.  So you would need to resort to the 'Linework' tool to hide the line.

The factory has at least corrected the problem of where the stair path arrow ends - on the top riser/nosing line.  With the old stairs it used to include the top tread, which ws totally confusing.


Go to Revit Stair & Railings Index Page

Thursday, 15 October 2015

Weird Stair Stuff - part 4 - Stair Subcategory Overrides

Go to Revit Stair & Railings Index Page

Subcategories (again)

The last couple of posts have been about stair and railing subcategories, which changed in v2013.
I was recently asked two questions about how to override the display of parts of stair.  After my success in finding a workaround with railing overrides, I thought it should be possible to do something similar with stairs, particularly as they are now made of separate components (runs, supports and landings), and have more subcategories . . . .

Visibility Graphics

In the Visibility Graphics dialog box, sadly stair subcategories do not allow individual overrides (except for visibility and lines) - it is the whole stair or nothing [the greyed out boxes in the dialog screen snapshot below are not editable].  Transparency, surface patterns & halftone would all be extremely useful for all or any of the subcategories.

Visibility Graphics Stair Subcategories

View Filters

If at first you do not succeed, try a different tack: 
After encountering a similar limitation on railing subcategories, I tried creating a view filter, which worked for the particular railing subcategory I wanted (although filters are not available for all).
Unfortunately, view filters do not work for any stair subcategory - they just do not show up in the list.  So it is just the stair category - all or nothing again.

Strangely enough there seem to be numerous stair parameters to choose from if you do want to filter the whole stair.  But if you study that list, you'll see that it is only overall stair parameters, and not any of the really useful things, which are properties of a run or landing like "Actual Width", "Monolithic Material", "Tread Material".  So in fact that list of parameters that you can filter by is pretty limiting.

We are running out of options here - its getting desperate:

Override By Element

  • Override By Element works on the whole stair
  • Override By Element does not work on individually selected components such as Support, Run or Landing (it is greyed out when you right-click on an individual stair component).
So that didn't get us anywhere useful.

Linework Tool

What is the second last solution to over-riding things in a view?  The 'Linework Tool'.  Well, that works but it is pretty tedious to work with, and quite clunky - as stairs are system families, you cannot even tab-select multiple lines or the whole component, so it is line by line.

So, first do a temporary transparency override on the whole stair, then use the linework tool to make each riser and tread line dashed:

Then reset the override to remove the transparency - and the tread/riser lines show dashed beyond the support (stringer):
That would have been so much better if we had overrides or filters on subcategories.  Although, having said that, we have the problem that in section/elevation the risers and treads are not distinguished by subcategory - they are all the same (Treads/Riser), which is again very limiting.

Last Resort

What is the last solution to overrides in a view?  Detail lines and masking regions - but we won't even go there because it is absolutely forbidden as far as I am concerned!

In my next post I will talk about the other stair subcategory workaround I had to come up with - and maybe with slightly better results.  But it is a seriously weird workaround.

Go to Revit Stair & Railings Index Page

Saturday, 10 October 2015

Revit Stair Subcategory Visibility

When the new stair components came out in Revit 2013, they introduced some new subcategories.  This also added limited flexibility of control but introduced some confusion too.  Since the Autodesk Revit help files only make a half-hearted attempt to explain what the subcategories are, I thought it needed proper documentation . . . .


New stair subcategories

Who stole the Up/Down arrows and text?  Well, they are now under the Annotation tab, since stair path arrows are now annotation.
New stair annotation categories
 The new stairs elements are still not displayed as actual 3D objects in plan – 2D representations are generated as they have always been (except in detail plan views). This means that many of the old problems still exist – lack of ability to display the actual materials and patterns on the stairs; strange behaviour with cut line locations etc.  However, the 2D representations have been given an overhaul, giving us more fine control over display (in plan only) and annotation. With this comes additional complexity and management work in setting up view control and templates.

Visibility controls for stairs are all within “Visibility Graphics”. No stair visibility settings are controlled by “Level of Detail” (it is a different story for railings!).  Along with adding new stair and railing subcategories, the naming has been rationalised so that the linework above the cut line is now grouped together with the prefix <Above>; there is one subcategory for hidden lines below – that being “Riser lines”.


 So what is the difference between 'Nosing Lines', 'Outlines', 'Riser Lines' and 'Treads/Risers'?  The easiest way to describe it is by colour coded diagrams.  I wish that the Autodesk help-files would do something like this.
Colour over-rides in Visibility Graphics

Stair plan - coloured subcategories
  • Nosing Lines - furthest extent of the tread or nosing in plan.
  • Riser Lines - represent the vertical outside face of the riser, normally shown dotted as it is hidden beneath the tread. NB. On stairs where the Nosing Length is zero (no projecting nosing), the Riser Line will be on top of the Nosing Line so it will appear as a grey dashed line over the top of a solid black line - even on a concrete monolithic stair.  If you turn off the Riser Line in view visibility it will solve this graphic issue.
  •  Outlines - top and bottom nosing line of each run plus sides of each run and landing including external supports (see below).
  •  Treads/Risers - it seems that this subcategory is not used?  Well, not in plan anyway, but have a look at a section view (see below).
Colour coded plan - Supports hidden

So, what happens in section/elevation?  This is where the added flexibility of new subcategories  completely falls down.  The entire run and landing elements are shown in the same subcategory - and it is a different one from plans:  'Treads/Risers'.
 

So there is no capability to show/hide or over-ride just riser lines or treads or landings.

Location of Nosing and Riser lines in section


Mix ‘n’ Match Old and New Stair Visibility

If you have a mixture of old and new stairs in one model, then it gets harder to control the appearance of stairs and annotations in each view.
Some subcategories will only affect visibility of new stairs but not old:
  • <Above> Cut Marks - New stairs – only applies to double zig-zag cut marks;  Does not apply to old stairs.
  • <Above> Riser Lines -  Does not apply to old stairs (cannot be shown on old stairs)
  • <Above> Nosing Lines - Does not apply to old stairs
  • <Above> Outline - On new stairs it is only the overall stair component outlines;  Old stairs includes the overall stair outline plus nosing lines;  .
  • Cut Marks - Does not apply to old stairs (controlled by a type property for the stair)
  • Nosing Lines - Does not apply to old stairs
  • Riser Lines - Does not apply to old stairs (cannot be shown on old stairs)
  • Outline - On new stairs it is only the overall stair component outlines;  Old stairs includes the overall stair outline plus nosing lines;
  • Treads/Risers - On new stairs it is all the tread, riser, nosing and landing lines;  Does not apply to old stairs
  • Supports - Stringers and supports in both old and new stairs.

 View Templates

What all this means is that you will need to modify your project template file to have the right subcategories on/off in default plan views (most likely turn off several of the <Above> subcategories); the only one turned off by default in a Revit plan view is “<Above> Up Arrows”.  The use of View templates will now become essential for the control of stair visibility in different types of plans, since there are more subcategories to control.
Set yourview template defaults
Stair Annotation visibility

Object Styles

The OOTB project default settings for the new stair subcategories are not necessarily what you will need.
Default object styles for stairs
You should check and probably change the default Object Styles for stair subcategories – for example, by default all the <Above> subcategories are set as a “Dash - Tight” line style, which is the same as for the “Riser lines” subcategories (which actually represents hidden lines below, where the nosing projects beyond them) – I would make the above and below line-styles (Line Patterns) different.  The Riser Lines should probably be black so that when they are coincident with Nosing Lines, there is no graphic clash.
Proposed Object Style Line Patterns for stairs