BILT Speaker

BILT Speaker
RevitCat - Revit Consultant
Showing posts with label Worksharing. Show all posts

Thursday, 11 May 2017

Autodesk Add-ins incorporated into Revit 2018

I don't recall seeing any documentation about this but it seems that Autodesk have incorporated some of their Add-ins into the Revit 2018 install:


Well, not quite true - they did tell us about the Formit Converter add-in.  There was a checkbox for it during the install process, and if I remember correctly the default setting was ticked so that it would install automatically.

But I am delighted to see that the following add-ins have also been automatically installed in Revit 2018:
  • Batch Print
  • eTransmit
  • Model Review
  • Worksharing Monitor
This is great news as it means that you don't need to search for those and download, then organise to get them installed as part of a deployment, or install them later (possibly involving much pleading with your IT department).

In addition to this, we obviously have Dynamo & Dynamo Player, which are now properly incorporated into the Revit install, and can be found on the Manage tab, alongside Macros (logically), instead of being stuck on the add-ins tab.

Sunday, 2 November 2014

Revit LT - Is it any good?

When I first heard about Revit LT, I thought it would be an exciting opportunity for many people to start using Revit at an affordable price - an effective way for Autodesk to quickly increase their user base.  Then I looked at the list of features available in LT - or rather the list of full Revit features not available in LT.  When I got to "Worksharing" not being available in LT I stopped reading.  What possible use could Revit LT be if it could not operate in an office environment of more than one person?  I rapidly formed an opinion that the only conceivable use for Revit LT might be for content creation.  From that point on I have ignored LT as being a waste of time.

Recently, I had an opportunity to test Revit 2015 LT for a couple of hours - so curiosity got the better of me, as I wanted to see what happened if you tried to open a workshared file in LT.  Here are some of the things that I found - information that it is not easy to find on Autodesk websites.  This might help you to make up your own minds about whether Revit LT has a place in your organisation.

Revit LT 2015 Features

Here is a partial list of Revit features not available in LT that I was interested in.  The full list can be seen on the Autodesk website under the compare section

3D Architectural Modelling - what is missing in LT:
  • Parts & Assemblies- fair enough, its a construction feature (not core architecture)
  • Conceptual Massing - fair enough - its a specialist tool (you could use Vasari instead)
  • Adaptive Components - pity; but they need serious fixing anyway before widescale use is recommended (refer to my blog post Reasons not to use Adaptives)
  • Stair by Sketch (the old stair method) - you should be using the new stair components anyway; new sketch methd works in LT.
  • In-Place components - only walls are possible in LT.  In-Place families should be avoided anyway, unless there is no other option.  It might be possible to create an in-place wall in LT, then change the category from Wall to something else back in full Revit?
Links and Views
  • View filters - oh no, this is a core part of Revit, so why is this feature omitted from LT?
  • Customise the visibility of linked models - could be a problem on large projects
  • Copy and Paste from Links - its a bit dodgy in full Revit anyway
Collaboration
  • Copy/monitor - fair enough.  Can be done in full Revit
  • Worksharing - this is the big one!  more about this later
  • Revit server - irrelevant without worksharing
  • Shared coordinates among projects - a new or casual user of Revit would not understand this anyway, so they wouldn't miss it!
There is more:  no API, analysis, rendering/ray-trace in project etc.  But these woud not be expected in LT anyway.

I chose to investigate 4 features in details - the ones I thought might affect working on a project.  they are highlighted in red above.

How Revit LT Handles Missing Features


Worksharing

Although Revit LT does not support worksharing, the Factory have put a lot of thought into how LT will handle worksets.  From some quick testing, here is what I found to happen when you open workshared Revit models in LT:
  • LT opens a worksetted file and retains the worksets (albeit controls are hidden) - in fact it does something similar to opening and detaching from a central file file in full Revit.  It will open a detached copy of the central file and automatically save it as a new central file with the suffix "_LT", in the same location as the original central file.
  • LT does not have Detach or Create Local options when opening a central file - because it detaches by default.
  • LT opens all worksets, even if it was last saved with some closed - this could be an issue if the file has many linked (Rvt & Dwg) files in worksets that you habitually do not open, so it could be slow to open the full list of worksets.
  • Workset visibility (per view) is respected in LT as it was last saved in full Revit.
  • The workset command icons are missing;  workset properties are not visible; workset tabs are not visible on any dialog boxes.
  • You can work on the file in LT as normal, albeit with several commands and functions missing.
  • You can save the LT file - because it is a new LT central file it will not interfere with the original central file (that it was detached from).
Opening an LT file in full Revit:
  • If you try to open an LT central file (one saved in LT) while it is still open in LT, it will not let you - and gives the following message:
Message in Revit if you try to open a file already open in LT
  • If you open an LT central file (that has an "_LT" suffix) in full Revit, it treats it as a regular central file, and will automatically create a new local file from it.
  • All the original worksets will be visible again in full Revit.
  • You will see that anything created in the model in LT will be on a new workset called "Revit LT User".
  • Full Revit will allow you to save new changes back to the LT central file (synchronise).

  • All seems well at this point, except that you now have two central files (one with  "_LT" suffix) - so you need to decide which one is to go forward, and archive the other one.
  • If you decide to keep the LT central file, and do not rename it (by saving it as yet another new central file) - then you can run into trouble:
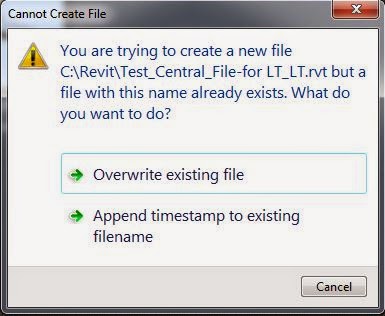
  • If you try to open the LT central file in Revit LT, it sees that it already has an _LT suffix and it does not attempt to add another suffix.  Instead it tries to keep the same name, giving you the option to overwrite or rename the original:
LT try to open an LT-Central file
  • Once the file is open, it lets you work as normal (with LT restrictions), and saves the file.
  • If you subsequently try to open this second LT central file in full Revit, it appears to proceed normally by creating a new local file;  however, when you try to synchronise it gives that familiar but nasty "local file incompatible" error message.  Generating two successive LT central files has obviously pushed Revit too far and it has lost track of its centrality!
Full Revit try to open a file saved in LT


View Visibility Graphics

Some categories are not available in Revit LT - such as Mass & Parts.  Curiously "Roads" is not available in LT either - but then no one knows what it does in full Revit anyway!
Full Revit Categories
Revit LT Categories

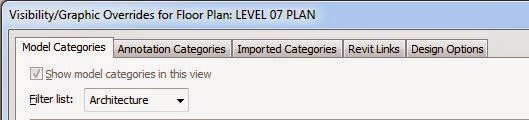
Some tabs in the Visibility Graphics dialog are missing in LT - Filters and Worksets
Visibility Graphics in Full Revit
Visibility Graphics in Revit LT
  • If View Filters have already been set up in full Revit, those overrides are respected when the Revit project is opened in LT - so they will print/display correctly, but cannot be changed.
  • LT also respects any Workset visibility or overrides that have previously been applied to views.
  • LT maintains any workset default visibility settings.
  • LT properties dialog box does not display the workset property of selected elements.

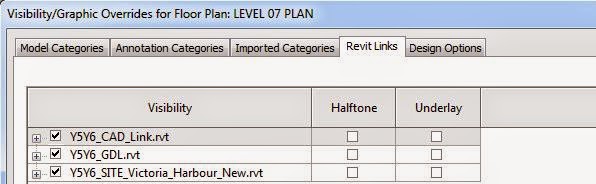
The "Revit Links" tab is available in LT, but it has limited capability - no Display Settings, so it is not possible to override display in linked models.  However, if linked model overrides have already been set up in full Revit, those overrides are respected when the Revit project is opened in LT - so they will print/display correctly, but cannot be changed.

Revit Links in Full Revit

Revit Links in Revit LT

Design Options

Somewhat to my surprise, Design Options work just fine in LT.

Adaptive Components

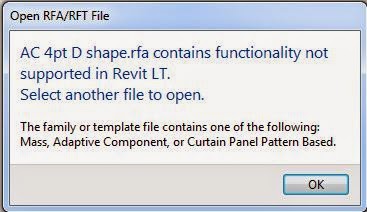
  • Revit LT will not allow you to load an Adaptive Component into a project
  • If an adaptive component exists in a project, LT is fine with it - LT even allows you to flex the component by moving its adaptive points
  • LT lets you copy an adaptive component within a project
  • LT lets you place a new adaptive component within a project, providing the family is already loaded
  • LT will not allow you to open an adaptive component in the family editor

The Verdict

You can make up your own mind about whether it is any good.
However, from my testing it looks like LT might be useful for more than just creating content in isolation.  It could also be useful as a lower cost licence for non-Revit team members to use for opening workshared files effectively in "detached mode" for checking and printing.

It would make more sense to me if Autodesk were to enable a core Revit function like View Filters in LT and maybe take out non-core functions like Design Options. If Autodesk were able to address the worksharing issues so that you could actually open and create a local workshared file (albeit without access to worksets), then I think it would sell like hotcakes.

Wednesday, 29 January 2014

Separating Model and Detail Lines in Revit

Have you ever wanted to select all the detail lines in a view in Revit, without selecting any model lines?  Or to select all (and only) the annotation on a view?

Easy, you might think - until you realise that Revit makes it quite hard to distinguish between some model and detail elements.  Lets try it:

1.  Filter

Select a whole bunch of elements and go to the Selection Filter.  Note that it is inconsistent in how it displays the categories/subcategories:
  • It does not distinguish between model or detail lines, but it does separate out line types
  • It lists "Detail Items" as one category, when in reality they could be filled regions, detail components, repeating details etc.
  • Stairs are listed, and stair components are itemised separately
  • Text Notes are listed but not separated by type (as lines are)
  • etc - the list goes on
It would be so helpful if it distinguished all those things properly and consistently.

2.  View Visibility

Since you cannot separate model/detail lines using the selection filter, you could try the Visibility/Graphics dialog box.  Then you discover some more Revit madness:
  • Some categories are wrongly assigned as model - eg. Detail Items, which are clearly annotation categories as they are view specific
  • Model and detail lines are again all grouped together under Lines in the model tab - wrong!  
  • Even worse, Lines include sub-categories for Area Boundaries and Room Separation lines, which should really be subsets of Areas and Rooms; and these line subcategories don't even behave the same way although they perform similar functions - Area lines are never visible in 3D, while Room separation lines are visible in 3D.
  • Just to add to the confusion, if you go to the Annotation Tab, you'll find a whole bunch of stuff that is certainly not view specific: 
  • Grids, Levels and Reference Planes should most assuredly have their own tab called "Datums"
  • Scope Boxes, Section Boxes, Callouts, Sections, Elevations are all to do with view definitions - and they can all potentially be seen in multiple views (some in 3D too).  What on earth are they all doing under the Annotation tab?  They need a separate tab - or maybe grouped with datums under "Setouts"?
  • Adaptive Points under the Annotation tab - just plain crazy!  And there are some other point types that you can't even control visibility of from this dialog box (eg. divide path/surface), which is endlessly frustrating.
  • For a new user, this stuff is confusing as hell.  Its a mess that is long overdue for a fix-up.
  • And it doesn't even remotely help us with this task.

3.  Select All Instances in View

Well, this just plain doesn't work for detail or model lines, so forget that idea.

4.  Isolate

If you select a detail line and try "Isolate Category" it does at least work - but again it does not distinguish between model and detail lines.  However, it does actually isolate by sub-category for lines (like the selection filter) - possibly useful, but it is yet another inconsistency.

5.  Properties

When you select a line and look at the properties, it is not immediately apparent whether it is a model or detail line.  But if you look carefully there is a discrete little checkbox under the Graphics Heading.  It would be very laborious checking each line by this method.
If you select a mixture of detail and model lines the checkbox is even more discrete - you need to look carefully to see the tick is gray not black

6.  Tooltip

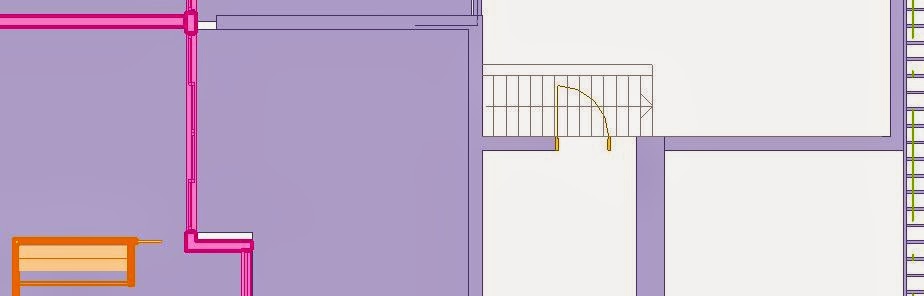
Lets suppose you had a staircase on plan and you wanted to verify if it was a model stair or whether some naughty cad drafter had taken a shortcut by drawing linework.  You could just hover the cursor over the stair lines - it will pop up with a little tooltip.  In this example it tells you the viewname and that it is a detail line;  in the case of a model line or stair it would also give you the workset and category.  You might also be lucky enough to have your eye drawn to this stair by the dodgy looking door opening onto it!!  That should be enough to warn you that it is probably not modeled as a real stair.

7.  Worksets

If your project has worksets enabled then you may find this useful for separation of model and annotation categories.  Because model lines are assigned to a model workset you can hide or isolate them by workset;  Detail lines and all other true annotation always belong to the view workset.  View references (sections, callouts etc) have their own worksets.

You could try the nifty new(ish) Worksharing Display command on the View Control Bar - choose to display by Worksets:
All the model worksets will be displayed by colour;  annotation categories will remain unchanged.  However, the fifth colour (purple*) is too dark to easily distinguish between that and black or gray lines.
Go to the Worksharing Display settings, and change the purple colour to something slightly brighter
 Then it should be easier to visually check where the detail lines are
It might be easier to read if you hide the surface shading by making the view wireframe.

This still does not help you to actually select all those detail lines quickly, so here's one last thing to try:
First, reset the worksharing display to normal.  Then . . . 

8.  Workset Visibility

If you go back to the Visibility/Graphics dialog box, we can get it to do one last trick.  We could turn off all the model elements to leave the annotation visible.   However, you can't just use the neat looking "Show model categories" checkbox at the top left - because the software designers have left us with a chaotic jumble of categories under each tab.
But you can control it another way.  Go to the Worksets tab.
Select all the worksets listed (they are only model worksets, as you cannot select view worksets here)
 Then set their Visibility Settings to "Hide"
Click Ok and you will be left with only detail lines, detail items and text (ie. the dumb annotation).  Warning:  all hosted annotation will not be visible either as they will only display when their host model elements are visible (ie. clever annotation - tags, dimensions).
Now at last you can easily see and select all those dodgy detail lines

9.  Convert

There is a neat little utility that the software designers put into Revit a few years back - it lets you convert selected lines from detail to model and vice versa.
Warning:  If you don't know which type you selected, it just goes ahead and converts them without letting you know which direction.
If you selected a mixture of model and detail lines, it asks you which you want to convert
So now you can easily convert those dodgy stair detail lines into slightly less dodgy stair model lines - at least they will then show up on multiple views.
The next task will be to persuade the person who drew them the error of their ways.  I offer no advice here on that subject, except that there is one tool that could help you - if you have Worksharing Display ON, then the tooltips offer up a little more information.  Use it as you will!
It should be noted that if you need to recreate a new central file by "save as", then all the elements in the model up to that point will have your name listed under "Created by".

[Edit]  

10.  View Model Display

An anonymous commenter has rightly pointed out that I missed the most obvious method:  There is a view property 'Display Model' that allows you to hide the model elements (leaving the detail lines visible);  It also has a Halftone setting.
Part 2 - Click here to see a description of this technique
Part 3 - Using addins to separate elements in selections