
Method 1 (Project Units):
- Click on the Project Units icon on the manage menu


- Click on the desired units (eg. length)

- Change the number of decimal places as desired
- And don't forget that handy "Suppress trailing zeros" setting to keep your drawings less cluttered (although I'd prefer it didn't have that redundant apostrophe on the dialog box!)
- This will affect all linear dimensions in the project , except where this setting has been over-ridden - in which case go to method 2.
- Select a dimension
- Click on Edit Type

- Click on the parameter called Units format
- Click on the "Use Project Settings" checkbox;

- Alternatively, change the number of decimal places and it will over-ride the project settings just for this dimension type.

That is a sensible Revit-like workflow once you know the process.
But, have you ever wanted to change the unit properties on a tag? That is a whole different story . . . .
Tag Units
Each time I need to change tag units, it usually takes about half an hour to either remember or figure it out. Here is the process I usually go through:- Select a tag


- Edit type to see if it has unit over-ride properties like a dimension

- Er no, nothing useful there
- Hmm, what next?
- Try changing the project units
- No, that doesn't work either
- Oh, maybe its set in the family?
- Try editing the family

- Changing the project units in the family make no difference back in the project
- Try selecting the label that has the value in it
- Check its type properties

- No, nothing there
- Hmm, running out of options here
- Ah, try Edit Label


- Can't see anything that lets me change the units here
- Click on the label parameter itself (on the right hand side)
- Oh, what is that tiny, tiny 'hand' icon that has come to life down the bottom of the dialog box?

- Click on it anyway, just to see
- Oh, finally we get to a units format dialog box
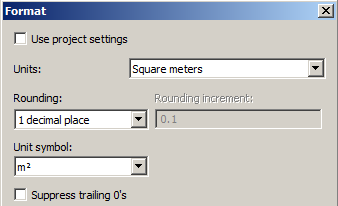
- Change the number of decimal places,
- or better still, click on the Use Project Settings checkbox so that it can be controlled back in the project (unless you need individual control just for this tag family
If you follow the logic of why it is done this way, you can see that you may need to have the flexibility to have different units for each parameter in each label in a tag - but wow, is it an obscure process. 99% of the time most people would be quite happy with type parameters in the family in the project (like dimensions).
Since it only needs to be changed about once a year I always forget, and have to figure it all out again.
 |
| Label unit format icon - is it a hand or a subtle method of torture? |
Thanks!! Thanks!! It was there all the time!
ReplyDeleteThank you so much... so useful ;)
ReplyDeleteThanks! I tried everything until googling and your last step was the key!
ReplyDeleteWhile this is yet another idiotic Revit UI gaffe, it does make sense to separate out from project units, especially where we still use Imperial Units - project unit settings are almost always in feet, but some of our tags need to be displayed in inches.
You sir, are a genius! Thank you for noticing the hand - I missed it a number of times.
ReplyDelete