BILT Speaker

BILT Speaker
RevitCat - Revit Consultant
Showing posts with label travel. Show all posts

Friday, 22 November 2019

Travel Path Update in Revit 2020.2

Hooray - with the release of 2020.2, we finally have something useable in the Revit 2020 Path of Travel feature!

The initial release in Revit 2020 Path of Travel and Follow Up and the improvements in 2020.1 actually gave us a feature that was unusable in almost every situation.

It still has a number of limitations but at last we can make use of it to some degree.  What makes the big difference is the ability to add "Waypoints" anywhere along the path of travel.


You may remember (from my earlier descriptions) that when you place a 'Path of Treavel' by clicking the start and end points, Revit calculates the path for you - and you had little control over that, apart from choosing which elements form obstructions (or not).  Hence, in the standard Autodesk sample file, the path calculation was not able to determine that a sofa at a lower level should still be an obstruction:
Path or travel in v2020

In 2020.2, the calculation seems to have been slightly rationalised to give a more sensible path through the corridor to the north, but it still goes over the sofa in the split-level living area.
Path of Travel in 2020.2

Add Waypoints

We now have the ability to add (or remove) 'Waypoints' - this allows us to nudge the path to a more sensible course around the sofa.

If you need to make your path of travel orthogonal (as required in some jurisdictions), it can be done by adding enough waypoints - rather laborious but at least it works.


This is a very welcome addition to this feature.  However, it is still taking longer than the Daleks to learn how to manage stairs and changes of level in the building.
There is still no way to control the minimum width of a gap between obstacles (about 430mm or 17")

Tuesday, 3 September 2019

Reveal Obstacles in Path of Travel - Revit 2020.1

Revit 2020.1 Enhancement

If you place a 'Path of Travel' using the new (in Revit 2020) feature, you may encounter a situation like that shown below, where the path appears to go through an object that should be an obstruction - such as the path through sofa example below:


In addition to other Revit 2020.1 enhancements to the Path of Travel feature  - Move Start/End Points, we have a new tool that may help you out:

Reveal Obstacles in Path of Travel -


This is useful for figuring out why your path of travel is not behaving as expected. 
  • On the Analyze toolbar, click on 'Reveal Obstacles'

  • This temporarily changes the view display to show in orange all categories that represent obstacles to the path.
In the example below (Autodesk sample file), some items are not shown orange
 
  • The doors are not obstacles because that category is excluded
  • Some furniture is not shown in orange (obstacle) because they are below the cut plane for calculation.  The reason is that the model is split level, and the living area is 500mm lower than the rest of the house - refer to Analysis Zone follow up for more detail on Split Levels and calculation heights.
  • In the case of the large sofa family, one part of the component shows orange - this is the high back.  This demonstrates that Revit actually analyses the geometry of elements, not just a bounding box for each component - which is a good thing.

As the sofa is much lower than the main floor level, only the back projects up into the analysis zone.
  • If the sofa is raised by 200mm (8"), then the sides of the sofa also project into the zone - they become obstacles, and hence turn orange (it may not be immediate - see glitches listed below).

However, the path itself does not change - you have to select it and click on 'Update Path' for that to happen;  then the path will go around the sides of the sofa.

Obstacle Settings

 
If you go the the Route Analysis Settings, you can add or remove obstacles by category - for example add Furniture and Casework categories to the list that are not obstacles


Initially nothing happens, but when you update the path it will no longer avoid those categories.  These will no longer be highlighted in orange by the 'Reveal Obstacles setting

Furniture no longer an obstacle

Casework category no longer an obstacle - path not yet updated

NB. There is some unexpected behaviour that can occur with the 'Reveal Obstacles' feature:
  • If you already have 'Reveal Obstacles' mode on when you go into the 'Route Analysis' settings, then change the categories - Reveal Obstacles does not update the categories displayed orange/grey (you need to turn it off then on again for a refresh).
  • If Reveal Obstacles mode is on, and you try to select an element:
    • Initially it will highlight all of the obstacles as one item;  select it and you get Analysis results Properties (see below for more details)
    • if you tab select, it highlights a component, but still considers it part of the analysis result;  Select it and you get Analysis Result listed but without any properties;
    • Tab again and it finally selects just the element - you can then change its properties;  However, the Reveal Obstacles highlighting is not updated even when it should be - eg. if the sofa height is changed to 500mm so that the whole sofa becomes an obstacle, the sofa does not turn orange (when it should).
  • If you select the whole analysis result, you get shown properties for the Analysis Result.
  • It is not immediately clear what these properties are for.
  • If you click on the 'Edit..' button (Results Visibility), as you would be tempted to do, you get some more mysterious properties
  •  Make the dialog box a fraction wider, and one of the headings shows in full:  'Analysis Display Style' - it has a hidden button to the right of <By View>

  • Click on the hidden button to reveal the Display Style dialog

  • You can play around with the text and arrowhead settings
 
  • And go to the Legend Tab
  • Click on 'Show Legend'
  • The end result means not much to me, but I'm sure it has a purpose
Arrowheads and legend displayed
  •  You can move the legend on the view, if that is what you need


I am guessing that these analysis display settings are for some other kind of analysis, but have been enabled here too?
  • I am not going down that rabbit hole today!
 

Conclusion

Sadly, useful as this new feature is, it does not address fundamental shortcomings - such as what you need to do when Revit fails to generate (or update) a path at all.

We need more help to be able to deal with that situation, as the Warning dialog box is not at all helpful!

Friday, 30 August 2019

Travel Path Update in Revit 2020.1

Following on from my posts about Revit 2020 on Path of Travel and Follow Up :

With the release of Revit 2020.1, we have been given four minor improvements to the new (2020) 'Path of Travel' feature in Revit.  Welcome as they are, these improvements do not address any of the fundamental shortcomings of the tool, which seems like a missed opportunity:
  1. Start and End Points of travel paths can be dragged.
  2. Reveal Obstacles toggle.
  3. To and From Room properties have been enabled (these were previously just blank instance properties in 2020).
  4. Two new Dynamo nodes for Travel Paths (presumably new API capabilities allow this?)

Start and End Points

If you select an existing 'Path of Travel' element (which behaves like a polyline detail line) it now displays a blue grip-handle dot at each end.
  • Select the grip-handle and drag it to a new location - while doing so, Revit displays a moving straight line directly between the cursor and the other end of the path.

  • Once you let go the grip-handle in its new location, Revit recalculates the path of travel

  • Associated properties, schedules and tags will also be updated.
This is a very welcome little change to behaviour - if you tried this with the original vesion (2020), it just moved the whole path of travel.  However, this is only a small usability enhancement.

The fundamental issues it does not deal with include:
  • Still no ability to choose, change or control where the actual path goes (apart from adding/removing obstacles).  In order to do this, we would need to be able to somehow nominate additional points along the path, which it must go through.
    [Edit. * NB. Revit 2020.2 improves on this]
  • No ability to make the path orthogonal (in Australia I have never needed that, but comments on my last blog post indicated a requirement for this in North America)
    [Edit. * NB. Revit 2020.2 improves on this]
  • No ability to deal with sloping floors, level changes (split level), stairs.
  • No ability to prevent the path going through a very narrow opening (430mm or 1' 5") - more on this in another blog post.

NB. Given that the default selection colour in Revit is dark blue, and the grip-handles are mid/dark blue, it is pretty hard to even notice this new feature.  I would recommend changing your options for selection (and pre-selection) colours to something other than blue. 

Incidentally, which *!@*&#$ at Autodesk thought it was a good idea to make the selection and pre-selection colours the same (both dark blue)!


Reveal Obstacles toggle


This is a useful new tool for figuring out why your path of travel is not behaving as expected.  Again, this does not address fundamental shortcomings - such as:
  • What do you need to do when Revit fails to generate (or update) a path at all.

This new feature has a few quirks in behaviour - as detailed in another blog post.


[Edit. Revit 2020.2 further improves on 2020.1]


Friday, 10 May 2019

Path of Travel Follow Up - Revit 2020

Following up on my previous post 'Path of Travel - The Dalek of Revit 2020' I have investigated one of the problems that I encountered the new feature while testing it.  This related to the path of travel not going around the sofa in the lower area living room.

What I should have done is look at the model more closely in 3D.  The living area (with dotted hatching on carpet) is 3 steps lower than the rest of the house in the Revit sample file.  The sofa is on the lower level, and only the back and arms protrude above the floor level of the rest of the house.

What Revit does in calculating the path is to calculate obstructions from the 'Bottom' height up to the 'Top' of the analysis zone, relative to the level of the plan view that you are in.  Any obstructions outside this height range are ignored.

What happens in this example is that the path of travel is calculated ignoring the change in level going down the 3 steps.  The bulk of the sofa is below the analysis zone, so the only thing the path will avoid is the sofa back, and the path happily runs across the sofa seat - even if you might have trouble doing so when running in a panic.

If you look closely, you can see a small kink in the path, steering clear of the sofa back.


If we select the sofa and raise its height so its fully within the analysis zone, .

When you update the path, then you may get the expected result with the escape path sneaking around the back of the sofa.
 

That space behind the sofa looks a bit narrow, so I wondered how Revit would respond if we make it even narrower - so I nudged the sofa a bit closer to the side wall, then updated the path again.


Now that is definitely a problem - no way could you sneak behind the sofa!  It seems like Revit is allowing a clearance around the sofa, but not the wall behind it.

As per my previous (Dalek) post, if you leave the sofa down on the lower floor level, then lower the Bottom height of the analysis range to anything less than 175mm, it fails when you try to update the path or to create a new one that crosses the 3 steps down into the split level living area.

What this tells me is that this tool is very much a work in progress, and we should probably wait until it is updated before trying to use it in anger on a real project.  It is interesting to note that the calculations evaluate the true 3D shape of any obstacles, rather than a bounding box - something that might catch you out in situations like this.

For more info & enhancemenets on this feature refer to:

Thursday, 18 April 2019

Path of Travel - The Dalek of Revit 2020

Path of Travel - New Feature in Revit 2020

One of the new features that is particularly relevant for architects is the 'Route Analysis' tool.  This works by placing point-to-point lines between the start and finish of a route in plan.  Revit will then analyse this and find the shortest route between the points, avoiding obstacles on the way, and it will place a segmented detail line along that path, in the chosen view.  The intention for this tool is to create such things as:
  • Fire Escape plans
  • Emergency Evacuation plans
  • Life Safety plans (USA)
Here follows a detailed analysis of the new feature:


Analysis of Route Analysis


The tool is found on the Analyse tab, called 'Path of Travel'

Once the tool is activated, the ribbon displays a Linestyle choice.  It defaults to a linestyle called 'Path of Travel Lines'

Step one is to draw a line between two points.


 Revit then thinks a moment and places a 'Detail Line' segmented pathway between the two points


The first thing you'll notice is that its really hard to see.

This is because the default linestyle is not set to what you'll most likely need.

Path Linestyle

The default linestyle is system defined, but unfortunately its name is not enclosed in < > brackets, so its likely to get lost in amongst many linestyles.

Go to the Linestyles dialog to change its global settings (Not to 'Object Styles', which might be your first instinct) - it  is after all, just a detail line.

  • Note that it cannot be deleted or renamed. 
  • You can change its Weight, Colour or Pattern
  • In this case I've just bumped up the weight to something really visible


You can also create some more linestyles to use for different kinds of paths - this is the nearest we'll get to creating 'Types'.

In this example you might want to distinguish between an escape path to Outside vs to a Stair:
  • The original line can be changed to 'Path to Outside'
  •  A new line 'Path to Stair' could be added
 

  • Revit will again calculate the shortest path (around furniture/fixtures)

 Notice how hard it is to read the direction of the lines. 


  • Sadly there does not appear to be anything the user can do about the dot at the start, or the arrowhead - neither of which are very distinguishable with heavy lineweights at any scale above 1:50 (is that 1" to 48' in imperial?).
  • Overlapping lines can be moved Backwards/Forwards
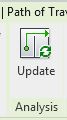


Update Paths

If the underlying geometry is changed, you may want to update the path

  • Select a path
  • Click on 'Update Path' on the ribbon
  • Revit will recalculate it


Move It 

I am quite sure this was not the design intent of the update command, but it serves to demonstrate some weird behaviour:

  • Select a path
  • Move it
  • In this example I moved it partially out of the building (keeping the ends inside)


  • Try the 'Update' command
  • It may or may not work


  • This may be your first experience of a very unhelpful warning that does not tell you why it cannot update the path
  • My instinct told me to try again, with the whole path kept inside the building

  •  This time it worked


  • A gold star to anyone who noticed that the path did not avoid all of the furniture - even on the very first attempt


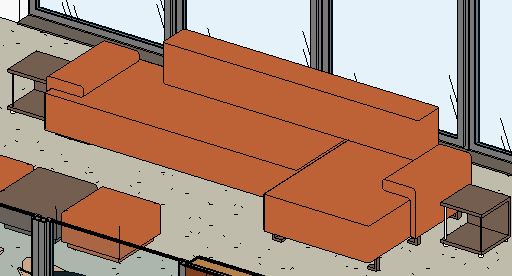
Split Levels & Dizzying Heights

You may have noticed that this example is the Autodesk sample file - a perfect vehicle for testing, as it has a split-level plan:

  • The living area is 3 lower than the rest of the house - and this is where Revit has failed to pick up the obstacles.
  • The question is, does the furniture project high enough to interrupt the path?
  • A section shows that it should - just.

Just to be certain, we should check the calculation heights:

  • Click on the tiny, tiny Route Analysis settings arrow

  •  The lower height is set to a default value of 203.2mm (8") above the view associated level (upper part of split level)


  • This may be just above the furniture, so I tried dropping it to zero, then 'Update' the path
  • Computer says 'No'

  • Then I tried just above floor level, say 10mm, but it still failed
  • The lowest level it would let me go without failing, was 175mm, but it still did not pick up the furniture on the lower floor.

 I then set the lower height back to 10mm, and tried a new path:

  • This time the message was a bit more informative:


I still don't know what the problem is, but it is a bit of a worry that the Autodesk sample file has uncovered a problem or limitation in the software so easily.  I'll update this section when more information comes to light, from Autodesk.

[Edit - it seems that the only part of the sofa high enough to be in the analysis zone is the sofa back, which explains the initial problem - but does not explain why the update path does not work when you lower the analysis zone - Refer to this blog post for more detail]


The Dalek of Revit 2020

Whovians would already have guessed that these paths of travel cannot go upstairs (or down).  That is certainly going to be a limitation for some situations, not the least being split-level plans.

Properties

Each Path that you place has some interesting system instance properties


  • Strangely there is no 'Comments' property.  This is very unusual, as almost every other element type does have a system Comments property that can be used in almost any situation (Filter, tag, schedule, key schedule etc)
  • The only properties that a user can change are the Line Style and Mark
  • Time = Calculated time it takes to walk from the start point to the end point of the path of travel. Walking speed is set to 3 mph/1.34 mps (Read only)  [From help file - mps presumably means metres/second.  I'd prefer 5 kilometres /hour]
  • Length = Total length of all segments of a path (Read only)
  • The system properties can tagged

  •  And scheduled


  • From Room and To Room properties are labelled as 'Not Available'.  In the Autodesk help files, they are labelled as 'For Future Use', which is a promising sign for something to come.
It is possible to add your own Project Parameters to Path of Travel lines
  • These must be instance properties
  • If you try Type properties, the Lines category is not available


View Filters

View Filters can access the all the same system properties (except Count)

  • Path of Travel Lines can be filtered by such things as Length, which would be very useful for highlighting paths over specified limits.

  • Path of Travel Lines can be filtered by Linestyle, for separating different kinds (in the absence of Types)

Since Path of Travel elements are actually Detail Lines, they are view dependent, so it unlikely that you would want to hide them in a view, so its more likely that you would want to override properties.

However, you could just do that with Category overrides - so I am not sure you would use view filters for this, unless you want them with halftone.


Obstructions

The settings menu lets you remove categories from the calculation.  By default the door category is removed (checkbox ticked).
I would like to see the standard filtering ability for the category list (its missing from the dialog box)
  • By Discipline
  • Show only selected

Path of Travel Calculations

The Autodesk Revit Help Files have a section describing how the paths are calculated.  I am not quite sure I understand it all - particularly as it only seems to be talking about plans, rather than how it checks for obstructions in 3D.
Path of Travel Calculations

Conclusion

This is obviously a first pass at what should be a very useful tool at some time in the future.

I am very pleased that it seems like Autodesk have been careful not to tailor this tool to any particular country or style of doing Escape Plans / Fire Safety, which is a very good thing (NB. Area plan calculations are a real pain for anyone outside the USA, as an example of country specific coding).  In fact the tool is sufficiently general that it could probably be used for all sorts of other purposes.  Presumably the tools have been made available in the API so that developers can create country specific addons?

In its present format, it does have quite a few limitations, which will hopefully be addressed in future iterations:
  • The Dalek conundrum - how to get up or down stairs
  • No system 'Comments' property.
  • Type properties not available (in Project Parameters, or anywhere else)
  • Users nominate Start point and End point - it does not allow us to nominate any intermediate points that we want to go through.  
  • Perhaps Autodesk could create a way to link paths to allow this?
  • It is not possible to move either the start or end point individually - it seems like you have to recreate a new one if you get it wrong first time. 
  • What happens if you don't like the route that algorithm has chosen as the shortest route?  You may have good reasons for not wanting that route.  I would like to have the ability to either choose another option (Like Google Maps directions), or else to be able to nominate intermediate points, or even to be able to drag individual joint nodes between each segment.

Cartoon - With thanks to Birkett (Punch Magazine)

More On Path of Travel

Improvements to Path of Travel in point releases: