BILT Speaker

BILT Speaker
RevitCat - Revit Consultant
Showing posts with label sub. Show all posts

Friday, 1 April 2016

Revit Stair Subcategories and Materials

Last year I posted a detailed description of what the 'new' stair component subcategories do in different views - plan vs section.
It seems that I missed something - Dan Stine (author of several Revit text books) has pointed out that the Treads/Risers subcategory does actually have an effect in plan views:
It controls the materials and surface patterns of the treads.  I did some testing to understand the subtleties of how this works. . . . .

Here I am using my subcategory visibility colour overrides to make it easier to see what is being controlled by which subcategory.

 Normally turning the 'Treads/Risers' subcategory seems to have no effect in a plan view.
This would be the case for one of two reasons:
  • If your monolithic stair run does not have a separate tread
 
  • If the stair run does have a tread, but the tread material does not have any surface pattern
Tread material - Run type property
 
Material properties of stair run tread

However, if the material of the tread is changed so that it has a surface pattern, this will display in a plan view
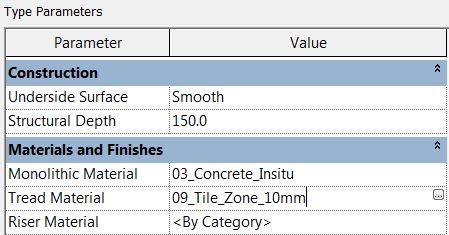
It looks different depending on the visual style of the view:
Hidden Line View with tiles on treads
Shaded View with tiles on treads
Realistic View with tiles on treads

If you then hide the Treads/Risers subcategory, the tread material will no longer be displayed.  Instead it will display the material of the underlying stair structure - if it is monolithic, that would most likely be concrete.

We normally do not have a surface pattern on concrete because it would show up in too many views.  However, if you do have a surface pattern, it will show once you have hidden the treads


Hidden Line - concrete surface pattern
Shaded View - concrete surface pattern
Realistic View - monolithic concrete stair


Really Weird Stair Stuff

In order to hide the surface pattern of the underlying monolithic material in a plan view, you have to turn off both 'Nosing Line' & 'Riser Lines' subcategories.  Turn off just one or other of them and you hide the lines, but not the material surface pattern.  That makes no sense to me.
Plan subcategories for materials


 How do you hide the material of the underlying monolithic structure?
  1. Make sure the material does not have a surface pattern, and view it in Hidden Line or Shaded View.  Or:
  2. Turn off the 'Nosing Line' and 'Riser Lines' subcategories.  That could be frustrating if you need to see the nosing or riser lines themselves!  
    Or (the better solution):
  3. Go to the Surface Pattern override for the whole stair;  untick the Pattern Overrides 'Visible' checkbox (won't work in a realistic view)
        The Pattern will then list as 'Hidden'


Which one of the three solutions you choose depends on exactly the result you are after, and on what Visual Style setting you have for the view.

For a Realistic View, you can hide the tread material (by Tread/Riser subcategory) but cannot hide the underlying monolithic material at all.

Material Linestyle Overrides 

Unlike the actual linework of the stairs, the lines within the surface patterns cannot have their weight or linestyle overridden in the Visibility Graphics dialog - they follow the standard rules for hatching lines.  The colour can be overridden, but you have to change the overall stair category pattern colour override, not the subcategory line colour override.  This means that the button to click on for colour override is quite different to the location of the 'Treads/Risers' subcategory visibility control checkbox(es).


The actual hatching pattern can be overridden from the same dialog - this allows you to choose a totally different pattern just for that view.  If you set it to "No Pattern", it just clears the override, rather than temporarily removing the pattern as an override - which is frustrating if that was the result that you wanted, particularly if you just tried to override one element, not all in that view.

The line weight of the surface patterns cannot be overridden by view, but that is another story . . . .

Saturday, 10 October 2015

Revit Stair Subcategory Visibility

When the new stair components came out in Revit 2013, they introduced some new subcategories.  This also added limited flexibility of control but introduced some confusion too.  Since the Autodesk Revit help files only make a half-hearted attempt to explain what the subcategories are, I thought it needed proper documentation . . . .


New stair subcategories

Who stole the Up/Down arrows and text?  Well, they are now under the Annotation tab, since stair path arrows are now annotation.
New stair annotation categories
 The new stairs elements are still not displayed as actual 3D objects in plan – 2D representations are generated as they have always been (except in detail plan views). This means that many of the old problems still exist – lack of ability to display the actual materials and patterns on the stairs; strange behaviour with cut line locations etc.  However, the 2D representations have been given an overhaul, giving us more fine control over display (in plan only) and annotation. With this comes additional complexity and management work in setting up view control and templates.

Visibility controls for stairs are all within “Visibility Graphics”. No stair visibility settings are controlled by “Level of Detail” (it is a different story for railings!).  Along with adding new stair and railing subcategories, the naming has been rationalised so that the linework above the cut line is now grouped together with the prefix <Above>; there is one subcategory for hidden lines below – that being “Riser lines”.


 So what is the difference between 'Nosing Lines', 'Outlines', 'Riser Lines' and 'Treads/Risers'?  The easiest way to describe it is by colour coded diagrams.  I wish that the Autodesk help-files would do something like this.
Colour over-rides in Visibility Graphics

Stair plan - coloured subcategories
  • Nosing Lines - furthest extent of the tread or nosing in plan.
  • Riser Lines - represent the vertical outside face of the riser, normally shown dotted as it is hidden beneath the tread. NB. On stairs where the Nosing Length is zero (no projecting nosing), the Riser Line will be on top of the Nosing Line so it will appear as a grey dashed line over the top of a solid black line - even on a concrete monolithic stair.  If you turn off the Riser Line in view visibility it will solve this graphic issue.
  •  Outlines - top and bottom nosing line of each run plus sides of each run and landing including external supports (see below).
  •  Treads/Risers - it seems that this subcategory is not used?  Well, not in plan anyway, but have a look at a section view (see below).
Colour coded plan - Supports hidden

So, what happens in section/elevation?  This is where the added flexibility of new subcategories  completely falls down.  The entire run and landing elements are shown in the same subcategory - and it is a different one from plans:  'Treads/Risers'.
 

So there is no capability to show/hide or over-ride just riser lines or treads or landings.

Location of Nosing and Riser lines in section


Mix ‘n’ Match Old and New Stair Visibility

If you have a mixture of old and new stairs in one model, then it gets harder to control the appearance of stairs and annotations in each view.
Some subcategories will only affect visibility of new stairs but not old:
  • <Above> Cut Marks - New stairs – only applies to double zig-zag cut marks;  Does not apply to old stairs.
  • <Above> Riser Lines -  Does not apply to old stairs (cannot be shown on old stairs)
  • <Above> Nosing Lines - Does not apply to old stairs
  • <Above> Outline - On new stairs it is only the overall stair component outlines;  Old stairs includes the overall stair outline plus nosing lines;  .
  • Cut Marks - Does not apply to old stairs (controlled by a type property for the stair)
  • Nosing Lines - Does not apply to old stairs
  • Riser Lines - Does not apply to old stairs (cannot be shown on old stairs)
  • Outline - On new stairs it is only the overall stair component outlines;  Old stairs includes the overall stair outline plus nosing lines;
  • Treads/Risers - On new stairs it is all the tread, riser, nosing and landing lines;  Does not apply to old stairs
  • Supports - Stringers and supports in both old and new stairs.

 View Templates

What all this means is that you will need to modify your project template file to have the right subcategories on/off in default plan views (most likely turn off several of the <Above> subcategories); the only one turned off by default in a Revit plan view is “<Above> Up Arrows”.  The use of View templates will now become essential for the control of stair visibility in different types of plans, since there are more subcategories to control.
Set yourview template defaults
Stair Annotation visibility

Object Styles

The OOTB project default settings for the new stair subcategories are not necessarily what you will need.
Default object styles for stairs
You should check and probably change the default Object Styles for stair subcategories – for example, by default all the <Above> subcategories are set as a “Dash - Tight” line style, which is the same as for the “Riser lines” subcategories (which actually represents hidden lines below, where the nosing projects beyond them) – I would make the above and below line-styles (Line Patterns) different.  The Riser Lines should probably be black so that when they are coincident with Nosing Lines, there is no graphic clash.
Proposed Object Style Line Patterns for stairs

Wednesday, 23 September 2015

Weird Revit Railing Stuff - part 6 - SubCategory Overrides

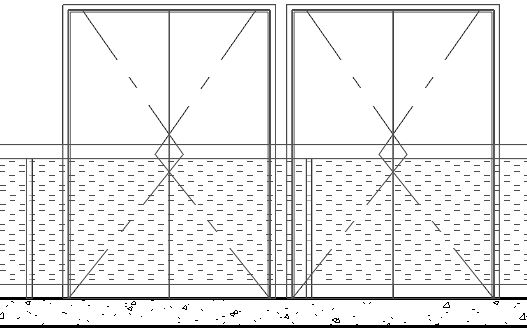
I was recently asked to solve a tricky Revit railing puzzle:  Someone wanted to show their glass panel balustrade as semi-transparent in elevation.  Simple, you might think.  Think again.
All good Revit experts would know that any element with a glass material that has a (semi-)transparency property will display transparent in a 3D view, but in elevation or section it shows solid.
Glass transparent in 3D view

Why is this?  Because it has always been an architectural drafting convention to make window glass opaque in elevation, so you cannot see through windows to all the stuff inside.  This is pretty sensible as elevation drawings would look a terrible mess otherwise.  So this convention was hard-coded into Revit software, as were many other conventions that we now see as restrictions .  Unfortunately this also applies to any glass element - even a glass balustrade that hides vital information behind it on a balcony.
Opaque glass balustrade in elevation

The obvious solution is to make either the railing category or just a selected railing semi-transparent

Semi-transparent Railing category override
But that is not much use as the handrail and balustrades have become transparent too.  So what about the railing subcategories?  Unfortunately the actual subcategories do not have individual transparency overrides - it is all or nothing for the whole category.
Railing subcategories in Visibility Graphics
 In addition to that, if you wanted to override the surface patterns there are some random restrictions:  some new railing sub-components allow overrides, some don't;  the old railing components do allow surface pattern overrides.
  • Balusters (old subcategory) - Yes
  • Rails (old subcategory) - Yes  - these are the original horizontal rail structures
  • Supports (new subcategory) - Yes
  • Terminations (new subcategory) - Yes.  Great, I can override the surface pattern but there is no possible way to make them visible in plan.  how good is that?
  • Top Rails (new subcategory) - No!   This is a newly added subcategory (in 2013), so why build in a restriction to the subcategory most likely to need an override pattern?
Most experienced Revit users would not attempt to create glass balustrades using 'Balusters' because they are almost impossible to control the spacing of (and width).  Instead they would use the old rail subcategory and have one rail for the handrail on top and another long tall, skinny glass rail for the balustrade (crashing through the actual support balusters).

Filters

Next stop view filters to see if the same restrictions apply.  Perhaps we could filter the glass rail separately from the top rail structure?
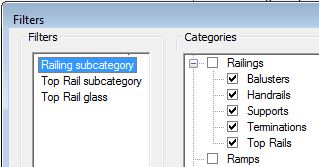
More inconsistencies here:  Balusters (old subcategory) can be filtered, but not the old Rail subcategory.  Foiled at the next turn by yet another inconsistency.  But this time all the new subcategories can be filtered, including 'Top Rails'.  So maybe we could (mis)use that for the glass balustrade, and create a view filter for the Top Rail only?
 You could even take it one step further (no stair pun intended) and restrict it to Top Rails with the word 'glass' in them.  Note that I have used the filter "contains" rather than "equals" as it would then find all types with that word in the name.  To make it more robust, you could filter by "contains" "lass" so that it would pick up lower and upper case glass and Glass types.
Once the filter is set up, it needs to be applied to the view, and then have its transparency override set

All that remains is to make sure the railing definition is set to use a 'Top Rail' for the glass balustrade, and a 'Rail' for the actual rail along the top.


And finally it works as desired - but it shouldn't be this hard to achieve.
Semi-transparent Top Rail subcategory for glass balustrade

A gold star to anyone who spotted that the swing symbolic lines are broken on the doors behind the railing.  Not my doors, I just grabbed them from an old library to demonstrate this issue!