
There are two main types of hatching patterns in Revit:
- Hatching patterns applied to the surface of a material, or as a cut pattern
- Filled Regions - 2D annotation patches
As any good Revit implementer should know, most Revit material hatching patterns are displayed and printed using the Revit line-weight number 1. [Edit. Ceiling surface patterns use line weight 2]
This number is then converted to a line thickness according to the scale of the view, on a matrix chart accessed from the 'Additional settings' icon on the manage tab of the ribbon.


This matrix is stored per project, and is something that should be set up in the company project template, and then seldom changed. Unfortunately many new users are not aware that material hatching lines use line weight 1, so they often assign that as their general use thinnest line drawing number. Most experienced users would recommend reserving weight 1 for hatching, then start the rest of the element line weights from 2 onward (2 = 0.1mm, 3 = 0.18mm, 4 = 0.25mm, 5 = 0.35mm etc). [Edit. or start from 3, to avoid ceiling hatching patterns in 2]. Once you have set up all your family templates, and libraries it is not easy to change them all a year later. Sadly the default templates and Autodesk libraries are almost all set up to default most things to weight 1 as the thinnest line weight, which propagates this awkward setup.
Incidentally, if I use the term 'Pen 1' instead of Weight 1, it gives away the fact that I once used pen plotters in the dim, distant past (or even Rotring pens!).
Let's assume that you have set up your library and templates to reserve weight 1 for hatching, it gives you more freedom to play around with pattern line-weights without affecting anything else in the drawings. But you need to know some mysterious things about how you can control hatching display - or in fact that you have very little control! The reason for this is that there are various limitations and some hard-coded behaviours within Revit.
Material Surface Patterns - Law of Diminishing Returns
When you apply a surface or cut pattern to a material, you do not get any option to set the line weight - you can only control the pattern and colour.
Object styles do not give you the opportunity to control material pattern line weights; nor do Visibility Graphics pattern overrides, which can be changed per category:

Or they can be overriden by element, where you can change the weight of projection or cut lines but not hatching patterns:

Notice the colour of the hatching lines at different scales in the screen snapshots below - I have chosen the 'colour purple' to make it easier to distinguish. At scales from 1:1 through to 1:50 they would all look the same (I only show 1:20 onward), but after that the lines get progressively lighter at each scale change. This is hard-coded into the software - not something that we appear to have any control over.
 |
| 1:20 material hatching |
 |
| 1:50 material hatching |
 |
| 1:100 material hatching |
 |
| 1:200 material hatching |
 |
| 1:500 material hatching |
 |
| 1:1000 material hatching |
 |
| 1:2000 material hatching |
 |
| 1:5000 material hatching |
You might notice that the line thicknesses above are the same from 1:20 up to 1:1000, which would not necessarily be the case in a real Revit project. I artificially bumped up the line thicknesses at the smaller scale, to compensate for the screen scale display of the lines. I ran out of 'thinness' for 1:2000 and 1:5000 as the thinnest that Revit lets you put in is 0.025mm. However, it is unlikely that your plotter will be able to get lines that thin anyway.
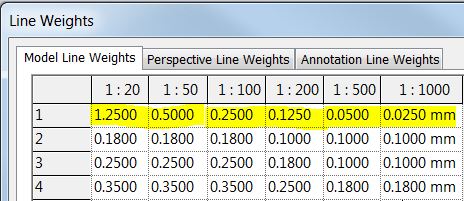 |
| Artificial settings to get consistent screen display - do not use! |
At 1:5000 the hatching just stopped displaying - or maybe the lines are so pale we can't see them. I'm not sure how Revit decides at what scale to give up displaying, as it is not always the same. It seems to depend on the line thickness, and spacing as well as density of the pattern.
For more weird Revit line weight behaviour click here
What does it all mean?
This is another example of the software writers deciding what is good for us! We have no choice or control that I can figure out. All I can recommend is to reserve weight 1 for material pattern hatching. It is probably wise to put all filled region hatching in weight 1 too, so that when you apply those nasty little filled region patches in section, they blend together. Normally I do not approve of that, but when it comes to pads and earth hatching in section it is pretty much unavoidable!I did wonder about that print settings dialog option 'Replace halftone with thin line':

Frank: Thanks for that tip - I wonder if there are other categories that use different line weights?
ReplyDeletethanks!
ReplyDeleteThank you for sharing that, it helps :)
ReplyDeleteThanks for this precious article.
ReplyDeleteIn a dark corner of the internet there is always the answer! Many thanks for being the hoarder of Revit secrets.
ReplyDelete