BILT Speaker

BILT Speaker
RevitCat - Revit Consultant

Thursday, 11 October 2012

Revit Single Point Repeater Patterns

Sample Revit Repeater Patterns

At RTC 2012 (Revit Technology Conference) last June, I presented a session on the new Revit v2013 "Divide" and "Repeat" tools.  The first part of the talk was about how the repeat pattern behaves in different situations - so I wanted to share some of the typical repeater patterns for reference - see below.  The conference paper goes into more detail, and then explains how you can use these patterns in Revit in real building situations.

Single Point Repeaters on a Divided Surface


Below is a chart of the basic patterns that can be achieved using a single point adaptive component hosted on a divided surface.  The results are not always what you expect.


Notice that patterns 10, 11 & 12 do not actually create a visible pattern, but the repeater element is there, and can be selected – this is because the patterns go off the edge of the surface and cannot find nodes to repeat on.

 Single Point Multiple Repeater Patterns:

Once you have 3 or more of the original hosted components (eg. 4 square as below), Revit will no longer create one single repeater pattern, but will create a number of patterns that alternate with each other.  This will happen regardless of whether the originals are the same or different.  In the example below it actually creates 4 separate repeater patterns (see one of them highlighted in orange).  You can take advantage of this to create a repeater pattern on alternate nodes by deleting the repeaters that you don’t want – see end result to the right immediately below.


You can create less regular looking patterns by making the originals all different, or else you can create patterns that look right but are only achievable by “working the system” – eg. A tartan pattern by only changing the look of one of four hosted original components: 

Alternatively you may need to create multiple repeaters and then delete some of them to achieve the desired results, as shown in example 13.  If you generate a repeater that creates a pattern on nodes that are already occupied, Revit seems quite happy to do this.

More to follow on multiple point repeaters in another post . . . . . Multiple Point Repeaters on Divided Surfaces       Two-Point Repeaters on Multiple Hosts

Friday, 10 August 2012

Revit User Group Sydney 100th Meeting

On Tuesday 14th August 2012 will be the 100th meeting of RUGSyd (Revit User Group Sydney) - we think this is the oldest Revit user group, not just in Australia but in the world.  Autodesk have confirmed this, but who knows, there might be another group out there . . .

Initiated by Wesley Benn, the first meeting was held in May 2003 in North Sydney, in the offices of Benn Design & AEC Systems.  The second meeting in June 2003 had a formal agenda and a committee was elected:

The proposed agenda was as follows:
1. General Business
- Election of Chairperson and Secretary (3 month temporary posts)
- Format of Meetings
- Next Meeting
2. User Requirements for REVIT Localisation
- Levels to AHD
- Site Co-ordinate Systems (eg AMG)
- Metric Library Components
- Local Annotation Standards (eg Stair Arrows, Door Swings, Window Openings, Brick Sizes, etc)
- Other Issues as suggested by Users
3. Bug List
4. Enhancement Requests
5. Open Question and Answer Session


Original Committee:
Wesley Benn     – Chairman      - Benn Design
Rocco Raso       – Secretary       - Planahead
Adrian Esdaile  – Treasurer      - Benn Design
Michael Juda                              - Australia Wide Drafting
Gyula Toth                                 - Futurespace
Tim Bowland                              - Clarendon Property Group
Marina Radosevic replaced Gyula soon afterwards.

User Group charter in July 2004
The first RUGs social was Feb 11, 2005 at Fluid, in North Sydney.  This has become an annual event, more recently at The Oaks pub in Neutral Bay
RUGS Website was set up in August 2005 - with much ongoing hard work by Bo Zhen of Benn Design.

My first presentation was at meeting #26, August 2005 (Tim Waldock User story - Penrith football stadium refurbishment).

A new committee took over in 2008, and RUGSyd became fully multi-disciplinary:
Toby Maple             – Chairman        - AEC Consulting; then Hassells
John Hainsworth     – Secretary       - Arups (Structural)
Tim Waldock           – Treasurer        - PTW (Architecture)
Wesley Benn                                      - Benn Design (Architecture)
Brendan Upton                                   - Hyder Consulting (MEP)

The venue was then changed to be held alternately at the three Revit reseller's offices in Sydney, until a fixed home was found at the Sydney TAFE, Ultimo (Level 3 Marcus Clarke Building, 827-837 George Street, Broadway) - our present venue, for which we are very grateful.  Many thanks to Tom Hoare of Sydney TAFE for allowing us to use the venue.

Current Committee (2012):
Steve Fiorio             – Chairman        - Hassells
Chris Mawson         – Secretary        - Arups (Structural)
Tim Waldock           – Treasurer        - PTW (Architecture)
David Foley                                          - NDY (MEP)

Friday, 8 June 2012

Thursday, 7 June 2012

Revit TV Drawing Manager

We have been using Revit TV Drawing Manager for a couple of years now.  It is a great Revit add-in that you can use to manage drawing sheets and revisions in a much more systematic way than the inbuilt Revit revisioning tool.  It has tools for things like batch renaming and revision updates.  Not only can it help you with managing huge numbers of drawings sheets on multiple linked files, but it also handles transmittals and the creation and automatic naming of batch export files (PDF, DWG, DWF etc) - it can generate file names to match the most complex conventions required.

RTV Drawing Manager works by using an external SQL database which holds all the sheet, revision, transmittal & contact data - this is then synchronised with the Revit file to generate actual revision notes on the sheets.

We have written a comprehensive series of help files for inhouse use.  These are now available to anyone who is interested in using RTV Drawing Manager - they are hosted on the RUGSyd website (Revit User Group Sydney) at:
Revit TV Help Files v2011
These help files were written for Revit v2011, so they don't show all the latest features, but should give you a pretty good idea of its capability:


Edit Multiple Sheets - allows you to add revisions to multiple drawings by several methods, including auto-incrementing each revision, when they may be different

Monday, 28 May 2012

RTC 2012 Australasia - report

Just returned from the 2012 Australasian Revit Technology Conference, which was held on May 24-26th 2012 in Wollongong, NSW, Australia.   Thanks to Wesley Benn and all the organising team for putting on another great Revit conference.

I love the way that RTC always keeps going at the highest quality right up to the last few minutes - not only did we get to see some amazing gadgets in the afternoon (Wesley had the audience ducking for cover with a live demo of a quadrocopter), but the evening went on to a gala dinner, that included lots of fun and games.  So many other conferences tail off on the last afternoon with many people leaving early - such an anti-climax.  But not so with RTC, which is great value for money.

Although RTC is for users, and is run by Revit users, it was great to see some heavyweight Autodesk presence contributing to the conference:
Presentations by Anthony Hauck (Revit Product Line Manager) and Ken Marsh (Revit Structure QA Analyst); and an introduction by Rob Malkin (Director Autodesk AEC Asia Pacific).

There were a lot of interesting presentations including quite a number from overseas speakers, including some fun but informative Lab sessions with Marcello Sgambelluri.   There were quite a number of sessions where people described their (positive) experiences of linking Revit to external databases & Excel - in previous years this has been mostly speculation about the possibilities, but now it is well and truly happening. I certainly learned a lot from this conference, and look forward to the next one in Atlanta in June.


Short videos from my "Divide & Conquer" presentation


Sunday, 22 April 2012

Revit 2013 New Divide & Repeat Tools @ RTC 2012

Are you going to RTC 2012?  Both Revit Technology Conferences promise to be better than ever this year - interesting new venues and a wide range of speakers on all things Revit and BIM.  I am lucky enough to be presenting at both conferences:

"Divide & Conquer Adaptive Components" by Tim Waldock
on 25th May 2012 at RTC Australasia - Wollongong, near Sydney
on 30th June 2012 at RTC USA - Stone Mountain, Atlanta, Georgia


This presentation will look in detail at the new Revit v2013 features “Divide Path” & “Repeat”, particularly as they are used in adaptive components.  It will build on my RTC 2011 presentation "Designing in Revit Using Parametric Formulas" – which looked at repetitive patterns in design.  It will show how the new techniques can be used to achieve similar results in a different, but more flexible fashion.

This presentation will also look at the use of adaptive components within projects, again using the new techniques, to generate curved shapes, and also at repetition on or within those shapes, thus creating organic architectural models


We will look at the process of creating adaptive component families:
  • New “Divide Path” & “Repeat” features of Revit 2013 will be explained and demonstrated in great detail – including some limitations.  Practical examples of their use will also be demonstrated.
 
  • There will be a focus on creating curvilinear geometry and organic shaped Revit models, but in a systematic way that would aim to make the buildings more constructable. 
 
Space Planning Repeaters

  • Some of the adaptive components will use complex rule-based parametric formulas to drive iterative design. 
  • Will involve some trigonometry and other mathematical formulas, including error checking.


  • APIs will not be used.
 See you at RTC . . . .

    Sunday, 15 April 2012

    Escape Path / Egress Travel Distance Component

    It is common for architects to need to calculate, check and record escape paths or egress travel distances in a building design.  Revit does not have an inbuilt method for doing this.   I've seen many suggestions on how to do this in Revit, but they are all pretty clunky, mostly involving several components and tags and schedules. 
    In Revit 2012, there was a new way to do this using adaptive components.  I did not publicise this before, because there was a bug in the software that prevented it from working 100% reliably - but in Revit 2013, that bug has been fixed, so here is how to do it:

    This method will create a 2D travel path (calculating distances in plan only).

    1. Create a new adaptive component (use "Generic Model Adaptive" template)
    2. Place a point on the intersection of the two reference planes;
    3. Place another three points in a line along the X axis, and 
    4. Make all the points adaptive
    5. In Object Styles, make a new subcategory called "Escape Path", with a suitable linestyle – say red, dashed, heavy lineweight.  Ensure that you choose the right category to put it under (generic, if that is your family category) – as all categories are listed.
    6. Draw a line between points one and two, using 3D snapping.

    7. Change the line to the Escape Path subcategory.
    8. Join points 2 & 3 with a similar line, then points 3 & 4.
    9. Place a dimension between points 1 and 2, using the Ref. level as your work plane – this will give you horizontal measurements in plan.  NB. Be sure to attach the dimensions to the actual points (not line ends) otherwise the reporting parameters will not allow you to use them in formulas.
    10. Select the dimension, give it a parameter “Plan_Length_1”
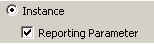
    11. This must be set as an instance & reporting parameter
    12.  Repeat this process between points 2 & 3, then points 3 & 4.
    13.  Flex the component by moving each point; NB. do not click and drag (it will move in z direction) - use the arrows
    14. Create a new Instance length parameter called “Total plan escape distance” 
    15. Give it a formula: “Plan_length_1 + Plan_length_2 + Plan_length_3
    16.  Tick the “Always Vertical”  family parameter – this will ensure that measurements are always true in plan (they can be slightly out if you don’t tick this).
    17. Save and load the family into a project; and it should prompt for 4 points when placed.
    18. Once placed it should report back the total escape path length, in its instance properties.
     To make this component more useful you could add some more checks and controls:

    •  A counter (integer parameter) for the number of segments, using visibility to hide unwanted segments and calculations to remove them from the total; When placed in the project, it will still require all the adaptive points to be place, but it will just ignore anything after the required number in the counter.
    •  A user defined parameter for maximum allowable length;
    •  A calculation to see if the total length exceeds the maximum;
    • A warning if the maximum is exceeded – this could either be a change of colour in the lines, or else an element that is normally hidden, but has its visibility turned on if the total length exceeds the maximum.  NB. If you want a text warning, it has to be done as model text nested in a generic component loaded into the adaptive family.

       
    • This example only has 4 segments, but you could add more - of course then you'd need more visibility and calculation parameters.
    • You could also create a version that measures distances in 3 dimensions.  To do that you need to host the reporting parameter lengths on reference lines drawn between each adaptive point - this would then measure the diagonal distance if any of the adaptive points are moved up in the Z direction.
    • If you make the Total distance a shared parameter, then you should be able to schedule and tag it.
    Warning:  In order to avoid the v2012 bug, you must start with a v2013 family template.  It will not fix the bug if you start from a v2012 template and upgrade it.

    Please use this technique at your own risk - it is entirely up to you to check that it all works properly, and that it meets your local standards for egress travel distance / escape path measurement.  Revitcat accepts no liability whatsoever for the creation and use of this technique.  For this reason it is not possible to post a copy of this component here, so you need to create it yourself from scratch from a v2013 adaptive family template.

    Youtube demo of escape path component in use