BILT Speaker

BILT Speaker
RevitCat - Revit Consultant

Tuesday, 16 December 2014

Revit's Most Hidden Commands (part 2) - Tag Units

Changing the number of decimal places on a dimension is relatively straight-forward in Revit once you know how to do it:

Method 1 (Project Units):
  • Click on the Project Units icon on the manage menu
  •  Click on the desired units (eg. length)
 
  • Change the number of decimal places as desired
  • And don't forget that handy "Suppress trailing zeros" setting to keep your drawings less cluttered (although I'd prefer it didn't have that redundant apostrophe on the dialog box!)
  • This will affect all linear dimensions in the project , except where this setting has been over-ridden - in which case go to method 2.
 Method 2 (Type Properties):
  • Select a dimension 
  • Click on Edit Type
  • Click on the parameter called Units format 
  • Click on the "Use Project Settings" checkbox; 
  • Alternatively,  change the number of decimal places and it will over-ride the project settings just for this dimension type.

That is a sensible Revit-like workflow once you know the process.
But, have you ever wanted to change the unit properties on a tag?  That is a whole different story . . . .


Tag Units

Each time I need to change tag units, it usually takes about half an hour to either remember or figure it out.  Here is the process I usually go through:
  • Select a tag

  • Edit type to see if it has unit over-ride properties like a dimension
  • Er no, nothing useful there
  • Hmm, what next?  
  • Try changing the project units
  • No, that doesn't work either
  • Oh, maybe its set in the family?
  • Try editing the family
  • Changing the project units in the family make no difference back in the project
  • Try selecting the label that has the value in it
  • Check its type properties
  • No, nothing there
  • Hmm, running out of options here
  • Ah, try Edit Label
  • Can't see anything that lets me change the units here
  • Click on the label parameter itself (on the right hand side)
  • Oh, what is that tiny, tiny 'hand' icon that has come to life down the bottom of the dialog box?
  • Click on it anyway, just to see
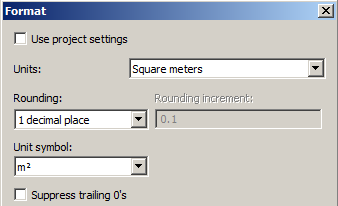
  • Oh, finally we get to a units format dialog box

  • Change the number of decimal places,
  • or better still, click on the Use Project Settings checkbox so that it can be controlled back in the project (unless you need individual control just for this tag family
If you follow the logic of why it is done this way, you can see that you may need to have the flexibility to have different units for each parameter in each label in a tag - but wow, is it an obscure process.  99% of the time most people would be quite happy with type parameters in the family in the project (like dimensions).

Since it only needs to be changed about once a year I always forget, and have to figure it all out again.

Label unit format icon - is it a hand or a subtle method of torture?

Thursday, 11 December 2014

Revit Stair Treads - Minimum Widths

When editing Revit component stairs, have you ever encountered an error message where it tells you that the actual tread width is less than the minimum allowed tread width, when in fact the two values are identical?

Usually it allows you to set tread widths the same as the minimum allowed value, but occasionally not.  I suspect this occurs when you mess with the minimum allowed value (a Type property of the whole stair) - perhaps when you increase the minimum to match an actual value that is already modelled.

My solution is to change the actual width value to be say 1mm more than the minimum, then change it back again so they are the same - error message gone.

Tuesday, 9 December 2014

View Filter Sort Order in Revit

In Revit, View Filters are not automatically sorted in the 'Visibility Graphics' dialog box - meaning that you often get a jumbled list that is really hard to read. [Edit: There is good reason for this - the order of the list is the order that filters are applied, from the top (as pointed out by Steve Stafford);  but sometimes you just want all similar filters listed together so it is readable]

Recently there has been a subtle change to how filters are added to the list (in v2015 of Revit):

In Revit 2013, when you add view filters, the most recent one will always be added to the end of the list.

In Revit 2015, when you add view filters, they appear to go in just below the selected filter in the list.  Once you add a new one, it does not become selected.  That means that if you add several in succession, they won't go in the order you add them - they will be added in reverse order just below whatever you happened to have selected.

To correct the Sort Order:

Initially I thought that you either have to live with the mess, or remove the filters and add them back in again.  Of course, if you do this, you lose all the filter override settings.

We actually have the ability to move filters up and down the list (Edit. Thanks to various comments - this paragraph has been corrected).

Revit 2015 - Adding new filters
  • Click on the filter in the list that you want new ones to follow
 
  • Add the first filter
  • Then click on the one you just added
  • Add the next one
  • Click on that one
  • Add again
  • etc - until you have the list as desired.

If at any point you forget to select the last one before adding the next one, all is not lost.  All you need to do is to move it up or down the list

This method does give you much more flexibility than how it worked in v2013.  However, it is confusing as hell until you see what it is doing.

I noticed that you can also add several filters at once, but it does not necessarily add them in the order that they are shown in the 'Add Filters' list.

There is also the curious question of why the list of filters in the Filter dialog box is not alphabetical.  Only Autodesk can solve that for us . . . . .

Monday, 1 December 2014

Best Tall Building in the World Documented on Revit

One Central Park in Sydney recently won the "Best Tall Building Worldwide (2014)", awarded by the Council on Tall Buildings and Urban Habitat (Chicago).

Designed by Ateliers Jean Nouvel, in association with PTW Architects in Sydney.  All the architectural documentation was done by PTW using Revit in Sydney.  This was an extremely complicated Revit model to work on, partly because no two floor plans were identical.  The building consists of a six storey mixed-use podium with a partially underground retail level and several levels of basement parking; and two towers of different heights.  The lower tower has an array of heliostat mirrors mounted on top - these track the sun and bounce its rays up to the underside of a massive cantilevered roof garden;  the cantilever supports another series of mirrors, which reflect the sun back down into the public garden behind the building, and also into the shopping atrium in the podium.

Array of mirrors cantilevered from the upper tower
Cantilevered mirrors viewed from inside the podium atrium
A series of fixed green walls are located in varied positions and heights around the building;  the residential zones also have planter boxes which are arranged in a pattern that repeats every three floors.  The combination of the repeating pattern and the varied height green walls gives an overall irregular look to the building;  it also means that no two floors are exactly the same - an unusal feat on a building of this size.
Green planters on the balconies
The cantilever structure not only supports the mirrors but also a roof garden for the penthouse apartments.  From this roof garden is visible another building successfully documented on Revit by PTW Architects:  the Channel 7 studios and offices at the Australian Technology Park - visible through the glazed railing.

View of Channel 7 headquarters from the cantilevered roof garden
The roof garden is linked to the penthouse floors by a red-glazed bridge, which is not for the faint-hearted to walk through.

Link bridge to cantilevered roof garden - with red glazing
The documentation was started in Revit v2009 and completed in version 2011, on computers that only had about 8 to 12Gb RAM, so they really struggled with the large file sizes.  The size of the project and the differing floor heights of the towers meant that it was modelled in a series of linked Revit files - with all its attendant problems of linked views and tagging elements in linked files.  Worksets were an invaluable tool for handling all the different links on computers with limited RAM.

We also used RTV Tools "Drawing Manager" to handle Revision control and the complex sheet numbering system required by the building contractors.  It was invaluable for handling revisions across sheets on multiple linked files; and for batch generating PDFs and DWGs with the appropriate file names for uploading to Aconex.

Although this project was basically done as "Lonely BIM", there was some collaboration - particularly with the steel fabricators.  This project was a successful testing ground for how to handle such a large and complex project in Revit.  Many people worked on the project over the years, and are now applying that gained knowledge in different locations and on varied projects in Sydney and around the world.

Saturday, 22 November 2014

AUx in Sydney frees up Revit & BDS licensing

For many years Autodesk University has been running in Las Vegas - meaning long overseas trips for those non-US residents lucky enough to get there.  In 2014, AU finally went on the road, in the form of "AUx"  (AU extension) - there were events all around the world, even one in my home-town of Nairobi.
Last week AUx came to Sydney - it gave us an opportunity to meet some of the Autodesk folks and hear about some of their new developments and plans for the future.  We also got to hear about their plans for software licensing . . . .

Revit & Building Design Suite Licensing


The Future

It seems like Autodesk are heading towards a license rental system rather than software purchase.  We heard from Autodesk that in the not too distant future, the new license rental scheme will become the only way to accquire Revit or Building Design Suite (BDS) licenses.  Of course anyone who already owns (purchased) licenses will have those in perpetuity - and providing they pay subscription they will get upgrades.  What this means is that most companies will end up with a mixture of rented and owned licenses.  This sounds well and good because it allows flexibility to expand/contract the number of licenses.  The reality may not be quite so good - the method of managing the two different systems is quite different and will have to run in parallel:
  1. Purchased licenses are usually part of a floating license pool, managed by the Autodesk license server on your network - this allows anyone on that network to use an available license (until all are taken).  This is an admirable system, albeit with some technical and logistical limitations (see next section);
  2. My understanding is that rented licenses are assigned to specific usernames (somewhat like individual purchased licenses being assigned to specific computers).  It is not clear how easily these are transferred between users as situations change - as they inevitably do (people go on leave; are reassigned to different projects or locations; people work part time; working at home or on the road; job-sharing  etc)
What really concerns me is how these two licensing systems will coexist and how easy it will be to manage change:
  • Inevitably we will need to move users between the floating license pool and named user rented licenses (for reasons described above);  Will we need to change the nominated usernames on rented licenses?
  • Will we need to change the licensing and/or serial numbers when this happens?
  • Will we need to reinstall software or will it be a simple license setting?
  • Will we need to contact Autodesk or our reseller to change rented license usernames?  How long will this take?  We need to make such changes in minutes or hours, but historically license reassignments take days or weeks.
  • Will we need to employ more staff just to manage licensing?  Or will the IT/BIM managers just add that to their list of tasks?

The Past (& Present)

Currently the floating license server for Revit and BDS has some extremely frustrating limitations on use:
  1. It only allows a company to run 4 concurrent versions of the software - for example, the license pool will cover version 2011, 2012, 2013 & 2014.  If you want to upgrade your BDS licenses to version 2015, you have to drop the earliest one (2011) from the list.  This includes all the software in the design suite - so that if you want to run Revit 2015, then your versions of Autocad, 3D Max etc must also be v2012 or later.  [NB. until a couple of years ago this was only 3 concurrent years]
  2. If we want to access an archived project in an old version of Revit (say v2008), we can either upgrade it (slow and it may not work), or we can open it in the old software - but once re-installed, we cannot activate the software because the license pool prevents this!
  3. Revit software is not backwards compatible:  Each year the file format is changed - old versions cannot read newer Revit files; you cannot save a file back to an older version.  What this means is that on collaborative projects, all team members must be running the same version of Revit.  The reality is that many companies work on different projects, each of which may be on different Revit versions (as agreed by each team) - so each company must maintain several active versions of Revit.
  4. If you are using BDS, you can open several different software packages within the suite simultaneously (eg. Revit, Autocad, 3D Max etc).  If they are all the same version number (eg. Revit 2015, Autocad 2015 and 3D Max 2015), you will only take one license out of the pool;  if they are different version numbers, it takes one license from the pool for each year (eg. Revit 2015, Autocad 2011 and 3D Max 2013 will use 3 licenses).  What this means is that it becomes desirable to upgrade all members of the suite and all projects using the suite simultaneously.
  5. Because of the file format change in Revit, and collaboration issues it becomes inportant to upgrade Revit every year.  Typically users do not want to upgrade other parts of the BD Suite annually because of customisation, plug-ins etc - they often skip a year or two for Autocad and 3D Max.  This upgrade cycle mismatch within BDS is hard to manage and causes many BIM/IT managers headaches around the world.
Because of all these restrictions I know of many large companies who are still not using v2015 of Revit because they are held back by active projects in v2011, or have not had time to update Autocad v2011 customisation.

The Present

At AUx Sydney we were told by Autodesk executives that once we own any version of an Autodesk product, we are legally entitled to licensing to allow the use of it at any time.  This means that if we want to run more than 4 concurrent versions on our network, or even to activate older versions to retrieve archived projects, we can get license files from Autodesk to do this at any time.  Although I have once or twice asked a reseller to make a special dispensation (they organised an extended 5 year concurrent license file from Autodesk) - I did not realise that this was considered to be standard practise by Autodesk.

Yippee - this means that all we need to do is ask Autodesk for extended floating license files to cover all the years of software that we owned, and hey presto:  problems 1 & 2 (above) are solved.  Given the time it takes and forms to be filled out, it may be wise to do this in advance of any requirements; another benefit would be to avoid replacing license files and rebooting license servers, which are notoriously fickle.

The Future (Again)

Wouldn't it be wonderful if Autodesk took away all these restrictions?  Here is what they could do to make our lives easier:
  1. Increase the number of concurrent years that are automatically built into supplied licenses to include all the years that we have purchased (or at least 6 years instead of 4, would probably eliminate half the problem situations around the world).
  2. Unbundle BDS !  Or at least unbundle the licensing file so that we could more easily extend the Revit licenses without messing with the other software.
  3. Lift the restriction of using up one floating license per year/version of software in use - so that we could open a copy of Revit 2015, Autocad 2011 and 3D Max 2013 on the same computer but only use one license from the pool.
  4. Somehow tackle the backward compatibility issues!  I know this is technically difficult, but we'd love to be able to save a model back to an older version even if we lost some functionality.  Maybe they could stop changing the file format so often - every 2 years would help a lot.

Sunday, 9 November 2014

Weird Revit Stair Stuff - Stairs in Groups


No matter how much stuff I post on this blog about stairs and railings in Revit, I keep finding new weird things to report.  The latest one is to do with groups that contain the (not so) new component based stairs, and the element selection process.

Group Selection

If you select a group (by single click) that contains a stair, the stair does not highlight while the rest of the group does (including the railings hosted on the stairs).
  

Isolate Element

If you then use the "Temporary Isolate Element" command, Revit will hide everything except what you have selected - in this case the stair is not displayed.  This could be confusing at the very least, but extremely annoying if you need to edit the group and work on the stair.

Group & Stair Selection

If you reset the temporary hide/isolate, then select the group (by single click) and the stair (tab/ctrl click), the stair does highlight with the rest of the group;  it also displays an icon to allow you to exclude the stair from the group

Then use the "Isolate Element" command again, this time Revit displays the group including the stair - which it should have done in the first place.  You can now proceed with editing the group (or whatever you needed to do).

Group & Run Selection

Just as an experiment, reset the temporary isolate;  try selecting the group and then just one run in the stair.  This time the run does not highlight - another inconsistency.  You can check that it is selected because the "exclude group member" icon is displayed, and Stairs:Run is listed in the selection filter.

When you use the Temporary Isolate Element command again, the stair run is not displayed - yet another inconsistency.

Summary

This may seem trivial, and it is possible to work around it - but I wasted a lot of time trying to figure out if a stair was or was not part of a group.  It was made more complicated because the group was part of a multistorey core, and the stairs from the floors above and below were easily selectable so I had to be careful that I selected the correct instance of the stair to match the selected instance of the group.
All this weird, inconsistent behaviour does not make it easy to learn or use Revit.


Sunday, 2 November 2014

Revit LT - Is it any good?

When I first heard about Revit LT, I thought it would be an exciting opportunity for many people to start using Revit at an affordable price - an effective way for Autodesk to quickly increase their user base.  Then I looked at the list of features available in LT - or rather the list of full Revit features not available in LT.  When I got to "Worksharing" not being available in LT I stopped reading.  What possible use could Revit LT be if it could not operate in an office environment of more than one person?  I rapidly formed an opinion that the only conceivable use for Revit LT might be for content creation.  From that point on I have ignored LT as being a waste of time.

Recently, I had an opportunity to test Revit 2015 LT for a couple of hours - so curiosity got the better of me, as I wanted to see what happened if you tried to open a workshared file in LT.  Here are some of the things that I found - information that it is not easy to find on Autodesk websites.  This might help you to make up your own minds about whether Revit LT has a place in your organisation.

Revit LT 2015 Features

Here is a partial list of Revit features not available in LT that I was interested in.  The full list can be seen on the Autodesk website under the compare section

3D Architectural Modelling - what is missing in LT:
  • Parts & Assemblies- fair enough, its a construction feature (not core architecture)
  • Conceptual Massing - fair enough - its a specialist tool (you could use Vasari instead)
  • Adaptive Components - pity; but they need serious fixing anyway before widescale use is recommended (refer to my blog post Reasons not to use Adaptives)
  • Stair by Sketch (the old stair method) - you should be using the new stair components anyway; new sketch methd works in LT.
  • In-Place components - only walls are possible in LT.  In-Place families should be avoided anyway, unless there is no other option.  It might be possible to create an in-place wall in LT, then change the category from Wall to something else back in full Revit?
Links and Views
  • View filters - oh no, this is a core part of Revit, so why is this feature omitted from LT?
  • Customise the visibility of linked models - could be a problem on large projects
  • Copy and Paste from Links - its a bit dodgy in full Revit anyway
Collaboration
  • Copy/monitor - fair enough.  Can be done in full Revit
  • Worksharing - this is the big one!  more about this later
  • Revit server - irrelevant without worksharing
  • Shared coordinates among projects - a new or casual user of Revit would not understand this anyway, so they wouldn't miss it!
There is more:  no API, analysis, rendering/ray-trace in project etc.  But these woud not be expected in LT anyway.

I chose to investigate 4 features in details - the ones I thought might affect working on a project.  they are highlighted in red above.

How Revit LT Handles Missing Features


Worksharing

Although Revit LT does not support worksharing, the Factory have put a lot of thought into how LT will handle worksets.  From some quick testing, here is what I found to happen when you open workshared Revit models in LT:
  • LT opens a worksetted file and retains the worksets (albeit controls are hidden) - in fact it does something similar to opening and detaching from a central file file in full Revit.  It will open a detached copy of the central file and automatically save it as a new central file with the suffix "_LT", in the same location as the original central file.
  • LT does not have Detach or Create Local options when opening a central file - because it detaches by default.
  • LT opens all worksets, even if it was last saved with some closed - this could be an issue if the file has many linked (Rvt & Dwg) files in worksets that you habitually do not open, so it could be slow to open the full list of worksets.
  • Workset visibility (per view) is respected in LT as it was last saved in full Revit.
  • The workset command icons are missing;  workset properties are not visible; workset tabs are not visible on any dialog boxes.
  • You can work on the file in LT as normal, albeit with several commands and functions missing.
  • You can save the LT file - because it is a new LT central file it will not interfere with the original central file (that it was detached from).
Opening an LT file in full Revit:
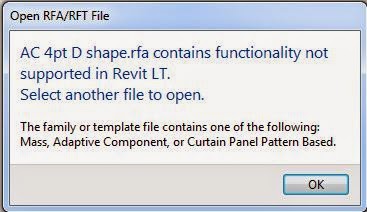
  • If you try to open an LT central file (one saved in LT) while it is still open in LT, it will not let you - and gives the following message:
Message in Revit if you try to open a file already open in LT
  • If you open an LT central file (that has an "_LT" suffix) in full Revit, it treats it as a regular central file, and will automatically create a new local file from it.
  • All the original worksets will be visible again in full Revit.
  • You will see that anything created in the model in LT will be on a new workset called "Revit LT User".
  • Full Revit will allow you to save new changes back to the LT central file (synchronise).

  • All seems well at this point, except that you now have two central files (one with  "_LT" suffix) - so you need to decide which one is to go forward, and archive the other one.
  • If you decide to keep the LT central file, and do not rename it (by saving it as yet another new central file) - then you can run into trouble:
  • If you try to open the LT central file in Revit LT, it sees that it already has an _LT suffix and it does not attempt to add another suffix.  Instead it tries to keep the same name, giving you the option to overwrite or rename the original:
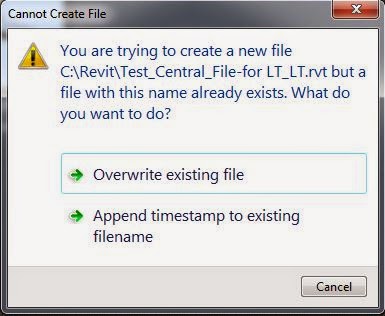
LT try to open an LT-Central file
  • Once the file is open, it lets you work as normal (with LT restrictions), and saves the file.
  • If you subsequently try to open this second LT central file in full Revit, it appears to proceed normally by creating a new local file;  however, when you try to synchronise it gives that familiar but nasty "local file incompatible" error message.  Generating two successive LT central files has obviously pushed Revit too far and it has lost track of its centrality!
Full Revit try to open a file saved in LT


View Visibility Graphics

Some categories are not available in Revit LT - such as Mass & Parts.  Curiously "Roads" is not available in LT either - but then no one knows what it does in full Revit anyway!
Full Revit Categories
Revit LT Categories

Some tabs in the Visibility Graphics dialog are missing in LT - Filters and Worksets
Visibility Graphics in Full Revit
Visibility Graphics in Revit LT
  • If View Filters have already been set up in full Revit, those overrides are respected when the Revit project is opened in LT - so they will print/display correctly, but cannot be changed.
  • LT also respects any Workset visibility or overrides that have previously been applied to views.
  • LT maintains any workset default visibility settings.
  • LT properties dialog box does not display the workset property of selected elements.

The "Revit Links" tab is available in LT, but it has limited capability - no Display Settings, so it is not possible to override display in linked models.  However, if linked model overrides have already been set up in full Revit, those overrides are respected when the Revit project is opened in LT - so they will print/display correctly, but cannot be changed.

Revit Links in Full Revit

Revit Links in Revit LT

Design Options

Somewhat to my surprise, Design Options work just fine in LT.

Adaptive Components

  • Revit LT will not allow you to load an Adaptive Component into a project
  • If an adaptive component exists in a project, LT is fine with it - LT even allows you to flex the component by moving its adaptive points
  • LT lets you copy an adaptive component within a project
  • LT lets you place a new adaptive component within a project, providing the family is already loaded
  • LT will not allow you to open an adaptive component in the family editor

The Verdict

You can make up your own mind about whether it is any good.
However, from my testing it looks like LT might be useful for more than just creating content in isolation.  It could also be useful as a lower cost licence for non-Revit team members to use for opening workshared files effectively in "detached mode" for checking and printing.

It would make more sense to me if Autodesk were to enable a core Revit function like View Filters in LT and maybe take out non-core functions like Design Options. If Autodesk were able to address the worksharing issues so that you could actually open and create a local workshared file (albeit without access to worksets), then I think it would sell like hotcakes.