BILT Speaker

BILT Speaker
RevitCat - Revit Consultant
Showing posts with label select. Show all posts

Saturday, 26 February 2022

Poor Man's Array in Revit

There are several situations in Revit where the Array tool is not available - one of those is when using the Sketch commands.  Here is a quick workaround.

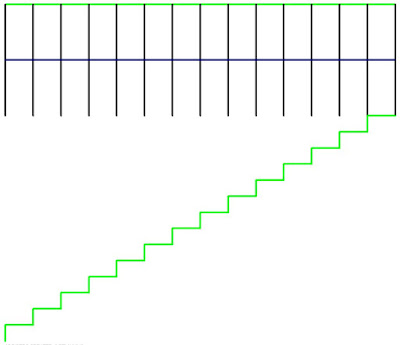
Stair Sketch Example

In this example I wanted to create a stepped side to a stair in the sketch mode.


When I selected two of the stepped boundary lines, I discovered to my horror that the Array tool is greyed out.

Workaround

Instead of using the Array tool, use the Copy tool, making sure that the 'Multiple' setting is ticked on the Options Bar

Revit first asks for the Start Point

Make sure to snap to the first end point of one of the items being copied

Then snap to the second end point

Then snap to the third end point - being the end of the first copy

Keep snapping to the end of the most recent copy until you have created your array - it is pretty quick once you get going.

In this example I had to delete the last created line

If you need a lot of copies - say 100, you have two choices:

  • Concentrate hard and try not to fall asleep
    or
  • Make 20 copies then stop and select all 20 steps;  copy those 5 times

Array Done!

I figured this trick out many years ago, and I needed it to achieve the stepped side to a stair sketch for another blog post - so I thought I'd document it in case it helps someone out there.

This might get you thinking about other uses of this simple technique.

I tried it for radial arrays, for which you would need to use the Rotate tool - but unfortunately that tool does not allow multiple copies.


Wednesday, 14 July 2021

Filtering Filters in Revit

The term "Filter" is much used in Revit - and it means different things in different situations.  Filters also follow varied and confusing rules depending on what you are doing.  Below are some of the rules and exceptions:

Coffee Filters

The 'Filter' icon in Revit probably makes good sense to most Americans, but others around the world might be a bit puzzled - it is a historical image, much like the Floppy Disk for 'Save'.

In the USA, coffee filters are still quite common:

Many American restaurants have a coffee filter machine, with a pot of brown liquid sitting on a hot-plate for hours after it has been dripped through a paper filter.


In Europe you might find various different machines for making coffee - plungers (French Press) used to be quite popular:


In Greece or Turkey, traditional coffee was made in copper pots.  now of course, there are updated electric versions available.


In Australia coffee-plungers are now a rarity, while filters can only be found in antique and junk shops.  Nothing less than a full-on espresso machine will do in even the smallest cafe.  A restaurant with a coffee filter would be laughed out of town:


There ends the 'Filter' icon history lesson.  I have to say that I do like the coffee filter as an icon because it is neat and distinctive - but it might puzzle the younger generation.  I can't see an espresso machine making a good icon.

Jeff has pointed out that the filter icon is probably derived from laboratory funnel filters - probably true, and much more logical than my coffee filter theory!


Selection Filters

When you select a number of elements in Revit, two Selection Filters icons are activated:

Status Bar Filter Icon

The Status Bar icon (lower right of screen) shows the number of selected elements; and the coffee filter icon, which gives you access to the Selection Filter dialog box.


Ribbon Selection Filter Commands

Ribbon Selection Filter commands allow you to:

  • Save, Load or Edit element selections
  • access to the Selection Filter dialog box


This is an invaluable (but underused) tool for filtering down your selection

It is really important to check the selection filter to make sure that you have not accidentally selected partially hidden items (eg. floors, section lines) before you delete, modify or copy them.


View Filters

View filters are created and saved in each project, and can be applied to:

  • individual views
  • multiple views or
  • view templates

View filter rules allow AND and/or OR

  • OR filter capability was added to Revit in v2019, which made our lives so much easier
  • OR filter rules are pure gold (as the French would say)

View filters can be used to:

  • Hide/show elements (Visibility) or 
  • To override their appearance

 Filter Overrides are not part of the View Filter:

  • Overrides are part of the view definition - meaning they are tricky to maintain or duplicate
  • Overrides can be part of a View Template


  • One of the annoying restrictions in View Filters is that Shared Parameters created in loadable Families are not available for use in View filters - unless you also add them as Project Parameters - refer to this blog post

More on View Filters in another blog post . . . .


Schedule Filters

Schedule Filters are quite different to View Filters in many ways:

  • Schedule Filters are an integral part of each schedule - they cannot be separately applied to other similar schedules - this is entirely different and inconsistent to View filters
    • However, Schedule Filters can now be included in View Templates that are then applied to multiple schedules (since v2017).
    • Be warned that if you create a complex filter as part of a schedule, then apply a view template, your filter could be overridden by whatever is in the template - never to be retrieved.
  • There is a huge list of system parameters that are not available for use in Schedule Filters - way too many to list here.  Autodesk are slowly adding new ones with each release, but it is a very slow feed, rather like an old-fashioned coffee filter that is clogged up with coffee grounds.
  • Shared Parameters created in loadable Families are available for use in Schedule filters - this is a good thing (but not consistent with View Filters).
  • Schedule Filters do not allow an 'OR' rule - this is a really bad thing (and not consistent with View Filters);  they only allow 'AND' rules.
  • Schedule Filters have a fixed number of 'AND' rules - currently 7 (this was increased to 7 a few years back).


More on Schedule Filters in another blog post . . . .


Browser Filters

Project Browser has its own filtering system:

  • It is limited to 3 'AND' rules, which includes some System Parameters and Shared Parameters

  • A few years back Autodesk added "Family" and "Type" as separate parameters for filtering, which is much better
  • Unfortunately the default filter "all" is by the combined "Family and Type" parameter, which cannot be edited - I would prefer the "all" filter to be by "Family" and "Type" as two separate rules.


Parameter Search Filters

A few years back (v2017) Autodesk added a new filtering function to a couple of dialog boxes.  They referred to them as "Search" capabilities but really they are just filters - which adds to the confusion.

Global Parameters Dialog Box

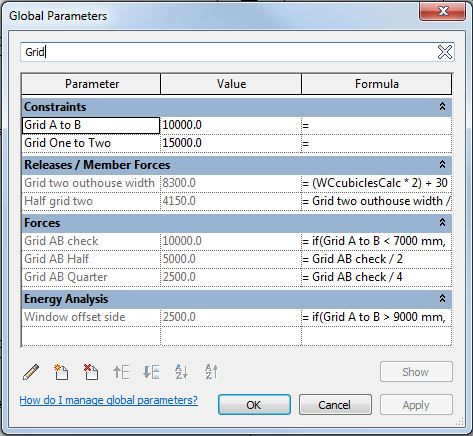
There is a 'Search parameters' box at the top of the dialog.

If you type in a word or part of a word, it does not search for parameters containing that (part)word.  What it does is to filter the parameters in the dialog so that it only displays those containing the (part)word in any of the columns (parameter, value or formula);

  • Any parameters not matching the filter are hidden


I seldom use this capability - partly because the way it was implemented is quite confusing.  No doubt there are people out there who love it!

It can catch the unsuspecting user out - if you don't realise that the focus is in that Search box, and you type something in (say a value that you are trying to input in a parameter), then all your parameters may disappear.  This could be very disconcerting.

I think it would have been easier to understand if the Parameter grouping titles did not get hidden.


Family Types Dialog Box

The same capability is also available in the Family Types dialog in the Family editor (since v2017).

The same gotcha/confusion is also available in the Family Types dialog in the Family editor.


Sunday, 17 March 2019

Glazed Doors in Window and Door Schedules in Revit

I started out writing this blog post about the behaviour of subcategories in nested families.  On closer investigation, the weird behaviour I intended documenting was not as I had thought - still a bit strange but not quite worthy of a post all to itself.  So I have changed tack and turned it into a discussion about how to get a glazed door family to appear in both door and window schedules.  Many experienced Revit users should already know this, but for those who do not, read on.

Schedules and Categories

Typically door and window schedules are created separately as single category schedules. Multi-category schedules have too many limitations to make them work efficiently for this task. A door or a window is usually either one of those categories, and therefore it can only appear in one of the schedules.  What if you have a window assembly that contains a glazed door? or a sliding glass door, which you want to show in the window schedule (because it is glazing), but also in the door schedule (because it hosts door hardware)?  This common requirement seems problematic in Revit, but there is a way around it . . .

Workaround:

Shared Nested Family

When a nested family is 'Shared', it behaves differently to the parent family in terms of subcategories.
For example, you might have a window parent family, that contains just a frame (or a fixed glass side panel).  Inside this could be a nested sliding door family.  Providing the door family is set to 'Shared', then it can have its subcategories independently controlled (by View Visibility) in the project;  it can also be individually selected, tagged and scheduled (as a door); the parent family can be tagged and scheduled as a window.

Nested Door Family Category Settings

Nested Door Family Subcategory

Parent Window Family

Parent Family Category

Parent Family Subcategories

Nested Door Family in Parent Family

Tagging and Schedules

Standard door and window families are normally tagged separately according to category
Once placed in a project, the combined door/window family can be tagged for either category:


Tag the whole family for the window category tag

Tab select the nested door family to tag it

Scheduling

  • The combined window/door family will appear in a window schedule. 
  • The Nested door family will appear in a door schedule

Category Visibility

This example shows a single swing door nested family in a window family (with fixed window panels either side).  In the project, both door and window categories/subcategories affect the sub-element display:
All Categories On

Door Panel Subcategory Off

Window Category Off - Door Category On

Non-shared Nested Family Categories

When a normal 'non-shared' family of one category is nested inside another family of a different category, it behaves as if it is part of the parent family in terms of categories.
Unshared Family Settings
In the parent family (in Family Editor), the nested family still shows its category when selected
Non-Shared Nested Door Family in Window Parent Family
When loaded into a project the whole window can be selected, but not the nested door family. 

Window family with non-shared nested door - in project

Changing the visibility of the Door category does not affect the nested door.
Door Category Off, Window Category Visible

Hiding the Window category, (while the door category is visible) hides the whole family, including the nested door
Door Category Visible, Window Category Off

This behaviour is as expected.

Weird Revit Behaviour:

Non-Shared Nested Families

However, if the nested families have elements of a specific subcategory (of the Nested family category - door) the element's visibility is still controlled by that nested family subcategory.  This does not really make sense if the nested family is not shared.
Door Panel Subcategory Off


This can be very confusing, as you have no way of knowing what category the nested family is, without editing the parent family.  As far as the user is concerned, the family is a window - since you cannot select the nested door in the project, the user will not be aware that it even has a nested family, let alone that a subcategory that has nothing to do with windows will still affect it.


Thursday, 15 February 2018

Selecting Pinned Elements in Revit

Following on from an earlier post about 'Chain-Pinned' elements in Revit, it is useful to point out the implications of different kinds of pinning when selecting elements.

Selecting Chain-Pinned Elements

Different hosted elements can be selected in different ways:
o        Tab-select to individually select chain-pinned elements.
o        Click-and-dragging across curtain walls or railings will also select individual hosted elements such as curtain grids, panels, mullions, top rails, handrails or supports  (regardless of whether they are chain-pinned or not).


You may find that you cannot select chain-pinned elements by either method.  This may be due to the ‘Selection Controls


‘Select Pinned Elements’ can be turned on or off as desired;  it may be useful to disable selection so that chain-pinned elements cannot be selected when click-and-dragging across curtain walls (such as curtain grids or mullions)

 or


If ‘Select Pinned Elements’ is disabled, it applies to both pinned (parent elements) and chain-pinned (hosted elements) – thus, if a curtain wall is pinned, you would not be able to select the wall or the hosted mullions etc This is particularly noticeable when you click-and-drag across many curtain walls – you will see a forest of chain-pins


In this situation, it is well worth using the selection filter to select only the parent categories (eg. Walls)