BILT Speaker

BILT Speaker
RevitCat - Revit Consultant
Showing posts with label dialog. Show all posts

Friday, 14 April 2023

Zoom in Family Types Dialog Box

Today I watched episode 99 of BIM After Dark, hosted by the Revit Kid.  The guest presenter was  Nicolas Catellier (Revit Pure), showing Advanced Revit Family Concepts.  However much you might think you know about Revit, there is always something new to learn.  

One tip that I picked up was the ability to zoom in the Family Types dialog box - this can be useful when you are editing families on a high resolution screen and the text is tiny.   Editing a complex formula is painful enough in Revit without having to squint to count the brackets at the end of a formula.

Family Editor Zoom

Just click in the Family Types dialog box, hold down the Ctrl key and use the mouse scroll wheel to zoom in or out.


There is one problem with doing this:  it plays havoc with the column widths.

  • The Lock column will most likely no longer fit in the dialog box 
  • A horizontal scroll bar may appear at the bottom of the dialog box

  • If you click in one of the formulas, it tries to display the whole formula column - which is logical
  • It also shifts everything to the left so it can display the Lock column - this is illogical and intensely irritating as you can no longer see the values.
  • You need to scroll left again to see the values

To resolve this you need to make the Formula column a bit narrower, and the Lock column much narrower (width of the checkbox).

It is not immediately obvious how to adjust the Lock column width:

  • Drag (to the left) the right-hand vertical line on the Lock column header - it seems like nothing is happening, but keep dragging it left until you align with the checkbox.

  • Drag the left-hand vertical line on the Lock column header to the right, until just before the right-hand line disappears.
  • You may need to make the Formula column narrower again until the horizontal scroll bar disappears from the bottom of the dialog box - but once you have minimised the Lock column width it should be easier to do that.


For a more detailed explanation of this workaround trick, refer to my blog post of a couple of years ago:

 Family Types Dialog Column Widths

 Thanks again to Jeff and Nicolas for the BIM After Dark presentation.


Wednesday, 14 July 2021

Filtering Filters in Revit

The term "Filter" is much used in Revit - and it means different things in different situations.  Filters also follow varied and confusing rules depending on what you are doing.  Below are some of the rules and exceptions:

Coffee Filters

The 'Filter' icon in Revit probably makes good sense to most Americans, but others around the world might be a bit puzzled - it is a historical image, much like the Floppy Disk for 'Save'.

In the USA, coffee filters are still quite common:

Many American restaurants have a coffee filter machine, with a pot of brown liquid sitting on a hot-plate for hours after it has been dripped through a paper filter.


In Europe you might find various different machines for making coffee - plungers (French Press) used to be quite popular:


In Greece or Turkey, traditional coffee was made in copper pots.  now of course, there are updated electric versions available.


In Australia coffee-plungers are now a rarity, while filters can only be found in antique and junk shops.  Nothing less than a full-on espresso machine will do in even the smallest cafe.  A restaurant with a coffee filter would be laughed out of town:


There ends the 'Filter' icon history lesson.  I have to say that I do like the coffee filter as an icon because it is neat and distinctive - but it might puzzle the younger generation.  I can't see an espresso machine making a good icon.

Jeff has pointed out that the filter icon is probably derived from laboratory funnel filters - probably true, and much more logical than my coffee filter theory!


Selection Filters

When you select a number of elements in Revit, two Selection Filters icons are activated:

Status Bar Filter Icon

The Status Bar icon (lower right of screen) shows the number of selected elements; and the coffee filter icon, which gives you access to the Selection Filter dialog box.


Ribbon Selection Filter Commands

Ribbon Selection Filter commands allow you to:

  • Save, Load or Edit element selections
  • access to the Selection Filter dialog box


This is an invaluable (but underused) tool for filtering down your selection

It is really important to check the selection filter to make sure that you have not accidentally selected partially hidden items (eg. floors, section lines) before you delete, modify or copy them.


View Filters

View filters are created and saved in each project, and can be applied to:

  • individual views
  • multiple views or
  • view templates

View filter rules allow AND and/or OR

  • OR filter capability was added to Revit in v2019, which made our lives so much easier
  • OR filter rules are pure gold (as the French would say)

View filters can be used to:

  • Hide/show elements (Visibility) or 
  • To override their appearance

 Filter Overrides are not part of the View Filter:

  • Overrides are part of the view definition - meaning they are tricky to maintain or duplicate
  • Overrides can be part of a View Template


  • One of the annoying restrictions in View Filters is that Shared Parameters created in loadable Families are not available for use in View filters - unless you also add them as Project Parameters - refer to this blog post

More on View Filters in another blog post . . . .


Schedule Filters

Schedule Filters are quite different to View Filters in many ways:

  • Schedule Filters are an integral part of each schedule - they cannot be separately applied to other similar schedules - this is entirely different and inconsistent to View filters
    • However, Schedule Filters can now be included in View Templates that are then applied to multiple schedules (since v2017).
    • Be warned that if you create a complex filter as part of a schedule, then apply a view template, your filter could be overridden by whatever is in the template - never to be retrieved.
  • There is a huge list of system parameters that are not available for use in Schedule Filters - way too many to list here.  Autodesk are slowly adding new ones with each release, but it is a very slow feed, rather like an old-fashioned coffee filter that is clogged up with coffee grounds.
  • Shared Parameters created in loadable Families are available for use in Schedule filters - this is a good thing (but not consistent with View Filters).
  • Schedule Filters do not allow an 'OR' rule - this is a really bad thing (and not consistent with View Filters);  they only allow 'AND' rules.
  • Schedule Filters have a fixed number of 'AND' rules - currently 7 (this was increased to 7 a few years back).


More on Schedule Filters in another blog post . . . .


Browser Filters

Project Browser has its own filtering system:

  • It is limited to 3 'AND' rules, which includes some System Parameters and Shared Parameters

  • A few years back Autodesk added "Family" and "Type" as separate parameters for filtering, which is much better
  • Unfortunately the default filter "all" is by the combined "Family and Type" parameter, which cannot be edited - I would prefer the "all" filter to be by "Family" and "Type" as two separate rules.


Parameter Search Filters

A few years back (v2017) Autodesk added a new filtering function to a couple of dialog boxes.  They referred to them as "Search" capabilities but really they are just filters - which adds to the confusion.

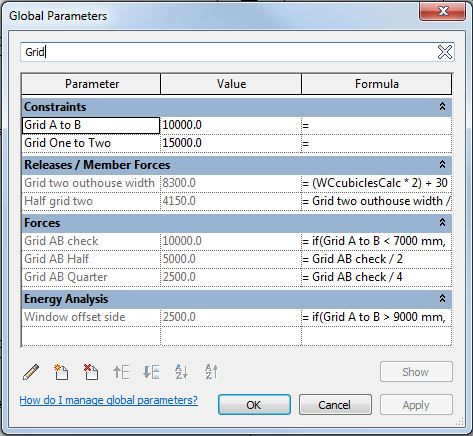
Global Parameters Dialog Box

There is a 'Search parameters' box at the top of the dialog.

If you type in a word or part of a word, it does not search for parameters containing that (part)word.  What it does is to filter the parameters in the dialog so that it only displays those containing the (part)word in any of the columns (parameter, value or formula);

  • Any parameters not matching the filter are hidden


I seldom use this capability - partly because the way it was implemented is quite confusing.  No doubt there are people out there who love it!

It can catch the unsuspecting user out - if you don't realise that the focus is in that Search box, and you type something in (say a value that you are trying to input in a parameter), then all your parameters may disappear.  This could be very disconcerting.

I think it would have been easier to understand if the Parameter grouping titles did not get hidden.


Family Types Dialog Box

The same capability is also available in the Family Types dialog in the Family editor (since v2017).

The same gotcha/confusion is also available in the Family Types dialog in the Family editor.


Tuesday, 15 June 2021

Family Types Dialog Column Widths in Revit

Does anyone find trying to control the column width in the Family Types dialog box annoying?

The "Lock" column in particular, has been driving me mad for the last 16 years!

About 7 or 8 years ago (?), Autodesk made a partial improvement to that dialog box: 

  • Revit remembers the size of the dialog box when you open or close the dialog - previous to that it always reset to a small default size & layout.  
  • However, it still behaves in an unpredictable way, which is intensely irritating.

I just discovered a trick that helps to get around the problem - so I spent a while analysing exactly what is going on:

Family Types Dialog Box Size Behaviour

  • When you close the Family Types dialog, and subsequently reopen it, Revit remembers the overall size and location of the dialog box.
 
  • This also happens between sessions:  When you close Revit, the next time you start Revit, it remembers the size and location of the dialog box.


Family Types Dialog Column Widths Behaviour

If you adjust the column widths in the dialog box:

  • When you close the Family Types dialog, and subsequently reopen it, Revit remembers the widths of the columns in the dialog box (even if you are editing a different family).
  • Not so between sessions:  When you close Revit, the next time you start Revit, it RESETS the widths of the columns in the dialog box to defaults below (albeit within saved overall width).

Default Column Widths:

    • Parameter = 26%
    • Value = 22%
    • Formula = 40%
    • Lock = 12%

Adjusting Column Widths

If you adjust the column widths, it follows strange and annoying rules:

  • Adjust between Parameter/Value:  It changes Parameter and Lock Column widths
    • This is not helpful as the lock column is wasted space!

  • Adjust between Value/Formula:  It changes Value and Lock Column widths
    • Even less helpful as the Lock column gets enormous

  • Adjust between Formula/Lock:  It changes Formula and Lock Column widths

When adjusting Formula/Lock columns, be careful:

  • If the right-hand "Lock" column vertical line disappears, it means the Lock column no longer fits in the overall width - this will cause much irritation (see below)
  • This makes a horizontal scroll bar appear at the base of the dialog box - yuk!
  • If you subsequently put the cursor anywhere in the "Value" column, as soon as you type a value and press enter, your dialog box may do a "crazy leprechaun dance"*
    • The focus moves into the Formula Column
    • In its infinite wisdom (/stupidity), Revit wants to display the column to the right in full - so it moves to show the whole of the Lock Column
    • You will probably no longer be able to see the Parameter name and/or Value

[*NB. this is what the first iteration of the ribbon menus in Revit 2010 was referred to as doing]

NB. This does not always happen - I think it depends on the overall dialog box width and the Lock Column width


Clever Trick

I only discovered this a couple of days ago:

  • Adjust the Formula/Lock column widths as close as you can to desired

  • Select the right-hand vertical line of the Lock column, drag it to the left until the cursor aligns with check-box
    • Nothing appears to happen
    • However, in its mind, Revit is actually making the column width smaller (it just doesn't show the change)

  • Adjust the Formula/Lock column widths again - to the right
    • it lets you get the Lock column width much smaller (without losing the right-hand line)
  • You can make the Lock column tiny - check-boxes will shrink

Once you have made the Lock column very small - it remains proportionally small when you increase the dialog box size - which is really useful.

Workaround to Avoid the Problem

If you always follow these rules, you are less likely to have a problem:

1.  Adjust your dialog box size to exactly what you will need for the entire Revit session - so if you are working with formulas a lot, then allow for a large width

2.  Adjust the column widths in this order:

  • Parameter/Value  <

  • Value/Formula  <
  • Formula/Lock (keep the right-hand line visible) - move to the right  >
  • Right-hand side of Lock column - move it to the left  <
  • Formula/Lock again - move to the right  >


3.  Make sure you never have the horizontal scroll bar visible 

  • If you ever adjust the Parameter or Value column widths, check the right-hand side of the lock column title - make sure it is visible (and no scroll bar).


Conclusion

If anyone tells me that they have known about this for years, I'd like to know why they never informed me before!


If you would like Autodesk to fix this problem, please go to Revit Ideas and vote for the wishlist item that Dave Plumb recently posted.


Monday, 23 September 2019

Inconsistent Units Settings UI in Revit


There are several very different ways of getting to Units Settings in the Revit User Interface.  Most of them are not very intuitive - and certainly they are totally different from each other.

Project Unit Settings

There are 3 different icons on the 'Manage' ribbon, depending on your screen resolution and size:

Largest resolution or screen
 If you are operating on a laptop or low resolution, the icon automatically reduces in size, and you may or may not get a text description:
Medium resolution or screen

Smallest resolution or screen

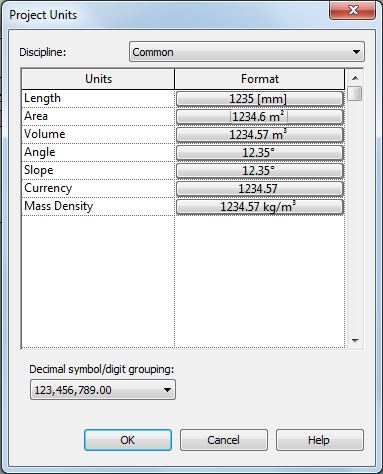
Once you click on the Project Units icon it takes you to the units dialog box, which has a list of different kinds of units:


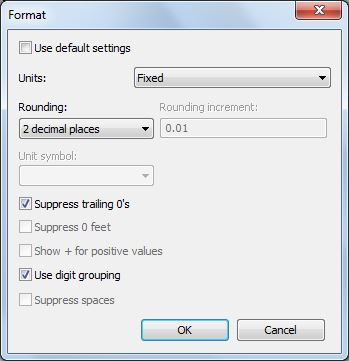
Once you choose a particular unit type, it gives the project-wide 'Format' settings for that type.  Since this is the project settings, the checkbox at the top is greyed out.   Some of the checkboxes are related only to imperial measurements so would always be greyed out for metric users.

This dialog box is the one common UI that appears for all methods of accessing units - but different items are greyed out in each situation that the dialog box appears.


Dimension Units

  • Select a Dimension in the project 
  • Click on Edit Type


  • Click on the Units Setting property
  • This takes you to the Units Format dialog box where you can override the project settings
Alternatively you can access this units dialog box from the Annotation ribbon:
  • Click on the Dimensions drop-down arrow
  • Select the kind of dimension you want


Schedule Units Settings

  • In the Schedule Properties, go to the 'Formatting' tab
  • Select a field (on the left)
  • Click on the 'Field Format...' button on the right


  • Once you click on this, you get the standard Units dialog box
  • Typically the 'Use default settings' checkbox is ticked 
  • You can untick it if you want to over-ride the project settings


Tag Units Settings

Refer to Revit's Most Hidden Commands (part 2) for more detail on this.  It is quite tricky to find this setting:

  • Edit the tag family
  • Select and Edit a label

  • The parameter in the label may look like it is selected (on the left), but it is probably not
  • Select the relevant parameter (on left, even though it shows on the right)

  • The 'Properties' icon (a hand) will be enabled
  • Click on it

  • Finally you get to the units settings, which is normally defaulted to 'Use project settings'
  • It is not possible to get to this unit override setting within the project environment (unlike dimensions and schedules)

Summary

Here we have at least 4 completely different ways to access Revit units settings:

Method 1 (Ribbon in the project ):


Method 2 (Dimension Type properties in the project ):

or

Method 3 (Schedule formatting properties in the project ):


Method 4 (Tag properties in the Family Editor ):


Why does something so simple have to be so inconsistent, and complicated ?