Wednesday, 30 December 2015

Revit Octopus - RTC 2012 NA Competition Winner

Octopus Hotel, Hainan
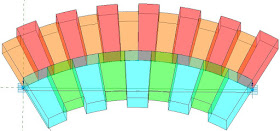
Back in 2012 this drawing was the Innovation category competition winner at RTC North America (Atlanta).  It was meant to represent the design process (on yellow trace paper and in Revit) of the Octopus Hotel designed by PTW in their Shanghai office.  The initial design modelling was done in Sketchup and 3D Max, then 2D documented in Autocad.  Then we had to start really documenting it in Revit to make sure the organic shapes were buildable. . . . .
The first task to solve was the plan layout - making sure that each hotel wing (octopus leg) had regular radius curves with smooth transitions between concave and convex curves, with a minimum number of different shaped hotel rooms.  Trying to do that in 2D was painful - lots of reference planes/lines and aligning centre-points of arcs with each other, and plenty of calculations.  If anyone made a change to the layout you had to start all over again.
To improve this process in Revit, I decided to make a flexible component that would place a number of tapered hotel rooms along an arc.  Initially I tried a line-based generic component that required the user to click a start and end point - that worked fine for linear hotel rooms.
As soon as I tried radial arrays, it became a nightmare, as they are really hard to control with parameters.  As adaptive components had recently been introduced to Revit, that seemed to be the way to go - but then I realised that they do not allow the Array command.  'Repeaters' to the rescue!
All of this required a lot of complex fomulas and trigonometry, even with using Repeaters - particularly as I wanted the end user to be able to dynamically change and schedule room areas, widths and the radius.


Area calculations for segments
Eventually I managed to create an adaptive component that had two curves (concave and convex), forming a corridor double loaded with rooms.  This was fully parametric in terms of being able to stretch the start and end points and change the two radii as well as critical room dimensions.

 
This would have made the design process so much easier than relying on several different programs and yellow trace paper!  Creation of this component was fully documented in my handout for the RTC events in 2012 (Australasia and North America).  When I get a chance I will try to post some of the techniques on this blog.


The 2d planning was only the start of the challenges - each hotel room had a balcony that had curves in plan and in elevation, so that really challenged Revit's ability to create organic geometry - but we did succeed in building a convincing 3D model in Revit.

Octopus hotel wing


Of course, now you might be tempted to use Dynamo to build this sort of complex geometry.

Friday, 4 December 2015

Revit Stair Sketch Tool

I have noticed that most people who want to create a non-standard stair in Revit will resort to the old stair sketch tool.  This is a really bad idea for a number of reasons.  I only know of one good reason for doing so (more on that later).
The old Stair by Sketch tool was left in Revit as a 'safety blanket' for those worried about the new Stair by Component tools.  In reality the component stair tools are much better than the old tools despite the many glitches and shortcomings.  [Edit: in Revit 2018 the old Stair by Sketch tool has finally been removed]

So, what happens if you want to create a non-standard stair that cannot be done using standard components?  A tapering stair for example.  Well, the component stair has its own sketch tool:  the icon looks like a pencil with curvy line (highlighted below).  That means you can sketch just one component - say a run or landing (both have the sketch option, but Support does not).


Once you start a component sketch, you get three line types, much like the old stair sketch tools:
  • Boundary lines
  • Riser lines
  • Stair path

Once you start using these line tools, you will see that they work quite differently - each line has to be created (drawn or copied), unlike the old sketch tool that created all the lines when you placed the central run line.  This may seem like a retrograde step (pardon the pun) but it is no great hardship, particularly as there are so many other advantages.

I usually find it is easier and quicker to create a standard run or landing component that approximates what you ultimately need - then convert it to a sketch.

It will give you a warning that the process is irreversible.  Take heed, because once it is a sketch it will always be a sketch, unless you delete and replace with a component (and risk losing hosted elements).

Once a component is converted to a sketch, you need to select it in order to then edit the sketch - this seems like a needless step, but in fact it is logical.  It caught me out a few times, wondering why my converted component did not look like sketch lines.

Once you are in sketch mode, you need to remember that adjusting the central Stair Path line will not affect the riser spacing - it is just another line.  The Finish Sketch command is much more forgiving than the old sketch tools, which were very temperamental.  I will cover more detail on the rules of what the sketch command will or will not allow, in another post.

Stair by Component = Good;   Stair by Sketch = Bad

Why is it bad to use the old sketch tools?  Here are a number of reasons:
  1. Using the old stair tools means that you are missing out on new features like stair numbering - despite the shortcomings, they are useful.
  2. The old sketched stairs have the path arrow built into the stair, which means limited control on where and when they show up.  It also means very limited control on the stair arrow style.
  3. It is really bad news to mix old and new stairs together in the same project because the annotation can be extremely inconsistent between the two - particularly for stair path arrows.  This leads to confusion and messy drawings.  Refer to Stair Paths Arrows for more detail.
  4.  Stair by component gives much greater control and options for changing the number of risers, the height and location of landings etc.
  5. Stair by Component allows stair runs to go over the top of each other - useful for spiral stairs more than 360 degrees, or for stairs with 3 runs per storey.
  6. Sketching individual components (run or landing) allows other parts of the stair to remain as components, with all the benefits of that.  Stair by Sketch means the whole stair is one sketch.
  7. The list goes on . . . 

Reasons to use Stair by Sketch

There are a couple of reasons for reverting to the old stair tools, but hopefully these will be dealt with by Autodesk fixing the bugs in the component tools:
  1. "Show Hidden Lines" does not work on component stairs
  2. There are many shortcomings with the Stair Path tool for adding stair arrows, including:
  • Cannot copy and paste stair arrows between views
  • There is no "Tag all stairs" command for adding paths to multiple stairs at one go
  • Duplicating a view will not include stair path arrows unless you duplicate with Detailing, in which case you get all the other annotation.
The moral of this story is that the reasons for using Stair by Component sketching far outweigh the minor benefits of sticking with the old Stair by Sketch tools.  I wish that Autodesk would fix those bugs and remove the old tool so that people would stop using it.

Wednesday, 11 November 2015

True 3D RCP View of a Stair in Revit

I was asked recently if there could be a way to show a true reflected ceiling plan (RCP) of a stair in Revit.  If you set up a conventional RCP view in Revit, it will display the underside of a stair above as if it has a smooth sloping soffit regardless of the construction.  A steel of timber stair will look just like a monolithic stair above - it shows the outline of each run and landing plus any supports, but no back of riser lines.  It makes no difference changing the view discipline to 'Structural'.


You can check which subcategories it is displaying by changing the view overrides:
<Above> Outlines   and   <Above>Supports


For more info, refer to Stair Subcategory Visibility

For a metal or timber stair, you would expect to see the undersides of the risers;  a precast stair might be the same.

Workaround

There is a way to achieve this, but of course it is a workaround that has several downsides.  What you need to do is create a plan callout of the stair, but it must be made as a detail view.  For more information on the downsides, refer to Detail Plan Callout Views.

When you create a callout from a floor plan view, you have a choice of making it a detail or a floor plan view. 


These behave very differently and are not interchangeable, so you need to choose the right one from the start.  Normally I would strongly advise to never use a Detail Plan View callout, but this is one exception to that advice - so go ahead and create a Detail Plan view.
 When you go to the callout view, it shows a true 3D representation of the stair, without any cutlines or representations of what is above.  It also cannot host a stair path arrow (amongst other things).
Detail View plan callout of a stair
This callout view can be converted to a reflected ceiling plan view by following a few steps:
  • Select the callout and change its properties:
  • Show In = Intersecting Views
 
  • Parent View = <none>

 
  • Far Clipping = Clip without Line
  • Far Clip Offset = a suitable view range distance to see the whole stair
  • Go to a section view that cuts through the plan callout
  • You should see the callout as a horizontal section line (if not, check its extents to see it is withing the section extents) - select it
  • Click on the 'Flip Section' double arrow symbol - it should now be looking upwards
  • Go to the callout view, and it should be a reflected ceiling plan
RCP Detail callout view
The subcategory display of this will be quite different from a normal RCP view - refer to Showing Concrete Stairs under tread finishes
The riser lines will be controlled by the 'Treads/Risers' subcategory.  The Nosing Lines and Riser Lines subcategories will not affect this kind of view.

I would only recommend using this workaround for detailed RCP views of stairs.  I would not use it on an overall RCP of the whole floor - I would accept the fact that undersides of risers will not display on the overall.

 Stairs index page

Wednesday, 4 November 2015

RTC Europe 2015 - Revit goes to Budapest

Danube from Pest Castle

RTC Europe is over for another year. The 'Revit Technology Conference' concept is broadening its horizons - it is now all about BIM, not exclusively Revit. This year the event was held in Budapest - the home of Archicad.  Graphisoft were very much in evidence at the event, what with sponsorship and organising tours and competitions.  I think this is a very healthy thing for the industry.  Autodesk and Revit need some effective competition otherwise they will stagnate.

As always, I learned a few more tricks about Revit - in fact quite a few more than normal this time, so this was a very fruitful conference.  We also saw a number of interesting new products on show, such as Enscape, Fuzor and Avail, along with established ones like the Ideate Revit add-ins and CAD Learning - the latter were doing a wonderful job of organising free Revit certification at the conference.

Corinthia Hotel, Budapest

What a spectacular venue for a conference:
Corinthia Hotel Atrium

Stairway to RTC, Corinthia Hotel

Grand ballroom, Corinthia Hotel - main RTC venue

Site Visit to Graphisoft Park

The day before the conference started, a few people went on a tour of Graphisoft Park, outside the centre of Budapest.  We had a guided tour around the technology park set up by the owners of Graphisoft in order to create a good working environment for the Archicad programmers (amongst others).  The park was created on the site of old gasworks, and some of the old buildings were refurbished.

Gasworks Towers at Graphisoft Park
Graphisoft Park, Budapest

Graphisoft Headquarters, Budapest

Original specs on first Mac used for Archicad

Pecha Kucha

This sounds like a Hungarian invention but was actually started in Japan - it is a presentation competition.  Each competitor has 20 Powerpoint slides and 20 seconds to speak on each one.  The inaugural Pecha Kucha event at RTC, sponsored by Graphisoft, was won by Joe Banks of Brisbane, Australia - that means free attendance for him at the next European RTC in Porto, Portugal in October 2016.


Shopping in Budapest

Knockdown sale on Vasari?
Retro mobile phone shop


Monday, 2 November 2015

Revit filter operators - Why Not Or?


Google search logo on 1st November 2015
Google can do it . . . .


So, Why Oh Why (YOY) can't Revit allow 'OR' operators in view and schedule filters?

Revit and and and and and and . . . .
Revit Schedule filter operators

Revit view filters operators

Friday, 23 October 2015

Weird Stair Stuff - part 6 - Showing Concrete Stairs Under Tread Finishes

I was recently asked if it was possible to show a concrete setout plans (and sections) for a monolithic Revit stair that has a tiled finish or timber treads on top of the concrete - ie. to hide the finish and show the concrete riser lines only (which are in a different plan location to the finishes risers shown on the architectural plan).  You would think it should be an easy task given that most structural engineers would want to see only the concrete part of a stair.  Wrong!

By default, in an architectural plan view, Revit displays the finished nosing lines and the hidden riser lines (which may be coincident in plan if you do not have a projecting nosing).  One of the reasons for this is that Revit is not displaying the 3D model in plan views - it displays a hybrid 2.5D version that represents the stair in plan according to Revit's mysterious rules and system controlled subcategories (which are quite frankly, very limiting).
Normal architectural plan view of stair
Changing the Discipline of the view to structural, makes no difference to stairs.  Hiding various stair subcategories will not show the hidden concrete underneath, whatever you try.  If you hover the mouse over the run (and tab to get just a run), it highlights the actual 3D model with all the hidden lines available - but they disappear as soon as you select it - how tantalising!
Pre-select run shows hidden lines of concrete below

If you hide the floor finish at the top of the stair (in this example it is modelled as a separate floor) you can see that there appears to be a gap - this is because Revit stops drawing the plan where it expects the top nosing line to be rather than where the top riser is (even though it does not model the nosing if your stair 'Ends with Riser').
Gap at top of stairs when floor finish is hidden

Back in the section view, if you turn off the 'Treads/Risers' subcategory it leaves just the concrete substructure.

Notice that the concrete actually extends to the back of the riser in section (and 3D) but this is not shown in plan.  The section also has a couple of other issues:
  • The concrete at the top of the stair stops in line with the back of the top riser, where in fact it should extend up until it meets the underside of the floor slab.  Obviously the stair has no knowledge of where that slab is or how thick it is, but there should be a way to deal with this.  There is a Run property for 'Extend Below Slab' so why not have one at the top.
  • There appears to be a joint between the landing and the upper run even though they are the same material - in fact it is a step in the landing because the concrete landing edge aligns with the nosing rather than the concrete riser.  This would need to be manually adjusted if you want them to align or if you want a finish applied to the landing edge.
Concrete Section - treads/Risers hidden
This is getting close to what a structural engineer might want to see, or for an architectural concrete setout drawing.  So how do we get this to display the same information in plan, when Revit really does not want to do so?

As a workaround, we could try using one of Revit's really weird features, as described in my post about stair arrows and detail views:

Detail view callout

Create a detail view callout of the stair.

This type of view (Detail plan view) is actually a true 3D view (a horizontal section), which does not use the normal Revit 2.5D representation of stairs (and ramps).  The stair shows the top riser line (including thickness) and the actual nosing locations where modelled.  In the snapshot below the floor finish is hidden so you can see the top riser.
Stair in Detail plan view type

So now it follows the subcategory rules that normally apply to a section:
  • Nosing Lines, Riser Lines and Outlines are not relevant to this view type
  • Treads/Risers subcategory does apply - try changing the colour override to test it
Treads and risers overridden in detail plan view

Now try turning off the visibility of the Treads/Risers subcategory - and magically you can see the concrete underneath, because that is controlled by the overall 'Stair' category.

Of course there are some downsides to this method of creating concrete setout plans - Detail plan views are not normal Revit views:
  • You cannot place stair path arrows on detail views (although you can place stair numbers)
  • You cannot 'Reference Other View' callouts to regular plan views - so you would have to work out your view referencing carefully.
  • Detail views do not have a 'View Range', so you have to rely on the parent view or 'Far Clipping'
  • View cut plane is controlled by parent view - and cannot be overridden
  • You cannot use Plan Regions
  • If someone deletes your parent plan view, Vamoose detail view.
  • the list goes on . . . . .


Refer to  True 3D RCP View of a Stair in Revit for more uses of this technique
Refer to stair arrows and detail views for more detail on the downsides of this technique
Go to Revit Stair & Railings Index Page