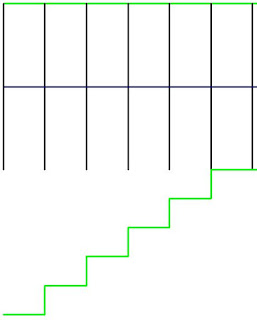
I had a question recently about how to create a Revit stair that is stepped in plan? It is actually not that hard to do but the method is not so intuitive - so here are some instructions:
Tapered Stair
For the record, we'll start with a tapered stair, to get the methodology - as that is very easy:- Create a stair with a straight run
- Select the run (in stair edit mode)
- Convert the run to a sketch
- Select the run and 'Edit Sketch'
- Adjust the angle of one or both sides
- No need to trim the riser lines (providing the boundary lines up with the end risers
- Finish the sketch and the stair
Stepped Stair
Follow a similar process as the tapered stair to start with:- Create a stair with a straight run
- Select the run (in stair edit mode)
- Convert the run to a sketch - this stage is not reversible, so you need to be sure about it
- Select the run and 'Edit Sketch'
- The sides and back of each step need to be drawn as 'Boundary Lines', which show green in the sketch mode [Refer to Poor Man's Array for a tip on how to do this]
- As per the tapered stair, the riser lines do not need to extend out to the boundary lines - this makes it easier to sketch and to modify later
- Finish the sketch and the stair
You may get some interesting results with the railings, but that can be dealt with in the next blog post . . . . Stepped Handrails in Revit


Good. Thanks.
ReplyDeleteYou're right: interesting resulting railings.