Wednesday, 12 December 2018

Weird Railing Stuff - part 14 - Railing Baluster Height Top Offset

Balusters have always been completely confusing in Revit Railings.   However, one baluster property used to be quite straightforward:  the baluster Height, which Revit seemed to handle quite well - providing the baluster top constraint was set to the appropriate rail element.  In earlier Revit days, baluster height could be set as an absolute value, or could be attached to one of the rail elements:

Revit Railing Rail Element Definition


Each of the named 'Rails' were available as a top constraint for balusters - whatever names you gave to the Rails were shown in the drop-down menu 

In the old Revit railing method the highest 'Rail' usually represented a handrail or top support/fixing rail of some kind - and this would be a good constraint for the balusters - if its height changed, all the balusters would adjust accordingly.  It didn't really matter what you called the Rails (but it does matter now - see below).

A Cat Among The Pigeons

A few years ago, we were given new specialist system defined railing elements "Top Rail" and "Handrail".

The original rail elements remain available in the UI for use as mid rails for example (although can still be used to represent handrails).  This means there are now three different ways to define the continuous rail elements.

At this point, Baluster top constraints became very confusing and inconsistent . . . .

Baluster heights can still go up to the old Rail elements.  They can also go up to new 'Top Rail' Elements but not to new 'Handrail' elements. 

Some railings have only handrails without top rails, so that is a totally ridiculous restriction.

Rail Naming

The old style Rails, might have the same name ("Top Rail") as the new system name of "Top Rail", particularly as that was a common naming convention in old style railings.


This could be very confusing as they both appear in the Baluster dialog drop-down menu - in order to avoid a conflict  the word "Element" is added as a suffix to the system family.  This drop-down menu is the only place it is so named.  Get used to it!

What I recommend is to rename any old style Rails that may represent handrails or top rails - this will avoid any confusion. 


A better solution is to use the new system family rails for either handrails or top rails and then remove the old style rails that used to represent handrails.  Even though the new system Rail families have been available for at least five years, you will find many railings that are set up the old way, so you will need to fix them.  The reason for the old style railings hanging around so long is partly because old railings are not upgraded to new style ones when an old project or template is upgraded - this is amply demonstrated when you look at the Autodesk sample file, which has never been fixed!!!  Thankfully Autodesk did fix their supplied project templates - but your company templates need to be manually corrected.

* NB. The new style handrails/top rails are mostly better than the old ones - but not in every situation.  The old rails could go around a tighter corner on a half landing, where you have limited space [they both break but the older ones in a better way].  However, on balance I prefer to go with the new ones and live with that shortcoming and the many confusing inconsistencies built into them.

Warnings

When you do fix your old railings, and you replace old style handrails with new ones, you may get an error message when you delete old handrails/top rails:

When you try to delete an old rail from a railing definition, Revit may warn you that it will reassign the height reference (for balusters).  If you say Yes, you might expect Revit to make an attempt to resolve it.  This is in fact quite misleading, because it usually fails abjectly:


The balusters cease to exist until you go in and manually correct their top constraints, which will most likely be unassigned:

Confused by all this?  That is not surprising - go in to your project template and check all the railings, and it may start to make sense.

Thursday, 6 December 2018

Weird Railing Stuff - part 13 - Handrail Support Family Types

Is this a Railing Bug?  Or is it the UI 'As Designed'?
Either way, it is yet another example of how the railing interface in Revit needs some serious attention.

Support Family or Type?

 As you all know, it is entirely possible to have numerous different families that all have the same Type names, in a Revit project.  This can happen for a number of reasons, including the mysterious bug whereby families get renamed with a number suffix when copying elements into a project that already contains that family.  These families may or may not be the same


When selecting a support family type in a handrail family, it only lists the Type name – so that if two different families have same type name, you can’t tell the difference


 In addition, the list of family/types does not appear to be alphabetical - so the order may easily be different to the order in the Project Browser.

Note that in the Handrail Type dialog box, the parameter is labelled as 'Family' when in fact it is listing Types only.  In the Railings dialog box, the parameter is labelled as 'Type' - yet another inconsistency!

Thursday, 29 November 2018

Weird Railing Stuff - part 12 - Top vs Hand Rail Usage Terminology

More Revit Railing UI inconsistency:


In the Railing Type Property dialog box there are sections for Top Rail and two separate Handrail properties.  Each of these have:
  • a Height property.  As noted in another post, the behaviour of the Height property is completely different for each. 
  •  a 'Type Name' property
  • There is also a property that you set whether the chosen type is used or not, and if so what position(s) it is in - these are also inconsistently named, which causes confusion when you first look at them:
Top Rail - 'Use Top Rail'  = Yes/No

Handrail - 'Position' = None, Left, Right, Left and Right


Why the inconsistency?  It would be so easy to make them the same - they could both be called 'Position' or both 'Usage'.  The settings could both have a 'None' option, instead of one being 'No'.

Friday, 23 November 2018

Weird Railing Stuff - part 11 - Rail Heights


More Railing inconsistencies in Revit

The (not so) new capabilities for adding 'Handrails' and 'Top Rails' to railings can be very useful, but the UI is riddled with weird settings and inconsistencies - this one relates to their Height Properties.


  • Handrail has height property built into handrail family type
  • Top rail has height property in the railing family type (not built into top rail family type)
 
  • The Handrail height is displayed in the railing property dialog box, but is greyed out
  • Top rail height is controlled directly in railing property (much better)
 What this means is that you can have one Top Rail family type that can be used at varying heights.
  •  Meanwhile, if you want to change the Handrail height, you have to click on the hidden button to the right of the Type name - this opens the Handrail type properties for the selected handrail.
  • The height can be changed here - but of course it will affect all railings that use that particular handrail type, so you probably need to duplicate type.


  • This means that you need a separate handrail type for every possible height.
  • It is possible to right-click on a Handrail type in the family browser, and 'select all instances in project' - it does actually highlight them individually.

  • Since Revit users are never quite sure what has been used, they seldom check by this method, but typically duplicate type anyway, leading to a profusion of similar or identical types.
  • For this reason, it is wise to name the handrail types accordingly - either with a specific height or with a purpose

  • This will ensure that when selecting a handrail type in the railing property, you have some chance of getting the correct height.

It is not clear to me why these settings are different - I would much rather that both had height properties in the railing.  That would give us consistency instead of confusion.  It would also mean creating fewer handrail types - we already have enough variations of those to cope with the extensions.


And all this doesn't even address the fact that the old 'Rail Structure' method is still available for use to create handrails, top rails and mid-rails - and that has a totally different method and UI.  Aaargh, what a mess!


Friday, 16 November 2018

Correcting the CL symbol in mirrored Revit links

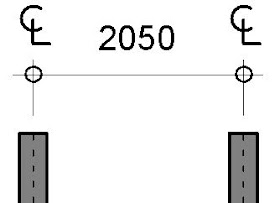
The automatic 'Centreline' capability on Revit dimensions can be really annoying when they pop up unexpectedly.  But when you actually need them it is very useful to be able to just change a property of the dimension family to make the CL symbol appear.

I have seen people just placing many instances of two little pieces of overlapping text, one being C, the other L - all because they didn't know about this feature.  That is criminal!  And its a nightmare when dimensions need to be adjusted.

Mirrored Centreline Dimension Symbols

What happens when you mirror the elements and dimension?  In most situations, Revit handles it perfectly well, because the CL is a symbol family, and Revit automatically corrects the symbol orientation.  However, there is one situation where it does not work:
  • If the dimension is in a linked Revit file that has been mirrored - normally you would not see the annotation in the linked file, but if you set the view properties for that link to be 'By Linked View', then the dimensions in the mirrored linked file become visible.

  • In this situation, the symbol may not be displayed correctly, depending on how the symbol family was created:
CL symbol in Mirrored Link
  • The OOTB centreline family is actually made up of arcs and lines (not text) - this symbol does not display properly in mirrored linked files.
I was recently asked to solve this problem, so I searched high and low for settings in the dimension and in the symbol family that might solve this.  I found nothing.
  • Next I tried converting the symbol from lines to actual text in the family - I'm not sure why it was originally done as lines anyway?
  • This needs to be made up of two pieces of overlapping text - in the symbol family, not the project file.
  • In this example I made the text using a font that was clearly not lines - 'Algerian' was the first suitable windows font that I found, to make the demo clear.

  • In the original file it looks fine, as expected.
  • Once I looked at it as a mirrored linked file, another problem showed up:
  • Each letter was displayed correctly, but displaced sideways

  • Aha, it must be the text justification, I thought.
 
  • But no, that made no difference whatsoever when I tried centre, left or right Horizontal Align.  Revit is just mirroring each piece of text around the symbol centreline, then flipping the text back again around its own axis.

Weird Workaround

So what was the solution?
  • Edit the text in the symbol family - Put a space after the C and one before the L.
  • Shift the letters accordingly. 

  • It wasn't perfect to start with, so I had to shift the text around a bit, or add a second space after the L


Weird behaviour in Revit requires weird thinking workarounds!

Saturday, 13 October 2018

A million ways to view Revit

Last week this blog reached a big milestone: 

One million views.   

OK, some of those viewings may be bots and a few were admin views, but it is still a big deal for me.  It is great to know that so many people out there are interested enough to look at this blog, and hopefully spend time reading the content.  It is also really rewarding when I meet people at conferences and user group meetings, and they tell me that the blog has helped them out (so they must be reading it).

Top Ten Blog Posts


By far the most popular is the post on stair path arrows in Revit.  What this tells me is that this is still a huge issue for people - ever since Autodesk created the 'New Component Stair' tools, and totally changed the stair path annotation method, it has confused users.  Autodesk have not only confused people, but they have continued to neglect the issue for 7 years (?) and have still not fixed the bug that prevents you from copying and pasting stair path arrows from one view to another - shame on you Autodesk.

In the top ten are five blog posts on stairs and railings - yes it is still a part of Revit that people need a lot of help with.  I hope that my blog posts have made life a little easier for people - although I do need to do some updates for the recent tweaks to the software, such as the new multi-storey stair tool.

Number 2 on the list is Copying Views between Revit projects - the reason this is confusing is that each view type has a different method of copying or transferring views. 

One way to get Autodesk to fix some of these issues is to vote on their Revit Ideas wishlist site.  Here is my list of things that I think should be voted up the list.

Monday, 1 October 2018

Quick-Fix Wonky Rotated Revit Plan Views

Following an earlier post on correcting the rotation of section views in Revit, I recently saved someone lots of time with this simple advice:

Here is a quick fix for accurately rotating plan views where someone has rotated a plan view incorrectly.  It may seem trivial but it is actually important that rotated plan views are at exactly the same angle as the part of the building they are displaying - this is so that the view-based orthogonal directions match the building.  If this is a fraction of a degree out, you will end up with all kinds of tiny but incremental differences that will surely cause problems.

When rotating a view, the simplest method is to make the view crop boundaries visible, then select the boundary and use the rotate command.  If someone types in an angle that is not to a whole degree, it will almost certainly not be the same as the actual rotation of the building elements.  Even if you snap to elements, it is easy to make an error.

Quick Fix

  • Go to another view that is correctly rotated ;
  • Create a 'Scope box' in that view - it will be perfectly orthogonal to the correct view;
  • Go back to the wonky view and change the Scope Box property of that view to the new scope box; 
 
  • It will rotate the view perfectly to the scope box (even if it is only a fraction of  a degree);
  • It will also re-crop the view to match the scope box - this may not be desirable, but can be fixed easily;
  • Delete the scope box if not required for other purposes;
  • Otherwise, just set the 'Scope Box' property to None;
  • Re-crop the view to what you need.
It may seem obvious but not everyone thinks of simple techniques like this.  I hope this saves someone a few minutes or hours and avoids a lot of pain.

Thursday, 27 September 2018

Creating Lofts in Revit Mass - CME Part 6


Here is part 6 of my series on  comparing the five traditional form creation tools with equivalent techniques in the Revit Conceptual Massing Environment.
Previously we analysed the creation of extrusion forms, Blends, Revolves, Sweeps and Swept Blends in the CME.  Hang on - part 6 of 5?  Oh that's right, there is no way to create 'Loft' forms in the traditional Revit environment:

Part 6:  Lofts

It is possible to create a 'Loft' in the Conceptual Massing Environment - it is a little different to a Swept Blend, and has its own rules (and problems).  A loft is a 3D form made by linking a series of planar profiles to create a surface(s), which can be flat, faceted, curved or double-curved (NURBS).  I consider a loft to have a minimum of 3 profiles, as 2 would just be a 'Blend'.  The profiles are linked along a notional path - the difference between this and a Swept Blend is that the latter uses a specific path element, and a loft does not.  Revit will figure out its own path (or not, as the case may be!).


As soon as the edges are not aligned and you have 3 or more profiles, you will get curved surfaces – Revit creates its own spline edges.


The greater the displacement between profiles, the more dramatic the curves


The profiles do not have to be parallel to each other, but as soon as they are at different angles it becomes less predictable as to whether Revit will create the form as you desired. In the example below, the profiles were hosted on reference planes, which can be rotated, but only before the ‘Create Form’ process


Revit may not create the form at all, and you might get this error message:


If the error mentions 'Self-intersecting geometry', it may be due to Revit getting the profile order wrong such that it tries to create a form that doubles back or crosses over itself - something that Revit does not like one little bit.  When you select the profiles in the first place, it makes no difference which order you select them - you have absolutely no control over the order that Revit uses in the Create Form function.  It is not clear how Revit decides on the order - it may be proximity to each other?  However, I don't think it is that simple.

The second part of the error message talks about the 'Reorder Profiles' button - this is not usually visibly apparent.  There is a blank space for it in the bottom left corner of the dialog box.  Wouldn't it be nice if Revit tried to Create Form again with a different profile order;  better still if it asked you to nominate the order!

About once in every few hundred times you get this dialog box, there will actually be a 'Reorder Profiles' button.  Be very careful about clicking on it.  The first time I tried that, Revit crashed out and closed without saving anything.  Thus it is wise to save all files before attempting this.


If you do click on the button, it won't help!  If it doesn't crash, it will just fail again.  It would seem that one of the programmers was aware of this form non-creation ability of Revit, and they tried to add a solution.  However, it seems like this functionality was removed from Revit before it was released to the unsuspecting public.  Sadly one instance of the many variations to the dialog box still has the button there to tantalise us.

If you would like Autodesk to fix this, please go to the Revit Ideas wishlist and vote for this enhancement request:

Control profile order during form creation


This description of Loft creation shows a very simple example - it can get quite complex.  There are many tips and tricks as to how to make Loft form creation easier and more predictable in Revit.  More to follow later . . . .

Wednesday, 29 August 2018

Creating Swept Blends in Revit Mass - CME Part 5

Part 5 of my series on  comparing the five traditional form creation tools with equivalent techniques in the Revit Conceptual Massing Environment.
Previously we analysed the creation of extrusion forms, Blends, Revolves, and Sweeps in the CME.  Next up is Swept Blends:

Part 5:  Swept Blends

Creating a Swept Blend in the Conceptual Massing Environment. . . .

  • A swept blend requires two or more profiles, each perpendicular to the path ;
  • In the traditional Revit environment, a swept blend can only have two profiles;
  • Unlike a sweep, the path can only consist of one element (line, arc or curve), even if the profiles are closed;
  • Unlike a sweep, the profile cannot contain a loop within a loop (to make a hollow form);
  • The easiest way to do this is to host the profiles on points – in the example here, an arc has 3 points that define it, so they can also be used to host the profiles


  • The profiles can be model lines, reference lines or loaded 2D profile components - each method has its own advantages or disadvantages (described below) depending on how you want to modify the form later on, so there is no clear 'best method';
  • Create Form by selecting the profiles and the path
  • In this example, the profiles are the same shape, so there is a smooth transition, and you cannot even see the middle profile
  • NB. If you had just selected the profiles, Revit would decide its own path, which may not match the one you created – in which case the form would become a ‘Lofted’ shape

Edit Form

Editing behaviour differs, depending on the original profiles and path:

  • For model line profiles, you can use ‘Edit Profile’ – it will prompt you for which profile to edit, so you may need to put the form into X-Ray mode to be able to select the middle profile(s) or use wire-frame mode
  • In sketch mode you can modify the profile, or change it entirely
  • However, if you don't have the same number and type of segments in each profile, it may result in sharp edges
  • Try matching the segments in each profile, to make the transitions smooth, without edges  

  • For reference line profiles, the profiles can only be changed in size/proportion, depending on how much you can manipulate the reference lines without breaking the profile (but you cannot add segments)
  • For loaded component profiles, they can be parametrically controlled (best method), but you cannot reload a profile with a different configuration or number of segments 

 Point Hosting

  • The Autodesk help files recommend putting the profile(s) onto points hosted on the path (rather than using the points that define the path in the example above) – this has several advantages: it should give more control with moving end points and rotation


  • Unlike a sweep, when you create a form, it does not extend along the whole path – only between the first and last profile


If you adjust the path underneath, the form follows it:


If the profiles were model lines, then the lines and host points on the path are ‘consumed’, which means the host points cannot be selected or manipulated, and the model lines have limited controllability (except in edit profile sketch mode).

Dissolve


If the form is dissolved the model lines and points are kind of reinstated but not to exactly their original state:
  • Circles are split into semi-circles
  • Points lose their display status
For this reason, you may need to recreate or rehost the profiles after dissolving a form, and reset some properties.


Loft vs Swept Blend

The important thing to note with Swept Blends is that the path is included during the creation of the form, but does not become part of the form itself;  when the path is modified, the form changes too.
If the path is not included, the form becomes a 'Loft'. 

The inclusion of the path can be extremely useful when it comes to modifying the form - as will be seen later . . .

Youtube

For more info on this, view the Youtube video:
Create a swept blend in Revit CME