Most elements can be 'Pinned' in Revit to make them more stable: when an element is pinned in Revit, it cannot be moved, deleted or edited without unpinning it – but there are exceptions . . .
The Ribbon Pin Icons
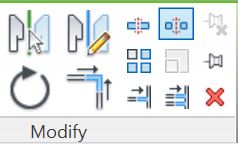
When you select an element in Revit, the ribbon displays a 'Modify' panel with two icons for pinning/unpinning (top right of the panel):- The lower right 'Pin' icon will be available if the element is not pinned
- If the element is already pinned, it will be greyed out
- The upper right 'Unpin' icon will be available if the element is already pinned
- If the element is not already pinned, it will be greyed out
- If multiple elements are selected, and some are pinned, some not, then both pin and unpin icons become available, so you can no longer tell the state of any of them from the ribbon icons.
Element Selection Pin Icons
The icons that display on the selected element operate in the more logical (but reverse) fashion - as well as being command functions when clicked on, they do actually indicate the current 'pin state' of the element(s).- Each element has its own icon, so you can tell the state of each one.
- Pinned elements show a blue 3D pin icon
- Elements that were once pinned but are now unpinned sometimes show a blue pin with red cross - but it depends on how it was unpinned.
This is where it starts getting tricky:
The keyboard shortcut to permanently unpin elements is ‘UP’. Multiple elements can be unpinned at one time using the UP shortcut. There is no keyboard shortcut for the temporary unpin command.- If you click on the blue pin icon on the element, Revit now will show a red line through the pin to indicate it is now unpinned but was previously pinned - this can be a good reminder that you should repin it after performing some edit operation on it.
- Revit remembers this 'previous pin state' even when you close the session and open the model again later - when you select the element it still shows the blue unpinned icon - I like to refer to this as temporary unpinning.

- However, if you use the ribbon command icon to unpin, then the blue element pin icon totally disappears - I like to refer to this as permanently unpinning.
This difference between the two operations is almost like a partly implemented idea for a proper temporary unpin command - I wish that Autodesk would take it one step further and give us a proper temporary unpin (or persistent pin): this would allow us to unpin an element, then edit it, after which it would automatically repin itself. There is a precedent for this in Revit with the temporary 'Exclude Options' selection checkbox (which rechecks itself automatically).
Feel free to vote for my Revit wishlist idea for Persistent Pins
Selection Settings
In the bottom right corner of the Revit window are the orange selection pin icons, although these perform a totally different function:- They display the status of whether you will be able to select pinned objects or not - they also operate as switches between the two modes.
- The red cross on the icon means that you cannot select any pinned elements.
Pin Visibility
Element pin icons are not always visible:- In a workshared model, when you select an element, it displays the 'Workshare puzzle' icon - this will obscure any pin icons
- To see the pin icons you have to take ownership of the element(s)
- you can click directly on the icon to remove it (and take ownership of the element), or right-click ‘Make Element Editable’ to take ownership and remove the puzzle icon.
Pin icons may also be hidden by group add/remove icons if you select an element inside a group without editing the group.
Chain-Pins
Chain-Pinned ‘hosted elements’ (eg. Curtain panels) behave completely differently to normal pinned elements. However, the icon for this is very similar - it has a chain link next to the pin.
The same pin/unpin commands and ribbon icons are used but they operate in a quite different way
Refer to Chained / Pinned Hosted Elements


No comments:
Post a Comment