Following on from my
last post about new features in Revit 2018.2, there are some very nice tweaks to the Pattern dialog boxes:
Fill Patterns
- The Fill Pattern dialog box is now fully resizable (height & width) - Revit remembers the resize operation during the session.
- The Fill Pattern dialog box has been redesigned to replace text icons with visual icons - as per many other Revit dialog boxes.
 |
| Revit 2018.2 dialog box |
 | | |
| Old dialog box |
|
|
- No Pattern <None> is now at the top of the list (when accessed from a dialog box that has the option to remove a pattern, such as the Material dialog box) - this replaces the 'No Pattern' button at bottom left of the old dialog box.
- Solid Fill is now second from the top of the list (Drafting patterns) after 'No Pattern' - generally I think this is a good thing. NB. This is not the case with the Override dialog boxes, which have not yet been redesigned - so we have another new inconsistency.
- There is now a Search/Filter function for patterns - it will filter the list to only include whatever contains the text you type into the 'Search' box. It is not case sensitive. Watch out for this feature: if you have any text in the search/filter box, you may not see the <None> or Solid fill items at the top - it will take some getting used to, and will surely catch you out a few times.
- It is now possible to select multiple fill patterns when the dialog box was accessed from the Manage toolbar (but not from dialogs that require you to choose a fill pattern to be used somewhere - like the material dialog box); If multiple fill patterns are selected, they can be deleted but not edited (the edit icon is greyed out).
Edit Fill Patterns
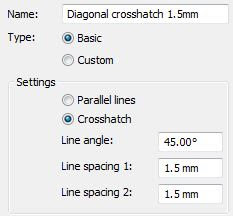
The Edit Fill Pattern dialog box has been redesigned - the new overall layout is more logical:
 |
| Revit 2018.2 Edit Pattern dialog box |
 |
| Old Edit Pattern dialog box |
- 'Simple' patterns are now labelled as 'Basic'

- When listing custom patterns from a pattern file, it shows 4 instead of 3. When the dialog box is resized vertically, it only increases the size of the preview, not the list of custom patterns, so you still need to use the tiny scroll bar on the right.
- The 'Import' button (on the left) has been replaced by a 'Browse' button (on the right) - why?
- The Import Scale value has been unlocked so it can be changed at any time after importing - this sounds great but BIM Managers may not be happy as they will lose the ability to set and lock down pattern scales.
- Changing the scale without re-importing is immensely useful, as we often do not know where the pattern came from. In this situation, the preview updates as soon as you change the scale.
- We have lost the File Units - Aaaargh! Why? I like to know if the source was metric or imperial.
- As with the old dialog box, we cannot see the name of the imported pattern file, which would be useful.
- We now have a search/filter function for custom patterns, which operates much like the one on the Fill Pattern dialog box - this only works immediately after importing a pattern file.

- The title 'Settings' seems a bit odd when the pattern is set to custom - it was obviously designed for Basic/simple patterns, where it is more appropriate.
Overall, this is a welcome change to the UI, with only a few minor quibbles. It would be great to have many, many more such minor improvements that incrementally take away the pain of using Revit.


After the 2018.2 update I am not able to apply Fill Patterns to the Surface or Cut Pattern of a material.
ReplyDeleteIt remains ...
But after editing a pattern and then cancelling the operation the pattern is assigned.
Unfortunately it is not possible to edit the Solid Fill pattern.
Is this a bug?
René Broersen
BRTArchitecten
Alkmaar, the Netherlands
René, I am not seeing any problem with that (although it is not clear what you mean). If you think it is a bug, you need to submit that to Autodesk, or at least raise it as an issue on the Autodesk Knowledge forums where you may possibly get a response from Autodesk - this blog is not a suitable forum for getting bug reports out there.
Delete