Monday, 31 March 2014

U-Shaped Winder Stairs in Revit


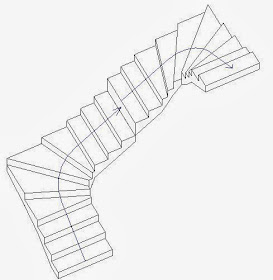
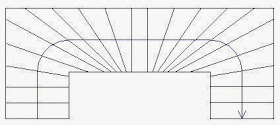
In a previous post on Revit winder stairs I suggested that on a U-Shape Single Point winder it is not possible to control the number of parallel treads on the middle section between the two corners of the windersSo you could end up with a stair that has parallel treads on the lower and upper sections but looks more like a balanced winder stair in the middle section, with only one parallel tread.

"Single-Point" U-Shaped Winder
I doubt if anyone would find this acceptable.

Here follows a rather dodgy workaround:

2 x L-Shape = U-Shape

To create a sensible U-Shape winder stair you need to create it in two halves:
  • Start the stair command, and set the overall stair height to be half that you require
  • Go to the L-Shape stair tool
  • Place one as required
 
  • Select the L-Shape stair and make it a Single-Point winder style
  • Set the overall height back to the full stair height required
  • Place another L-Shape winder component - use the space bar to rotate it to suit and snap to the end of the first one
  • It will not create a landing if the two components are aligned (without a gap)
  • You would expect it to automatically start the second run at the correct height
  • But there will be a height mismatch
 
  •  You could try making the lower run not end with a riser and then add another riser to the run - that looks ok but when you finish the stair you get a railing height mismatch
 
  • To solve this you need to keep the lower run ending with a riser
  • Move the second run away by one tread
  • Notice that the riser numbers are different - they need to be the same
  • Drag the blue dot at the top of the lower run to add another riser
  •  Adjust the number of parallel treads on each run (if you can!)

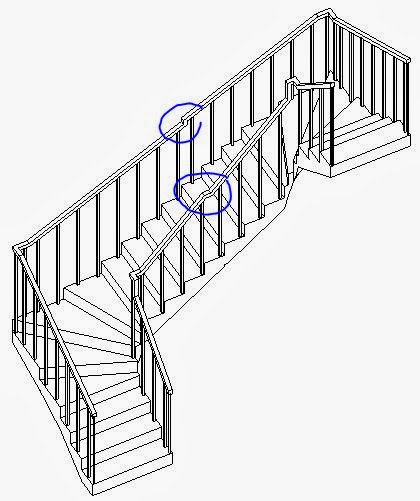
  • When you complete the stair, the railings should now join each other at the same height;  but the balusters will not align to each other without adjusting them - if you can understand the baluster settings in the railing type properties !
  • Note also that the railing heights are not consistent - they are not even close to being the right angle to the run of parallel treads between the winders, nor the right height above them.
 

That is about as good as you can get with the railings, but at least the stair itself has the correct heights - assuming that your building code allows 3 winders on each corner.

If you try to put a one-tread-width gap between the two runs, and then join them with a landing, it might look almost ok . . . . .
Until you complete the stair and look at the railings, which attempt to put in horizontal or vertical sections for the landing
These railings are going to need some serious fixing up!!!  I'll leave you to figure out whether it is possible or even worth attempting it.

And if you want stringers on the stair you get a whole new headache.
So my recommendation is to use this workaround to get the plan working, but if you need a true 3D representation it isn't going to work well enough in most cases.

Saturday, 29 March 2014

RUGS - Oldest Revit User Group in the World?

Having joined the RUGS committee in 2008 as treasurer I finally got a promotion:
This year I took over as chairman of RUGS from Steve Fiorio - a post he had held since 2012.

We believe that RUGS is the oldest formal Revit User Group in the world.  This has been confirmed by Autodesk, and no other group has yet claimed the title.

Initiated by Wesley Benn, the first meeting was held in May 2003 in North Sydney, in the offices of Benn Design & AEC Systems.

The RUGS Website was set up in August 2005 - with much ongoing hard work by Bo Zhen

Go to the link for our 100th meeting in August 2012 to see more about the history of RUGS

Our original logo tells a story:

I am not sure if we are still Australia's largest user network, but the reference to "CAD Software" shows its age - this logo obviously predates the common usage of the acronym "BIM".  Time for an update, if I can only track down the original graphics.

RUGS meetings are held on the second Tuesday of each month (except January when everyone is at the beach enjoying the Sydney sunshine). 
The venue is very kindly provided for us by Ultimo TAFE -
Room W3-06,
Level 3 Marcus Clarke Building,
827-837 George Street,
Ultimo
[in Sydney, Australia, just in case any overseas readers are thinking of attending]


This year we are experimenting with a new approach of getting the 3 Sydney based Autodesk Resellers more closely involved - they will take turns in helping to organise speakers for the meetings.  We hope to get a wider audience as Revit users see this as "reseller neutral"  - RUGS is organised by Revit users for the users.

Proposed Schedule of RUGS meetings for 2014:
11 Feb
  • Ceilidh Higgins (Daryl Jackson Robin Dyke) - "BIMnomics"
  • Frank Crisp (PTW) - "Pattern based families for creating facades"
11 March - Cadgroup
  • Deepak Maini (Cadgroup) - Navisworks
  • Michael Sandel (Plansource) - Shadows on adjacent buildings
8 April
  • Greig Bannister (Panzura) - Revit file storage/sharing solution
  • Anthony Bowden (PVN) - Revit family templates
  • Tim Waldock (PTW) - Whats New in Revit Architecture 2015
13 May - A2K
  • Computational Fluid Dynamics (CFD) for architects and engineers
  • Whats new in Revit MEP 2015
10 JuneRedstack
  • Surveying and Scan to BIM, Recap
19 July ?  (TAFE Closed on 8th July).
  • Friday annual social event. Jointly sponsored by all 3 resellers. Venue TBA
12 Aug -
9 Sept -
14 Oct
11 Nov – 
9 Dec -

Monday, 10 March 2014

Revit Stair & Railing Selection


The new Revit 2013 Stair and Railing tools brought with them some tricky changes to the selection process that might catch you out.

Selection filters now have some new subcategories for stair components, stair annotation and railing components. All the new stair subcategories have been prefixed with the word “Stairs:”, which makes them easier to find in a list; new stair tags are likewise prefixed with "Stair". Sadly this logic was not applied to new railing subcategories: Top Rails, Handrails and Supports do not have a Railing prefix in the filter, so they don't show in the list in a sensible order.  In fact it can get quite confusing because we now have "Stairs: Supports" and "Supports", which are two entirely different things so you have to remember that the latter is for railings only.
When you look at a typical selection filter list the railing subcategories are jumbled up with the rest - this becomes important when you need to specifically exclude some of the subcategories from your selection (see further on).


The same naming convention is used in the properties dialog box.  At least it is consistent, if annoyingly wrong!

Railing Terminations and Extensions cannot be selected, nor do they list with separate subcategories - they are only accessible through the type properties of Top Rails and Handrails.

Visibility / Selection

Any of these railing or stair components can be Tab-Selected or selected by dragging across them.

The rules for selection/display of Railing Supports are mysterious and confusing:
  • In section and 3D views they are visible at all detail levels.
  • In plan views they are only visible in Fine detail level;
  • Railing Supports below the cut plane in plan views are visible (fine detail level only), and can be selected by dragging or tab-select;
  • Supports above the cut plane are only visible during pre-selection or selection highlight (fine detail level only);  they cannot be selected by any method except changing the view range cut-plane or going to another view on the next level up;
  • In Medium or Coarse detail level below the cut plane in plan view, they can be selected by dragging, in which case they display a pin only (no graphics);
  • In Medium or Coarse detail level below the cut plane plan view, they can be tab-selected (location by guesswork), in which case they do not display a pin but do show a highlight line at their origin (no graphics);
Medium or Coarse Detail Level

Fine Detail Level- railing supports visible

Hidden supports visible when railing is selected

 
It is important to note that railing supports can be selected even when not visible in plan - but only below the cut plane in medium or coarse level of detail.
Invisible Supports selected

Pinned Elements

If you select by dragging across a stair, you may get pins showing up on the stairs. These are actually for the Top Rails, Handrails or Supports, which are now separate sub-components (somewhat like curtain wall components) - this means that you can often get numerous confusing pins showing up on screen. This applies to new style railings on both old or new type stairs, but not old style railings.
You can also Tab-Select these railing sub-components individually.  Again, they display pins, but each behaves slightly differently (and differently to curtain wall sub-elements).

Once you have successfully selected a railing sub-component the displayed pin behaves slightly differently for each category, as described below.

Pinned Element Properties

You can unpin them to unlock and change some of the instance properties:
  • Type selector becomes available for all railing sub-categories when unpinned - so you can change the type (Type Selector grayed out when pinned)
  • Unpinned railing supports allow the "Hand Clearance" instance property to be changed
  • Type properties can be accessed and modified without unpinning them (any sub-category)
Pinned Railing Support

Unpinned Railing Support

Stair Component Properties

Stair components do not have pins, but some of their properties can be changed without editing the stairs.
  • Runs and landings allow height property changes - this will have knock on effects to adjacent components - refer to Modifying Landings
  • Stair supports may allow changes to cut properties of free ends

Sub-Category Selection Limitations

Depending on how you select elements (multiple selection by dragging across screen or tab-selecting), you will encounter some inconsistent limitations to what you can do with selected stair components or railing sub-categories:

  • Move Command (Multiple Selection).
    • If you have any pinned Railing Supports explicitly included in your selection of elements (ie, in selection filter list), it will not allow you to move the whole selection.  Therefore you have to remove the supports from your filter selection list before moving the selection.  This will surely catch out anyone but a railing expert.
    • This does not apply to Top Rails, Handrails or any stair components - whole selection can be moved even when they are explicitly shown in the selection list and pinned.
  • Move Command (Individual Selection).
    • If you individually select any stair components, they cannot be moved without first editing the stair - in fact the Move command is greyed out;
    • If you select a (railing) support, you can move it after unpinning it - within reason (beware of how much it moves - it measures up the diagonal even if you give a horizontal distance);
    • If you select a handrail or top rail, it cannot be moved even if unpinned - but it lets you try!
     
  • Delete Command (Individual Selection) 
    • Stair components cannot be deleted without editing the stair
    • Railing Supports, Top Rails and Handrails can only be deleted after unpinning them
    • Deleted Railing Supports can be reinstated by selecting the host Handrail and clicking Reset Rail, but it will reset all changes to supports on that handrail
    • Deleted Top Rails and Handrails can be reinstated by resetting the host Railing

  • Edit Rail Command 
    • Unpinning a Handrail or Top Rail seems to make no difference to allowing it to be edited - can be edited when pinned
    • However, if a pinned Rail is edited, it will flag the Handrail or Top Rail as unpinned
    • Repinning a Handrail or Top Rail will remove all edits and reset it to original state - beware, as it is easy to lose work, as you might think that the pin command will lock all your changes!
    • Likewise, repinning a Railing Support will restore it to its original location

     
  • Groups
    • If any stair or railing sub-component is explicitly selected, but its host is not selected, then the Create Group command will be greyed out and unavailable
    • In which case, you need only add the host element (stair or railing) to the selection to enable the Create Group command
    • If a railing is added to a group, all its hosted elements will go with it
    • If a stair is added to a group, its components will go with it (run, landing, support), but its railings will not be added (unless explicitly selected)
     
  • Design Options
  • The rules for adding selections to design options are subtlely  different from creating groups:
     
    • If Top Rails, Handrails or Railing Supports are explicitly selected along with their host railing they can be added to a design option
    • If Top Rails, Handrails or Railing Supports are explicitly selected without their host railing they cannot be added to a design option
    • The same rules apply to stair components
    • If a railing is added to a Design Option, all its hosted elements will go with it even if they are not explicitly selected
    • If a stair is added to a Design Option, all its hosted elements will go with it, including its railings, even if they are not explicitly selected.  This is different behaviour to creating groups

Thursday, 6 March 2014

Revit Repeaters Index Page


When Revit v2013 was released it gave us the first version of a great new feature:  Repeater.  Repeaters are an alternative way of creating arrays in Revit, but they only work in the conceptual massing environment (Adaptive Components and Massing) where the tradional Revit array tool is not available.

I presented a paper on the topic "Divide and Conquer: Adaptive Components in Revit 2013"  at Revit Technology Conferences in May 2012 (Wollongong, NSW), June 2012 (Atlanta, USA).  When I submitted the abstract v2013 had not been released so I wasn't able to use the word "Repeater" in the title!  I followed this up with further presentations at RTC in 2013: "Fractal Fun with Revit Repeaters" - May 2013 in Auckland, July 2013 in Vancouver and September 2013 in Delft (Netherlands).  In the process of researching these topics I have tried to explore the capabilities and also to uncover the mysterious rules of Repeaters.  I have written a number of blog posts on the subject, so it might be useful to list those here.

Revit Repeater Index

Repeater Theory
Fun Examples

Adaptive Components Index

Adaptive components are a vital part of Repeaters, so here are a few posts on them as background:


Before Repeaters - Traditional Revit Arrays