Tuesday, 15 March 2022

Stepped Stair Railing Top Rail Extension in Revit


Following on from an earlier post about stepped railings, here is a bit more information about what happens when you try to add Top Rail extensions.

Weird Railing Stuff - part 18

If the lowest boundary line on the railing path has a Slope property "By Host", the railing segment will be horizontal (assuming you have done a Height Correction on the other segments)

To add an extension to the base of the stair railing:

  • Tab-Select the Top Rail only


  • Edit its Type properties
  • Tick the checkbox for "Plus Tread Depth";  Apply or OK
  • Nothing happens
  • Revit thinks that this segment of the railing is not part of a sloping stair, even though we know it is
  • Edit the Extension Length property to 300mm
  • This time Revit adds the extension (horizontal), as expected (but still no extra tread depth, unlike the straight handrail on the other side of the stair, where it has both)


  •  Confusing huh?

Solution

To solve this, the Slope property of the railing segment must be changed:

  • Select the whole railing
  • Edit the path
  • Select the last segment of the path
  • Change its Slope property to "Sloping"

  • Finish the Path sketch
  • The Top Rail should now be sloping and have both the 300mm extension (horizontal) and the extra tread depth (sloping)

Both railings should now match


Saturday, 26 February 2022

Poor Man's Array in Revit

There are several situations in Revit where the Array tool is not available - one of those is when using the Sketch commands.  Here is a quick workaround.

Stair Sketch Example

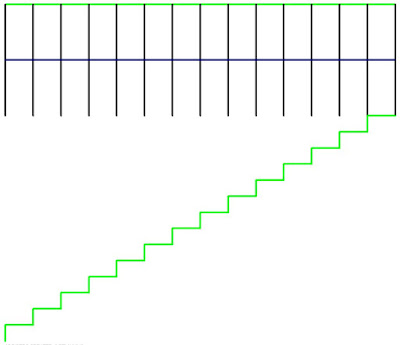
In this example I wanted to create a stepped side to a stair in the sketch mode.


When I selected two of the stepped boundary lines, I discovered to my horror that the Array tool is greyed out.

Workaround

Instead of using the Array tool, use the Copy tool, making sure that the 'Multiple' setting is ticked on the Options Bar

Revit first asks for the Start Point

Make sure to snap to the first end point of one of the items being copied

Then snap to the second end point

Then snap to the third end point - being the end of the first copy

Keep snapping to the end of the most recent copy until you have created your array - it is pretty quick once you get going.

In this example I had to delete the last created line

If you need a lot of copies - say 100, you have two choices:

  • Concentrate hard and try not to fall asleep
    or
  • Make 20 copies then stop and select all 20 steps;  copy those 5 times

Array Done!

I figured this trick out many years ago, and I needed it to achieve the stepped side to a stair sketch for another blog post - so I thought I'd document it in case it helps someone out there.

This might get you thinking about other uses of this simple technique.

I tried it for radial arrays, for which you would need to use the Rotate tool - but unfortunately that tool does not allow multiple copies.


Tuesday, 8 February 2022

Stepped Handrail on Stepped Stairs in Revit

A couple of years back I posted on how to create a stair with stepped sides


I always intended to follow it up with what happens to the handrail, and how to solve it?  Well, it is never too late.


Just in case you are wondering how to create the stepped side to the stair run in sketch mode - here is a trick for creating a DIY array in Revit.


When you create a stepped boundary for a stair run, the handrail also becomes stepped, but it is pretty clunky.


Baluster Placement

The first thing to notice is the hideous baluster placement - it is placing one at each change of direction, and one (or more) in the middle of each segment.

To tidy it up:

  • we will probably have to create a new railing type (to avoid messing up the straight railing on the other side of the stair
  • then edit the railing type properties; and the baluster placement
  • Untick the checkbox for 'Use baluster per tread on stairs'


  •  Balusters will only be placed at ends of each segment

Alternatively you could try the opposite: keep the Baluster per tread, but remove the start and end balusters - but then you lose control of the baluster locations in the segments running parallel to treads (not centred).


Top Rail Properties

You may not like the clunky Art Deco look of the vertical "Gooseneck" handrail segments, so the first step is to tab-select just the top rail (not the whole handrail) - then look at its Type properties

  • Change the Transitions from 'Gooseneck' to 'Simple' (or None)
  • Revit will give a not very helpful "not continuous rail" warning:
  • Whichever you choose (Simple or None), you get 'None', as Revit has a headache and thinks it is all too difficult, so it simply can't be bothered to join the segments

Edit Railing Segments

The next thing to try is editing the whole railing path:

  • Select the handrail
  • Edit the path

  • Select the first path segment at the base of the stair
  • Check its properties, displayed on the Option Bar
  • Change the Slope from 'By Host' to 'Sloped'

  • Finish the Sketch
  • Nothing appears to happen to the railing slope!  We will solve that later.
  • Edit the path again
  • Select the next segment that should be sloping (3rd from end)
  • Change its Slope to 'Sloped'
 
This is getting tedious, so let us try a couple of shortcut:

  • Instead of finishing the sketch to see how it looks, you could try the cool new Railing "Preview" feature in the ribbon menu (in a 3D view)


  • Tick the Preview checkbox
  • Aaaargh - it does not work when you adjust railing segment properties! It does not show the adjusted slope property.  You still have to Finish the sketch to see the effect


  •  Edit the path again
  • Select several segments to change their Slope property
  • Aaargh - the properties are not shown on the Option Bar when you select multiple segments!
  • Change the Slope properties for every alternate segment - one by one!
  • Finish the Path sketch

Something is wrong with the overall height of the railing when compared to the straight railing on the other side of the stair.  

  • This can be checked in an elevation view

Height Correction

To solve this, one way is to change the Height Correction property of each segment:
  • Edit the railing path again
  • Select the first segment
  • Change its Height Correction property to Custom; with a value to match the riser height
  • Finish the Path sketch
  • The railing height is now correct (more or less)
  • The lowest segment is now sloping

  • Check it in elevation


Now who has a headache?  Not just Revit!

This is a crazy amount of work to do in order to get this sort of correct.

Of course, you could avoid all this by just putting in a straight diagonal railing, but the point of this blog is to demonstrate the problems with stairs and railings - and to show workarounds (however nasty they may be).   There may also be situations where the diagonal railing is not appropriate - perhaps where the stepped sides are much larger steps.


Tuesday, 25 January 2022

They Broke Their Own Cloud Space in Revit 2022

Way back in Revit 2015, Autodesk gave us a really nice enhancement:

  • Ability to use all the sketch line drawing tools to quickly create Revision Clouds.


Prior to v2015 we had to laboriously draw each arc of the cloud as a segment (2 clicks:  for start and end of the arc) - the longer the segment, the larger the arc radius.  For those who never experienced it, that was a really tedious workflow.

I remember from Beta testing that we requested for the Rectangle to be the default drawing tool (it was not initially - I think the original default was either the line or circle.  Luckily we asked for that request before the code was finished so it was quickly implemented.

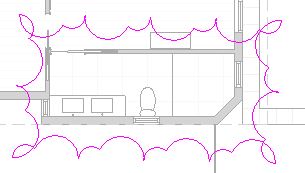
One of the other little features they added was the ability to reverse the direction of the cloud using the space bar - as it was being drawn:


This allowed the user to create a reverse or inside-out cloud - it may look ugly but it has a very specific use:  To indicate "Hold" on part of the drawing or model.

They Broke it in 2022

I am not sure if it happened in v2022 or 2022.1, but the spacebar trick no longer works for placing rectangular reverse clouds.   Aaaargh.

It still works for circles and both polygon types.

That means you could use a 4 sided polygon to get a square cloud - but the chances of needing that shape are slim.  The only other option is to use the line tool and create a rectangle by drawing the 4 sides in an anti-clockwise direction.

The good news is that it is still waaaay better than the old method pre-v2015.

Let's hope that Autodesk fix this in the next update?


Thanks to Frank Crisp of Koichi Takada Architects in Sydney for pointing this out to me.