Thursday, 29 November 2018

Weird Railing Stuff - part 12 - Top vs Hand Rail Usage Terminology

More Revit Railing UI inconsistency:


In the Railing Type Property dialog box there are sections for Top Rail and two separate Handrail properties.  Each of these have:
  • a Height property.  As noted in another post, the behaviour of the Height property is completely different for each. 
  •  a 'Type Name' property
  • There is also a property that you set whether the chosen type is used or not, and if so what position(s) it is in - these are also inconsistently named, which causes confusion when you first look at them:
Top Rail - 'Use Top Rail'  = Yes/No

Handrail - 'Position' = None, Left, Right, Left and Right


Why the inconsistency?  It would be so easy to make them the same - they could both be called 'Position' or both 'Usage'.  The settings could both have a 'None' option, instead of one being 'No'.

Friday, 23 November 2018

Weird Railing Stuff - part 11 - Rail Heights


More Railing inconsistencies in Revit

The (not so) new capabilities for adding 'Handrails' and 'Top Rails' to railings can be very useful, but the UI is riddled with weird settings and inconsistencies - this one relates to their Height Properties.


  • Handrail has height property built into handrail family type
  • Top rail has height property in the railing family type (not built into top rail family type)
 
  • The Handrail height is displayed in the railing property dialog box, but is greyed out
  • Top rail height is controlled directly in railing property (much better)
 What this means is that you can have one Top Rail family type that can be used at varying heights.
  •  Meanwhile, if you want to change the Handrail height, you have to click on the hidden button to the right of the Type name - this opens the Handrail type properties for the selected handrail.
  • The height can be changed here - but of course it will affect all railings that use that particular handrail type, so you probably need to duplicate type.


  • This means that you need a separate handrail type for every possible height.
  • It is possible to right-click on a Handrail type in the family browser, and 'select all instances in project' - it does actually highlight them individually.

  • Since Revit users are never quite sure what has been used, they seldom check by this method, but typically duplicate type anyway, leading to a profusion of similar or identical types.
  • For this reason, it is wise to name the handrail types accordingly - either with a specific height or with a purpose

  • This will ensure that when selecting a handrail type in the railing property, you have some chance of getting the correct height.

It is not clear to me why these settings are different - I would much rather that both had height properties in the railing.  That would give us consistency instead of confusion.  It would also mean creating fewer handrail types - we already have enough variations of those to cope with the extensions.


And all this doesn't even address the fact that the old 'Rail Structure' method is still available for use to create handrails, top rails and mid-rails - and that has a totally different method and UI.  Aaargh, what a mess!


Friday, 16 November 2018

Correcting the CL symbol in mirrored Revit links

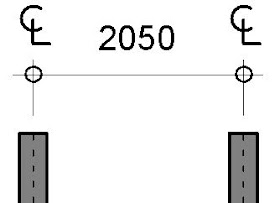
The automatic 'Centreline' capability on Revit dimensions can be really annoying when they pop up unexpectedly.  But when you actually need them it is very useful to be able to just change a property of the dimension family to make the CL symbol appear.

I have seen people just placing many instances of two little pieces of overlapping text, one being C, the other L - all because they didn't know about this feature.  That is criminal!  And its a nightmare when dimensions need to be adjusted.

Mirrored Centreline Dimension Symbols

What happens when you mirror the elements and dimension?  In most situations, Revit handles it perfectly well, because the CL is a symbol family, and Revit automatically corrects the symbol orientation.  However, there is one situation where it does not work:
  • If the dimension is in a linked Revit file that has been mirrored - normally you would not see the annotation in the linked file, but if you set the view properties for that link to be 'By Linked View', then the dimensions in the mirrored linked file become visible.

  • In this situation, the symbol may not be displayed correctly, depending on how the symbol family was created:
CL symbol in Mirrored Link
  • The OOTB centreline family is actually made up of arcs and lines (not text) - this symbol does not display properly in mirrored linked files.
I was recently asked to solve this problem, so I searched high and low for settings in the dimension and in the symbol family that might solve this.  I found nothing.
  • Next I tried converting the symbol from lines to actual text in the family - I'm not sure why it was originally done as lines anyway?
  • This needs to be made up of two pieces of overlapping text - in the symbol family, not the project file.
  • In this example I made the text using a font that was clearly not lines - 'Algerian' was the first suitable windows font that I found, to make the demo clear.

  • In the original file it looks fine, as expected.
  • Once I looked at it as a mirrored linked file, another problem showed up:
  • Each letter was displayed correctly, but displaced sideways

  • Aha, it must be the text justification, I thought.
 
  • But no, that made no difference whatsoever when I tried centre, left or right Horizontal Align.  Revit is just mirroring each piece of text around the symbol centreline, then flipping the text back again around its own axis.

Weird Workaround

So what was the solution?
  • Edit the text in the symbol family - Put a space after the C and one before the L.
  • Shift the letters accordingly. 

  • It wasn't perfect to start with, so I had to shift the text around a bit, or add a second space after the L


Weird behaviour in Revit requires weird thinking workarounds!